If you need assistance, please send an email to forum at 4hv dot org. To ensure your email is not marked as spam, please include the phrase "4hv help" in the subject line. You can also find assistance via IRC, at irc.shadowworld.net, room #hvcomm.
Support 4hv.org!
Donate:
4hv.org is hosted on a dedicated server. Unfortunately, this server costs and we rely on the help of site members to keep 4hv.org running. Please consider donating. We will place your name on the thanks list and you'll be helping to keep 4hv.org alive and free for everyone. Members whose names appear in red bold have donated recently. Green bold denotes those who have recently donated to keep the server carbon neutral.
Special Thanks To:
Aaron Holmes
Aaron Wheeler
Adam Horden
Alan Scrimgeour
Andre
Andrew Haynes
Anonymous000
asabase
Austin Weil
barney
Barry
Bert Hickman
Bill Kukowski
Blitzorn
Brandon Paradelas
Bruce Bowling
BubeeMike
Byong Park
Cesiumsponge
Chris F.
Chris Hooper
Corey Worthington
Derek Woodroffe
Dalus
Dan Strother
Daniel Davis
Daniel Uhrenholt
datasheetarchive
Dave Billington
Dave Marshall
David F.
Dennis Rogers
drelectrix
Dr. John Gudenas
Dr. Spark
E.TexasTesla
eastvoltresearch
Eirik Taylor
Erik Dyakov
Erlend^SE
Finn Hammer
Firebug24k
GalliumMan
Gary Peterson
George Slade
GhostNull
Gordon Mcknight
Graham Armitage
Grant
GreySoul
Henry H
IamSmooth
In memory of Leo Powning
Jacob Cash
James Howells
James Pawson
Jeff Greenfield
Jeff Thomas
Jesse Frost
Jim Mitchell
jlr134
Joe Mastroianni
John Forcina
John Oberg
John Willcutt
Jon Newcomb
klugesmith
Leslie Wright
Lutz Hoffman
Mads Barnkob
Martin King
Mats Karlsson
Matt Gibson
Matthew Guidry
mbd
Michael D'Angelo
Mikkel
mileswaldron
mister_rf
Neil Foster
Nick de Smith
Nick Soroka
nicklenorp
Nik
Norman Stanley
Patrick Coleman
Paul Brodie
Paul Jordan
Paul Montgomery
Ped
Peter Krogen
Peter Terren
PhilGood
Richard Feldman
Robert Bush
Royce Bailey
Scott Fusare
Scott Newman
smiffy
Stella
Steven Busic
Steve Conner
Steve Jones
Steve Ward
Sulaiman
Thomas Coyle
Thomas A. Wallace
Thomas W
Timo
Torch
Ulf Jonsson
vasil
Vaxian
vladi mazzilli
wastehl
Weston
William Kim
William N.
William Stehl
Wesley Venis
The aforementioned have contributed financially to the continuing triumph of 4hv.org. They are deserving of my most heartfelt thanks.
Registered Member #543
Joined: Tue Feb 20 2007, 04:26PM
Location: UK
Posts: 4992
HP5 400 ISO 4" x 5" is to be used for x-radiography in a dark slide configuration.
Step by step, minute by minute, and centrigrade by centrigrade, what chemicals will be needed to produce the best results for trial experiments to produce stabilized images?
Registered Member #30
Joined: Fri Feb 03 2006, 10:52AM
Location: Glasgow, Scotland
Posts: 6706
How long is a piece of string?
Joking aside, the process for developing black and white film is fairly standard. First you have to decide whether you want to develop it to the manufacturer's ISO rating, or "push" it to a higher rating. I'll only cover standard processing here. Push processing may well be useful to bring out faint X-ray images, but I've never done it, so you'll need to check out a photography textbook.
You'll need the following parts:
A really dark room with a tap and sink. If you can find a blackout bag (a bag made of heavy black cloth with hand holes, specially made for film handling) then the room doesn't need to be so dark.
A developing tank (might not be necessary if you just want to handle one small film piece)
Developer, stop bath and fixer, available as concentrates, but harder and harder to find as digital cameras stomp film to death.
A thermometer.
A stopclock or other timing device.
Start by making up the developer, stop bath and fixer solutions as per the instructions on the bottles. The temperature of the developer is important, because the developing time is a strong function of it. You should get a developing time vs. temperature chart with the developer, but you want it to be about 20 degrees. Tap water can be much colder in the winter, so add warm water as needed.
Now load the film into the tank in complete darkness. This takes some practice, so it's a really good idea to practice with scrap film first. If you're only doing one frame, you may be able to do it in dishes, but total darkness is even more important without the extra protection of a lightproof tank.
Once the tank is loaded and closed up, you can turn the lights on. Pour the developer in, bang it on the table a couple of times to dislodge air bubbles, start the clock, and agitate as per the instructions you got with the developer. Agitate doesn't mean violent shaking, as this causes air bubbles and reduces contrast. Just gently turn the tank upside down and the right way up again.
Once time is up, pour the developer out and the stop bath in, and agitate continuously. The purpose of stop bath is to neutralize the developer, which doesn't take long. I forget the exact time, but it should say on the stop bath bottle. If I remember right, stop bath is just a dilute solution of acetic acid.
Now pour the stop bath out and the fixer in. Fixer gets rid of all the undeveloped silver, and by the end of the fixing process, the film won't be light sensitive any more. But for now it's still sensitive, so don't open the tank yet! Fixer is quite expensive, but you can reuse it several times. Used fixer contains silver compounds, and big photographic labs will recycle it to extract the silver. It also smells strongly of sulphur, so try not to spill it on your clothes.
Once the fixing is done, you can open up the tank. Or finally turn the lights on, if you're using dishes. But you're not quite finished yet. If you want a long-lasting result, the film must be washed under running water for about half an hour to remove every last trace of fixer.
All of this was much more laborious than sticking a memory card into a laptop, but somehow quite fun
Registered Member #1062
Joined: Tue Oct 16 2007, 02:01AM
Location:
Posts: 1529
I would also like to add that after the film is rinsed with water after the fixer, their are compounds (the one I know of is Photoflo) that the film is placed in, then taken out and hung to dry, without rinsing with water. This gives cleaner film.
"A really Dark room" may not suffice, my school has a dark room, with a dark closet in it to open film, but even that causes the film to be exposed some sometimes. I would go with the bag.
Stop bath is about 30 seconds, constant agitation.
Also, don't mix the fixer and developer, it makes something (I forgot what, I think ammonia) and smells horrible. Some people are sensitive to the chemicals too, so be aware of that. I always use my bare hands though.
Registered Member #1134
Joined: Tue Nov 20 2007, 04:39PM
Location: Bonnie Scotland
Posts: 351
The most important thing, especially with "unkowns" like homemade x-ray machines, is documenting what you have done, in terms of exposure time, and subsequent developing conditions, and working from there.
Not one radiograph I ever took, was thrown away for this reason, and was instead placed in a folder. A bunch of bad images is a valuable tool for refining your technique.
Developing times are worked out, simply by taking several radiographs of the same object, and varying the dev time. The opposite applies for working out exposure times. Once you have a folder full of film, you will be able to pick up any object lying around, and be able to say with confidence " ah that will need x-kVp, y-ma/sec z-time etc..."
Registered Member #122
Joined: Fri Feb 10 2006, 12:55PM
Location: Milano Italy
Posts: 148
Where is my previous post????
anyway, i have a backup!
*********************************************
i played with X-rays many times and all of the informations given so far are good, i just add few notes:
A really Dark room" may not suffice,
True! an ISO400 film is really sensitive to light (expecially if you overdevelop it), and even if all cracks and holes are covered, even the fluorescent tubes's afterglow will expose the film! I suggest you turn off the lights few minutes before opening the container of the film to fade the afterglow and adapt your eyes to darkness (with adapted eyes you may find some other holes or faint light sources), is better if you the use a small wattage incandescent bulb instead of high flux fluorescent bulbs to avoid afterglow and to decrease the time adaptation of your eyes.
Just gently turn the tank upside down and the right way up again.
be careful of some developing tanks: cheaper models have a rubber cap instead of a plastic threaded ones, you must press the center of cap when you close the tank to make some vacuum inside otherwise it will' not watertight; is better if you test it some times with water before using with chemicals!!!!!
and finally: me and some my friend tried many photographic films/papers few years ago until we found a best solution: we used a MACO GENIUS FILM inside an Xray intensifing cassette to obtain an excellent negative transparent image and we use a varicontrast paper to replicate it in positive and adjust the exposure. The MACO GENIUS is a photolitographic film so is easily reperible in large, largest and exaggerated formats, is really cheap if compared to a large format plain photographic film, can be manipulated in a darkroom with red safelight, can be developed, stopped and fixed with the same chemicals used for photographic paper, temperature and time of baths aren't so critical and finally his contrast may be controlled by varying the concentration of the developer; you may get excellent results with minimal problems and minimal cost!
Registered Member #1721
Joined: Sat Sept 27 2008, 08:44PM
Location:
Posts: 136
Hello:
I do radiology for a living, so I would highly recommend using a cassette with screens, in part for reasons on which I will elaborate later. For now there are two basic types of screens inside of X-ray cassettes:
For most larger objects the reqular screens are great, due to geometric blurring and scatter etc., you will not get better pics with detail screens. If your object is delicate, small, or thin, then try to use detail screen cassettes. This is what they are designed for.
There are different type of screens inside of the cassettes, the most common ones use a rare earth phosphor to generate green light when exposed to X-rays, often Gadolinium Oxysulfide. The other type converts x-rays into blue light like the older Calcium Tungstenate ones. The key here is to match the screen light color, to the peak sensitivity of the film used. You can put sheets of photo printing paper into the cassette also, but it is much slower, but a whole lot cheaper than film! for this I would recomend high speed or regular screens.
My main reason for recomending cassettes and screens is radiation exposure!
The basic principal used in medicine reference radiation dose is "ALARA" it stands for: (As Low as Reasonably Achievable). This principal applies also for hobby use, yes officialy I should be tellling everyone not to mess with X-ray's period, and that they are very hazardous, and that X-ray's and ANY equipment capable of producing them, requires licensing just about everywhere on the planet. After telling folks this they will of course disassemble their equipment, and take it to the dump. Ya sure they will, just like a kid will throw away his ice cream bar when you tell him that it has sugar, and its bad for your teeth!
Sooooo back to reality, please folks lets observe basic safety measures, and lets not get so caught up in the design of our equipment that we forget this. Here are some very basic concepts, these represent a very basic starting point. I would strongly suggest that you go a little further, and do some research on your own. If you can manage even a basic understanding of the science involved, then all the better for your safety, and for the safety of others like your neighbors who live below in your appartment! If you are not careful then they could become unwilling participants in an experiment on the effects of ionizing radiation. This reasearch has already been done, and we do not need to repeat these tragic findings.
Starting Point:
Minimum Shielding (Based on Voltage to X-ray tube): 15-70KV use about 2 mm or 1/16"min.of lead. Use 3-4mm or about 1/8"min. for 70-120KV. For 120-250KV use about 6mm or 1/4" of lead. For 250KV+ find a large uninhabited field with a handy rock wall, and use a 25 meter or 100 foot extension chord, you get the idea :) Use layers for thicker shielding, to make a 4mm thick shield 4 x a 1mm sheet is better than a single 4mm sheet. Concrete can be substituted but testing is essential due to density variations in concretes. Remember X-ray tubes produce off axis X-rays so you need 360 shielding. Also high energy X-rays can be scattered by thick objects etc. so secondary radiation needs to be considered also.
Distance: The intensity of the radiation goes down with distance via the inverse square law, thus twice the distance from the source, and you have about 1/4 of the radiation.
Time: Restrict the tube on time to only what is needed for the experiment.
System Speed: The faster your receptor the lower the hazard.
The screen material can also be used to measure high intensity radiation, you cut out a piece and attach it to a silicon solar cell, this could even be used to make an electronic auto exposure device.
X-rays can be a lot of fun, but they demand respect just like the high voltage which helps create them. One last note of warning reference X-ray tubes with Beryllium windows:
These tubes emit massive amounts of soft X-rays, a second of close range exposure to a diffraction X-ray tube for example at full power, can deliver a dose high enough to permanently remove the exposed skin. Skin grafts are very painful, in addition to the cancer which will show up later. So if you have to use a Beryllium window tube, permanently mount a .5mm Aluminum filter on the tube port. This will remove only the soft X-rays which do not contribute to your image anyway. So have fun, but be safe :) We want to oogle your results, and not grieve your passing. Take care and good luck....Lutz :)
Registered Member #122
Joined: Fri Feb 10 2006, 12:55PM
Location: Milano Italy
Posts: 148
i do my experiments in a basement, i always pointed the primary beam on the floor or on a perimetral wall to ensure an enormous beamstopper; i always remotely operated the machine in another room behind at least one bricks wall for shielding me against secondary and scattered radiations; luckily, wood and plasterboard aren't common materials for home buildings in Italy (except few estetical parts) so i have bricks and concrete slabs everywere.
i point your attention to photo paper and intensifier cassette again:
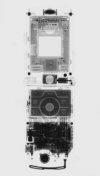
with a KODAK TMAX400 photo film (similar to ILFORD HP5) i made these images (three different exposure times:
with the same film plus a reprint on a variable contrast photo paper this other image:
This is the result with Xray medical film inside an Xray medical cassette
and finally, what you see is what you can made with photolitographic film inside a medical cassette + reprint on photo paper..... even photo paper inside a cassette will made similar results (but of course in negative!), no doubt, this procedure gave the best results:
Registered Member #122
Joined: Fri Feb 10 2006, 12:55PM
Location: Milano Italy
Posts: 148
Hi Stella!
I suggest you to imediately start your experiments. doing something exciting and nice can help you to not think your problem and finally...... make a better and faster healing.
I think that this can be considered a sort of radiotherapy, but without the exposure of your body and without any side effect so, in short, i want see some of your radiograms!!!
This site is powered by e107, which is released under the GNU GPL License. All work on this site, except where otherwise noted, is licensed under a Creative Commons Attribution-ShareAlike 2.5 License. By submitting any information to this site, you agree that anything submitted will be so licensed. Please read our Disclaimer and Policies page for information on your rights and responsibilities regarding this site.


 X-ray Film Processing ISO400