If you need assistance, please send an email to forum at 4hv dot org. To ensure your email is not marked as spam, please include the phrase "4hv help" in the subject line. You can also find assistance via IRC, at irc.shadowworld.net, room #hvcomm.
Support 4hv.org!
Donate:
4hv.org is hosted on a dedicated server. Unfortunately, this server costs and we rely on the help of site members to keep 4hv.org running. Please consider donating. We will place your name on the thanks list and you'll be helping to keep 4hv.org alive and free for everyone. Members whose names appear in red bold have donated recently. Green bold denotes those who have recently donated to keep the server carbon neutral.
Special Thanks To:
Aaron Holmes
Aaron Wheeler
Adam Horden
Alan Scrimgeour
Andre
Andrew Haynes
Anonymous000
asabase
Austin Weil
barney
Barry
Bert Hickman
Bill Kukowski
Blitzorn
Brandon Paradelas
Bruce Bowling
BubeeMike
Byong Park
Cesiumsponge
Chris F.
Chris Hooper
Corey Worthington
Derek Woodroffe
Dalus
Dan Strother
Daniel Davis
Daniel Uhrenholt
datasheetarchive
Dave Billington
Dave Marshall
David F.
Dennis Rogers
drelectrix
Dr. John Gudenas
Dr. Spark
E.TexasTesla
eastvoltresearch
Eirik Taylor
Erik Dyakov
Erlend^SE
Finn Hammer
Firebug24k
GalliumMan
Gary Peterson
George Slade
GhostNull
Gordon Mcknight
Graham Armitage
Grant
GreySoul
Henry H
IamSmooth
In memory of Leo Powning
Jacob Cash
James Howells
James Pawson
Jeff Greenfield
Jeff Thomas
Jesse Frost
Jim Mitchell
jlr134
Joe Mastroianni
John Forcina
John Oberg
John Willcutt
Jon Newcomb
klugesmith
Leslie Wright
Lutz Hoffman
Mads Barnkob
Martin King
Mats Karlsson
Matt Gibson
Matthew Guidry
mbd
Michael D'Angelo
Mikkel
mileswaldron
mister_rf
Neil Foster
Nick de Smith
Nick Soroka
nicklenorp
Nik
Norman Stanley
Patrick Coleman
Paul Brodie
Paul Jordan
Paul Montgomery
Ped
Peter Krogen
Peter Terren
PhilGood
Richard Feldman
Robert Bush
Royce Bailey
Scott Fusare
Scott Newman
smiffy
Stella
Steven Busic
Steve Conner
Steve Jones
Steve Ward
Sulaiman
Thomas Coyle
Thomas A. Wallace
Thomas W
Timo
Torch
Ulf Jonsson
vasil
Vaxian
vladi mazzilli
wastehl
Weston
William Kim
William N.
William Stehl
Wesley Venis
The aforementioned have contributed financially to the continuing triumph of 4hv.org. They are deserving of my most heartfelt thanks.
Registered Member #1956
Joined: Wed Feb 04 2009, 01:22PM
Location: Jersey City
Posts: 172
Hello all
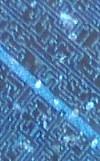
I'm designing a new PCB for my plasma speaker. The idea is to get out all the noise that was heard on the first design. Before etching the board I want to show my work and if there's any idea to improve my design I'll glad to read it and to try it. Sorry for my bad English in advance. I do what I can! =)
First of all a little description of the first design and the 'noise problem' that I had: - Only one power source for the entire board (+32 V). A 7812 was used to create 12 V to the logical section. - Ground plane on the entire board, even on the HV side. - A opamp as 'voltage follower' to give high impedance to the audio in. - The arc does not make ANY noise when the opamp is not mounted on the board. - Connecting the opamp a bzzz can be heard. Loud enough to ruin my so dreamed "crystal sound"... - With a scope I measured the frequency and amplitude of the noise on the out pin of the opamp. It was 120 kHz (the same as my switching frequency) and a few mV Vpp.
So what I already done to improve the design (see picture above): - Ground plane only on the "12 V" logical section - Separated power sources for the logical (15V unregulated) and HV (up to 50 V) sections - Wider traces on the HV side. - Two RC filters: - Between the opamp and the TL494 - On the +Vcc of the opamp - And now the opamp is a gain 2 amplifier. - The four resonant caps are on the board - The IRF540 will be soldered on the copper side of the board, having a massive heat sink. That's why it's mirrored.
So.. Any ideas how to improve this design? (schematic and layout) If anyone wants to see the schematic I can post it too.
Registered Member #56
Joined: Thu Feb 09 2006, 05:02AM
Location: Southern Califorina, USA
Posts: 2445
The board looks better, a few things you could try: * add a 10r resistor between the opamp supply rails and the high power section (in your design that would only be the ground). This will help cut back on the noise that creeps in, forming a rc filter with the filter capacitance on the opamp * add extra filter capacitance right next to the opamp .1ufd ceramic would do fine * add a 100r resistor from the input to the filtered opamp ground (sound cards are designed to feed into a 30r or so load, so feeing them into an open circuit just lets more noise in) *leave some space around the opamp + power circuitry so that if you need to you can add on a 'doghouse' or metal shield (pieces of unetched copper clad work well for making these).
I have a noise issue as well.... well not really, the output on my flyback just sucks.... the gap can only be like 1/4th an inch (sad) It used to be an inch EASY. I am still figuring out the issue, but yeah, I want to PCB my design as well.
Registered Member #1956
Joined: Wed Feb 04 2009, 01:22PM
Location: Jersey City
Posts: 172
Here it is!
Peter. From your list the only thing that I didnt do yet is creating space for the doghouse. Did I misunderstood something? Can you check it out the mods I made if it corresponds with what you told me to do?
The only doubt I have is about the 0.1uF filter cap.. I put it between the Vcc and Gnd of the opamp, after the 10R filter. Is that alright?
With the last modifications, layout and schematic:
The schematic got a little messy after the quick modifications that Peter proposed so...
Registered Member #133
Joined: Fri Feb 10 2006, 10:27PM
Location: Pensacola, Florida
Posts: 47
Hi Tobias,
A few notes to consider:
A double-sided board layout would permit reduction of your loops that may pick up fields from your HV section. Keep your loop areas small and you will reduce some of your noise. If you need to stay with a single-sided board, then I would still try to keep your traces as short as possible and keep your loop areas small.
I would not run any HV ground returns through your low voltage ground plane. Tie all of your HV grounds together, and then run a wide HV ground trace from your HV tie point all the way back to your circuit board input ground. Keep some spacing between this HV ground return trace and your low voltage ground plane, otherwise the HV ground currents may couple to your low voltage ground plane. Tie your HV ground return trace and your low voltage ground plane together only right at the circuit board ground input location. The key is to keep high frequency currents from traveling through your low voltage ground plane and getting into your op-amps.
If you have available room, place more physical space between your HV section and your low voltage section. You want to keep any coupling between the two sections down to a minimum.
Registered Member #1621
Joined: Tue Aug 05 2008, 05:26AM
Location:
Posts: 19
What you are currently calling a groundplane isn't - its full of big slots and holes. Go double sided and make one side your ground plane. Do not run tracks through it.
Registered Member #1956
Joined: Wed Feb 04 2009, 01:22PM
Location: Jersey City
Posts: 172
Steve Maurer wrote:
A double-sided board layout would permit reduction of your loops that may pick up fields from your HV section. Keep your loop areas small and you will reduce some of your noise. If you need to stay with a single-sided board, then I would still try to keep your traces as short as possible and keep your loop areas small.
I would not run any HV ground returns through your low voltage ground plane. Tie all of your HV grounds together, and then run a wide HV ground trace from your HV tie point all the way back to your circuit board input ground. Keep some spacing between this HV ground return trace and your low voltage ground plane, otherwise the HV ground currents may couple to your low voltage ground plane. Tie your HV ground return trace and your low voltage ground plane together only right at the circuit board ground input location. The key is to keep high frequency currents from traveling through your low voltage ground plane and getting into your op-amps.
If you have available room, place more physical space between your HV section and your low voltage section. You want to keep any coupling between the two sections down to a minimum.
Working on it!!
I never done a successful double sided board before. I use the laser print - glossy paper transfer method and I dont have the skills needed to get both sides aligned.. And here in Brazil to pay for a company to prototype the board is too expensive. So... single side would be! =P
I'm creating the return of the HV ground to the board ground input, trying to expand my board and put the ressonant caps on the right of the mosfet (while eagle says "I'm free, I dont do that!"). And trying to get a better arrangement of the components to reduce the loops.
TwoSpoons wrote:
What you are currently calling a groundplane isn't - its full of big slots and holes. Go double sided and make one side your ground plane. Do not run tracks through it.
I think I can do that this way: Get my layout etched on a double sided board with one side fully protected. Drill the holes and then circle around them on the ground plane side with a pen. Protect the traces side with tape and etch it again... sounds "doable"?
Thanks for the responses! I will work this morning trying to post the mods again here today. Best regards, Tobias
Registered Member #15
Joined: Thu Feb 02 2006, 01:11PM
Location:
Posts: 3068
Tobias,
Just a few things:
1. Your ground plane really isn't doing anything or acting as a ground plane. What a ground plane should do is to ensure return currents from signals on the top layer travel directly underneath the currents on the top plane (extremely small loop area and inductance). However, your ground plane is broken up with big islands, etc... So any return current on the bottom plane will be forced to travel in large loops around those traces, etc... Move the traces up to the top layer.
2. Also, if you are resonanting at 120kHz, you are NOT going to get crystal clear sound no matter what you do. You are still going to get harmonics in the arc down into the audio range at that frequency and get a "hiss" sound. It has been proven that you need to be switching at 3MHz+ to get truly clean sound.
3. Finally, the DC power that is feeding your switching circuit is UTMOST CRITICAL to be as clean as possible with no ripple whatsoever. Either have a regulated DC supply with a bandwidth much greater than 20kHz, or provide enough capactiance so that ripple / droop is minimum, otherwise you are going to "hear" it in the arc.
If you want crystal clear sound, scrap this design and build a class-e 4MHz+ coil.
I built one recently and its fabulous. It switches at 4MHz, and the DC supply is regulated as well so the DC feeding the class-e is pristine.
This site is powered by e107, which is released under the GNU GPL License. All work on this site, except where otherwise noted, is licensed under a Creative Commons Attribution-ShareAlike 2.5 License. By submitting any information to this site, you agree that anything submitted will be so licensed. Please read our Disclaimer and Policies page for information on your rights and responsibilities regarding this site.


 PCB design - Noise on Flyback driver