If you need assistance, please send an email to forum at 4hv dot org. To ensure your email is not marked as spam, please include the phrase "4hv help" in the subject line. You can also find assistance via IRC, at irc.shadowworld.net, room #hvcomm.
Support 4hv.org!
Donate:
4hv.org is hosted on a dedicated server. Unfortunately, this server costs and we rely on the help of site members to keep 4hv.org running. Please consider donating. We will place your name on the thanks list and you'll be helping to keep 4hv.org alive and free for everyone. Members whose names appear in red bold have donated recently. Green bold denotes those who have recently donated to keep the server carbon neutral.
Special Thanks To:
Aaron Holmes
Aaron Wheeler
Adam Horden
Alan Scrimgeour
Andre
Andrew Haynes
Anonymous000
asabase
Austin Weil
barney
Barry
Bert Hickman
Bill Kukowski
Blitzorn
Brandon Paradelas
Bruce Bowling
BubeeMike
Byong Park
Cesiumsponge
Chris F.
Chris Hooper
Corey Worthington
Derek Woodroffe
Dalus
Dan Strother
Daniel Davis
Daniel Uhrenholt
datasheetarchive
Dave Billington
Dave Marshall
David F.
Dennis Rogers
drelectrix
Dr. John Gudenas
Dr. Spark
E.TexasTesla
eastvoltresearch
Eirik Taylor
Erik Dyakov
Erlend^SE
Finn Hammer
Firebug24k
GalliumMan
Gary Peterson
George Slade
GhostNull
Gordon Mcknight
Graham Armitage
Grant
GreySoul
Henry H
IamSmooth
In memory of Leo Powning
Jacob Cash
James Howells
James Pawson
Jeff Greenfield
Jeff Thomas
Jesse Frost
Jim Mitchell
jlr134
Joe Mastroianni
John Forcina
John Oberg
John Willcutt
Jon Newcomb
klugesmith
Leslie Wright
Lutz Hoffman
Mads Barnkob
Martin King
Mats Karlsson
Matt Gibson
Matthew Guidry
mbd
Michael D'Angelo
Mikkel
mileswaldron
mister_rf
Neil Foster
Nick de Smith
Nick Soroka
nicklenorp
Nik
Norman Stanley
Patrick Coleman
Paul Brodie
Paul Jordan
Paul Montgomery
Ped
Peter Krogen
Peter Terren
PhilGood
Richard Feldman
Robert Bush
Royce Bailey
Scott Fusare
Scott Newman
smiffy
Stella
Steven Busic
Steve Conner
Steve Jones
Steve Ward
Sulaiman
Thomas Coyle
Thomas A. Wallace
Thomas W
Timo
Torch
Ulf Jonsson
vasil
Vaxian
vladi mazzilli
wastehl
Weston
William Kim
William N.
William Stehl
Wesley Venis
The aforementioned have contributed financially to the continuing triumph of 4hv.org. They are deserving of my most heartfelt thanks.
Registered Member #1025
Joined: Sun Sept 23 2007, 07:53PM
Location: Czech Rep.
Posts: 566
Hi guys, Here is my complete protocol for making HV caps. It took me a while to reach this final design, so I hope you all appreciate it in your HV experiments. The caps are based on PP copolymer foils used in laser copiers and printers. Each sheet should stand 14KV and depending on how many sheets you use you can get different capacitance (two sheets 9nF - six sheets 3.5 nF). Picture is more than 100 words so have a look...Used alu-foil is the fat one (for grilling). Have fun... Mates
Total number of sheets 15 per cap (2 for covering each alu-sheet, 5 between the covered alu- sheets, 5 on top of the second covered alu-sheet and one more for final rolling)
Size of alu sheet 22x15.5 cm
BTW: I hope you all already have the hot-glue pistol!
According to the longevity: The PP copolymer should be very resistant against ozone. I'm using these caps in my MARX generator and I have no fails after more than 100 shots. Also in my small TC these caps works without breakdown for quite a long time. But of course this is not professional product so I can not promise 1000h of continual work...
The required tools and supplies.
Cut the foil to size using a sharp knife
Use a smooth rolling pin (made of small fluorescent tube) on a smooth surface to get rid of as much air as possible. Air bubbles will cause corona and ozone to form above a certain voltage/frequency
Interleave the plastic sheets (5pc) between and above the already made doublets with aluminium foils between.
Use the rolling pin again and prepare the cables by removing 5-6cm of the isolation
Find the upper aluminium foil and place the firts cable on it. Let only the unisolated part of the cable in the contact with the aluminium foil.
Tricky part one: Roll the sheets slowly...
Find the most upper sheet (the lowest one before rolling)
Tricky part two: Unroll the most upper sheet until the second aluminium foil is exposed. Place the cable and roll it back. Hold the cap properly during this process otherwise it can unroll very quickly in your hand and you have to start again!
Use one or two more sheets to roll over to protect unrolling and it also makes the upper aluminium foil more than one sheet isolated.
Use the glue tape to protect unrolling.
Use the scissors and follow the upper cable with the tip and cut a track for it.
Put the cable through the track you have cut with the scissors. This is important for gluing the sides of the capacitor.
Cut the same track for the inner cable...
Place the inner cable inside the capacitor. You remove it back after the ends are glued.
Use the glue pistol to put some more easy-to-melt plastic at the ends and fix and isolate the cables with the glue properly!
Do the same on the other end.
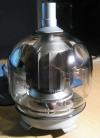
Final appearance before gluing
Tricky part three: Push the end of the capacitor against preheated metal plate (use an electric cooker) to melt the PP foils and the hot-glue into a compact structure. This is very improtant part which needs a lot of focus. It will protect the cap before the side spark-overs. (Side spark-overs are the biigest risk for the final capacitor).
Remember to remove the inner cable. In case the whole is blinded after the previous step make a whole with a pencil while the plastic is still hot and soft.
Use more hot-glue to fix and isolate the cables. It is good idea to put additional PVC or silicon tubing around the cables and glue it to the main body of the capacitor.
Check the capacitance
Test setting for the capacitor. Use the spark gap distance to set the final volatage to approx. 50-60KV DC (5-6cm distance)
Put some earplugs and sunglasses and let the capacitor run for while. Remember discharge properly the capacitor after the test (and any other) run. It can store the charge for a long time and touching both ends of 3.5nF cap loaded to 50KV is shocking experience!
Registered Member #162
Joined: Mon Feb 13 2006, 10:25AM
Location: United Kingdom
Posts: 3140
Nice work but I have to ask; how long have you run your capacitors with hv applied?
In the 80's I made various home-rolled capacitors and to cut a long story short - if there was any air in the foil/dielectric they eventually failed due to ozone created by internal corona 'eating' the dielectric.
Unless you can roll and seal them in a vacuum or fill the capacitor with oil I think yours will also fail.
Apply hv to your capacitor(s) and observe them in the dark (needs caution!) ANY sign of bluish light means they WILL fail.
Registered Member #10
Joined: Thu Feb 02 2006, 09:45AM
Location: Bunbury, Australia
Posts: 1424
Sulaiman wrote ...
Unless you can roll and seal them in a vacuum or fill the capacitor with oil I think yours will also fail. Apply hv to your capacitor(s) and observe them in the dark (needs caution!) ANY sign of bluish light means they WILL fail.
Not sure if I agree 100%. Caps you made in the 80's may have failed in TC use. This is 100% reversal stuff, not just intermittent DC charging. The prime example of a failure prone cap is in a TEA laser where you can have only a thin layer of dielectric and need a moderate voltage across it. Failure is common as 10kV plus is aplied continuously. However if you use a Marx to charge it in a few microseconds, a higher voltage can be applied and longevity is improved, presumably as the voltage is only applied momentarily. Less time for corona to do damage. Of course at 60kV, everything will light up with corona. TDU
Registered Member #1103
Joined: Mon Nov 05 2007, 06:02PM
Location: Houston
Posts: 80
I've made a few of these before, but I could never remove all the air from the conductor/dielectric layers. I never ran them for too long, so they still haven't failed. However I'm sure they would fail quite quickly if ran under extended duty.
I will have to use your method and see if I can produce a halfway decent DIY HV capacitor.
The best thing: they're cheap and fairly easy to make, and losing one or two during operation isn't too much of a loss.
Registered Member #187
Joined: Thu Feb 16 2006, 02:54PM
Location: Central Ohio
Posts: 140
When I made my first HV cap I used glass sheets and Al foil. I left it dry and the whole thing would light up blue with corona. I decided to fill it with oil and not only did the corona stop, the performance of it improved drastically.
Registered Member #187
Joined: Thu Feb 16 2006, 02:54PM
Location: Central Ohio
Posts: 140
jmartis wrote ...
Just a stupid suggestion, maybe you can "paint" the caps with oil before rolling them?
That's not a stupid idea by any means! Ideally, just about any device handling high voltages would be pre-wetted or "painted" as you say with whatever insulating material is desired (oil, epoxy, etc.). Unfortunately in this hobby the equipment is not already built with our interests in mind.
What is typically done to extend the life of a HV device is to submerge the device (transformer, capacitor, rectifier) in the liquid insulating media and then pull as strong a vacuum as possible to remove as much air as possible from every nook and crannie. Pre-wetting during assembly could cut vacuum treatment times to a mere fraction.
Not sure if you are already aware of this but as an engineer I had to point out how practical and sensible that idea is.
Registered Member #1025
Joined: Sun Sept 23 2007, 07:53PM
Location: Czech Rep.
Posts: 566
According to the oil suggestion... My first rolled capacitors were combined with a silicon oil. Honestly, I had to leave the concept when I started to play with voltages over 40KV. Problem was, that the oil made impossible to glue the sheets on the sides and the caps started to spark on the sides... Moreover, once the spark started it made carbonized path and decreased the breaktrough voltage very rapidly and the cap was more or less destroyed...
I think, the corona problem is not so big like most of you suggest. The latest version of my caps are very robust and I have not destroyed a single one even by playing with voltages close to 60KV reaching hundreds of hard (no load) discharges. (Of course I mean DC...)
Registered Member #1127
Joined: Mon Nov 19 2007, 12:08AM
Location:
Posts: 139
I just built a capacitor using your technique and poly sheeting from overhead enlargers. I tried 7 kV (AC) pulsed a couple of times through the capacitor. I saw some weak corona - but it wasn't bad. I also tried to vacuum seal the capacitor in a 2" PVC housing with end caps - poured in mineral oil and then vacuumed the whole lot. Seems to work fine... I'm sure 10 kV might be a bit much.... but I'll try it an see.
Just slide the hand rolled capacitor down the PVC tube and presto - I think my capacitors comes out to 8 nF due the number of layers I used. - It's a great idea! Thanks for the inspiration!
--- just tried 10kV ... no problems. 10 second burst...
--- just tried 12 kV NST.... no problems.... 10 second burst
This site is powered by e107, which is released under the GNU GPL License. All work on this site, except where otherwise noted, is licensed under a Creative Commons Attribution-ShareAlike 2.5 License. By submitting any information to this site, you agree that anything submitted will be so licensed. Please read our Disclaimer and Policies page for information on your rights and responsibilities regarding this site.


 60KV 3.5 nF home made caps - complete protocol