If you need assistance, please send an email to forum at 4hv dot org. To ensure your email is not marked as spam, please include the phrase "4hv help" in the subject line. You can also find assistance via IRC, at irc.shadowworld.net, room #hvcomm.
Support 4hv.org!
Donate:
4hv.org is hosted on a dedicated server. Unfortunately, this server costs and we rely on the help of site members to keep 4hv.org running. Please consider donating. We will place your name on the thanks list and you'll be helping to keep 4hv.org alive and free for everyone. Members whose names appear in red bold have donated recently. Green bold denotes those who have recently donated to keep the server carbon neutral.
Special Thanks To:
Aaron Holmes
Aaron Wheeler
Adam Horden
Alan Scrimgeour
Andre
Andrew Haynes
Anonymous000
asabase
Austin Weil
barney
Barry
Bert Hickman
Bill Kukowski
Blitzorn
Brandon Paradelas
Bruce Bowling
BubeeMike
Byong Park
Cesiumsponge
Chris F.
Chris Hooper
Corey Worthington
Derek Woodroffe
Dalus
Dan Strother
Daniel Davis
Daniel Uhrenholt
datasheetarchive
Dave Billington
Dave Marshall
David F.
Dennis Rogers
drelectrix
Dr. John Gudenas
Dr. Spark
E.TexasTesla
eastvoltresearch
Eirik Taylor
Erik Dyakov
Erlend^SE
Finn Hammer
Firebug24k
GalliumMan
Gary Peterson
George Slade
GhostNull
Gordon Mcknight
Graham Armitage
Grant
GreySoul
Henry H
IamSmooth
In memory of Leo Powning
Jacob Cash
James Howells
James Pawson
Jeff Greenfield
Jeff Thomas
Jesse Frost
Jim Mitchell
jlr134
Joe Mastroianni
John Forcina
John Oberg
John Willcutt
Jon Newcomb
klugesmith
Leslie Wright
Lutz Hoffman
Mads Barnkob
Martin King
Mats Karlsson
Matt Gibson
Matthew Guidry
mbd
Michael D'Angelo
Mikkel
mileswaldron
mister_rf
Neil Foster
Nick de Smith
Nick Soroka
nicklenorp
Nik
Norman Stanley
Patrick Coleman
Paul Brodie
Paul Jordan
Paul Montgomery
Ped
Peter Krogen
Peter Terren
PhilGood
Richard Feldman
Robert Bush
Royce Bailey
Scott Fusare
Scott Newman
smiffy
Stella
Steven Busic
Steve Conner
Steve Jones
Steve Ward
Sulaiman
Thomas Coyle
Thomas A. Wallace
Thomas W
Timo
Torch
Ulf Jonsson
vasil
Vaxian
vladi mazzilli
wastehl
Weston
William Kim
William N.
William Stehl
Wesley Venis
The aforementioned have contributed financially to the continuing triumph of 4hv.org. They are deserving of my most heartfelt thanks.
Registered Member #2385
Joined: Thu Sept 24 2009, 01:26AM
Location: Waxhaw, North Carolina (Or Charlotte near UNCC)
Posts: 26
So this time instead of using a predrilled pcb I decided to make my own design using eagle and then etch a copper clad, I first tried the laser printer method but for some reason it wasn't working very well. The ink never fully transfered to the board so I washed it all the way and tried something different. I used an industrial sharpie which can be bought at a hardware store. Below are some of the pics after I etched the board and began to solder the parts on.
note that the long solder points are areas were the etch got through the sharpie since the board was so large and took some time to etch.
Registered Member #1956
Joined: Wed Feb 04 2009, 01:22PM
Location: Jersey City
Posts: 172
Industrial sharpie is like a pen? That's what I found on google... So you DRAW the circuit on the board? If you did so, congratulations!!! I never tried it before but I can only imaging how time consuming it should be!
I starting etching my own boards last year and I did not have any problems. So far so good. A few hints: - Buy some glossy paper. The same that is used in expensive magazines! - Configure your laser printer for "dark", disabling any economic mode - The copper should be brilliant clear! I use scotch bright without water or anything else. And dont touch it after cleaning - To make the transfer take an Iron. Choose the temperature just after "acrylic", little bellow "jeans/cotton". The paper does not have to turn yellow, if it's doing so the temperature its too high. Disable the water vapor!!! - While the irol is getting hot you have to fix the paper on the board. - After hot, press the iron over the paper, moving slowly, fr about 2 minutes. - Take the hot board and give it a cold water bath!
The paper will go off easy, all the ink will stay in the board. Sometimes even the paper! You will have to stretch it out.
Were you following all those steps? By the way the traces appear to be very good on the pictures
Registered Member #2385
Joined: Thu Sept 24 2009, 01:26AM
Location: Waxhaw, North Carolina (Or Charlotte near UNCC)
Posts: 26
yeah thanks!, I have used that method exept for the magazine paper - I went to staples because all the laser printers here at school are horrible and need replacement rollers. I thought staples would have glossy photo paper but it turned out to be some kinda glossy card stock which didn't work to well and before using that i used glossy presentation paper which worked a little better but still left most of the ink on the paper. So i guess next time i'll try using the magazine paper you mentioned! The low voltage side was the worst when i tried transferring the ink, in fact some of that side i didn't wash away and kept it there as an outline so i could do the sharpie method. Still most of the ink was gone and I did have a heck of time using the sharpie pen lol, but it worked! Also those long solder points are from where the sharpie wore away because it took to long to etch the other side of the board since it was still mostly copper. In order to save some other spots I actually took the board out of the etch and dried it then redrew some trouble spots with the sharpie lol, just be careful if you ever try that, the sharpie will actually remove its self if you don't let it dry a little. The sharpie method may turn out to be a desperate measure, so I wouldn't really recommend it but it does work surprisingly well.
Registered Member #2385
Joined: Thu Sept 24 2009, 01:26AM
Location: Waxhaw, North Carolina (Or Charlotte near UNCC)
Posts: 26
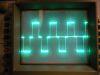
Alrighty, with everything on the board I decided to test the output frequency of the TL494CN and here's an image from my laptop oscilloscope. (the laptop oscilloscope isn't very accurate but it does its job ) There appears to be some noise on the rise and fall but when using one of the Lab oscilloscope at School I didn't see much of that at all and the wave was more square, I suppose there's some error involved in using a home-put together 100$ USB oscilloscope .
Registered Member #51
Joined: Thu Feb 09 2006, 04:17AM
Location:
Posts: 263
The trick to do a good toner transfer is the keep everything really clean right up to the actual transfer (don't touch the paper, keep the board clean with acetone. Then align the paper on the board and really lay into it with the iron to get a good transfer (Full heat, as much pressure as you can apply for maybe 10 minutes).
This has worked for me at least. The cheapest glossy photo paper staples sells should work well, you want a paper that is glossy, but breaks up easily in water. soak the board well after you have stuck the paper and toner to it, then very gently remove the paper layer by layer.
Then etch with hydrochloric acid and hydrogen peroxide.
This method has worked pretty well for me in the past.
Registered Member #902
Joined: Sun Jul 15 2007, 08:17PM
Location: Pacific Northwest USA
Posts: 1042
when I used to get the Radio Shack PCB kits (and they do still sell those, with etchant and boards) it came with a Sharpie (just an ordinary sharpie) to mask the board, and it worked wonders!
Registered Member #1792
Joined: Fri Oct 31 2008, 08:12PM
Location: University of California
Posts: 527
The few times I used sharpies I had problems when I changed the pen direction, or had a large area to cover. I'd get a bit of the board that wasn't really covered in ink. By letting it dry and then gently going over the area again I got better results. The newer the sharpie the better.
It works in a pinch and is not too bad for small boards.
I wonder, if you rough up the board a bit with sandpaper, maybe you could use a fountain pen to make traces. If it works you could use different width nibs to get different trace widths. Then for large copper areas, you could pain the ink on with a small brush to save time.
Registered Member #2385
Joined: Thu Sept 24 2009, 01:26AM
Location: Waxhaw, North Carolina (Or Charlotte near UNCC)
Posts: 26
I finally got around to testing the plasma speaker and it worked, then I turned it off for a bit. when I went back to test it further the power supply LED started to blink and nothing was working - Im guessing that its drawing to much amps to get started :( I have two power supplies, 1 12V 5A supply hooked up to the IC low voltage side and a 24V 3A power supply (looks like a laptop supply brick) hooked up to the high voltage side. What power supply should I be using? I have several SLA batteries but Im afraid I'll blow something up since it can just draw whatever amount of amps it wants from the batteries.
This site is powered by e107, which is released under the GNU GPL License. All work on this site, except where otherwise noted, is licensed under a Creative Commons Attribution-ShareAlike 2.5 License. By submitting any information to this site, you agree that anything submitted will be so licensed. Please read our Disclaimer and Policies page for information on your rights and responsibilities regarding this site.


 beginning of my third plasma speaker.


 .
.