If you need assistance, please send an email to forum at 4hv dot org. To ensure your email is not marked as spam, please include the phrase "4hv help" in the subject line. You can also find assistance via IRC, at irc.shadowworld.net, room #hvcomm.
Support 4hv.org!
Donate:
4hv.org is hosted on a dedicated server. Unfortunately, this server costs and we rely on the help of site members to keep 4hv.org running. Please consider donating. We will place your name on the thanks list and you'll be helping to keep 4hv.org alive and free for everyone. Members whose names appear in red bold have donated recently. Green bold denotes those who have recently donated to keep the server carbon neutral.
Special Thanks To:
Aaron Holmes
Aaron Wheeler
Adam Horden
Alan Scrimgeour
Andre
Andrew Haynes
Anonymous000
asabase
Austin Weil
barney
Barry
Bert Hickman
Bill Kukowski
Blitzorn
Brandon Paradelas
Bruce Bowling
BubeeMike
Byong Park
Cesiumsponge
Chris F.
Chris Hooper
Corey Worthington
Derek Woodroffe
Dalus
Dan Strother
Daniel Davis
Daniel Uhrenholt
datasheetarchive
Dave Billington
Dave Marshall
David F.
Dennis Rogers
drelectrix
Dr. John Gudenas
Dr. Spark
E.TexasTesla
eastvoltresearch
Eirik Taylor
Erik Dyakov
Erlend^SE
Finn Hammer
Firebug24k
GalliumMan
Gary Peterson
George Slade
GhostNull
Gordon Mcknight
Graham Armitage
Grant
GreySoul
Henry H
IamSmooth
In memory of Leo Powning
Jacob Cash
James Howells
James Pawson
Jeff Greenfield
Jeff Thomas
Jesse Frost
Jim Mitchell
jlr134
Joe Mastroianni
John Forcina
John Oberg
John Willcutt
Jon Newcomb
klugesmith
Leslie Wright
Lutz Hoffman
Mads Barnkob
Martin King
Mats Karlsson
Matt Gibson
Matthew Guidry
mbd
Michael D'Angelo
Mikkel
mileswaldron
mister_rf
Neil Foster
Nick de Smith
Nick Soroka
nicklenorp
Nik
Norman Stanley
Patrick Coleman
Paul Brodie
Paul Jordan
Paul Montgomery
Ped
Peter Krogen
Peter Terren
PhilGood
Richard Feldman
Robert Bush
Royce Bailey
Scott Fusare
Scott Newman
smiffy
Stella
Steven Busic
Steve Conner
Steve Jones
Steve Ward
Sulaiman
Thomas Coyle
Thomas A. Wallace
Thomas W
Timo
Torch
Ulf Jonsson
vasil
Vaxian
vladi mazzilli
wastehl
Weston
William Kim
William N.
William Stehl
Wesley Venis
The aforementioned have contributed financially to the continuing triumph of 4hv.org. They are deserving of my most heartfelt thanks.
Registered Member #1565
Joined: Wed Jun 25 2008, 09:08PM
Location: Norway
Posts: 159
Hello fellow HV people :)
I am trying to figure out how to make a SMPS based off a mains transformer from a old TV. It's a 2 switch flyback converter or 2 switch forward converter topology (can't tell if it's gapped or not) As far as I can tell, it's most likely a flyback converter and have a gap.
The primary schematic (as it was on the original board) a very simplified looks like: (the switches turn on and off at the same time)
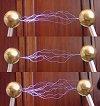
The mains transformer looks like: (+ the tripler with holding clips)
Edit: The board looks like: (transformer on bottom left)
The circuit will be powered from mains (230V, 50 Hz)
I got a LNK305 IC from some washing machine board that gives 12V from 330V, that I want to power a UC3843 and a FET-driver with)
The secondary side will have diodes(only using known to be fast ones), filter caps and maybe a reed relay to turn on and off the HV output, and buck converters (as far as I figure I want to take it)
Any suggestions? I haven't quite started on the circuit design yet and I still need to figure out the phasing of the transformer. I also need to figure out the size of the current sense resistor for the UC3843 IC, suggestions will be welcome. Same about how to pick working frequency.
I have choose to use the 2-switch flyback converter since it can't really over-voltage anything.
Sorry about the lack of research, but I don't quite know where to start.
You can tell which of these your supply is by looking for a buck choke(s) on the DC output side. The Assymmetric half-bridge is a buck-derived topology and requires a choke in each of the output sections to smooth the current. Flyback converters don't need this big choke at the output, so the capacitors can be fed from the transformer windings directly via the rectifier diodes. Much of the popularity of the flyback converter in low-cost compact applications is due to the elimination of this costly & bulky choke.
As for making a new SMPSU that uses the old transformer from your TV SMPSU, in my opinion it is not worth the effort. Unless your requirements for the new supply are within about 20% of the spec of the old TV PSU and you can tweak it to suite, then the old ferrite transformer is not going to be right for your new application.
Flyback power supplies are among some of the more difficult SMPSU designs to get right, and the hardest to modify after the design has already been frozen. Additionally a large part of the design of a flyback power supply is in the design of the flyback transformer itself. Each one is unique and hand-crafted through many iterations of design equations to give acceptable performance.
If you want to make your own SMSPU I would go down one of these routes. If you want 70W or less then design a flyback converter from the ground up including the design of the flyback transformer. If you want more than 70W of power then look at the assymmetric half-bridge or a standard half- or full-bridge depending on the power, again designing the transformer to suite.
Two other observations:
D1 in your schematic is pointing in the wrong direction. It should be pointing upwards the same as D2 otherwise it will short the supply when Q2 turns on. The traditional way to draw this is to draw it like an H-bridge but with two of the switches replaced by diodes. I think it is easier to follow when redrawn like this.
I'm not sure what that transformer is that is in the pictures, but it doesn't look good for use in a flyback or forward converter. You need good coupling between primary and secondary in these converters. Putting windings on opposite limbs of the core gives poor coupling and high leakage inductance. Any SMPSU designer will tell you that leakage inductance is the worst thing for a flyback converter as it causes over-voltage spikes on both windings when the switches turn off.
Registered Member #834
Joined: Tue Jun 12 2007, 10:57PM
Location: Brazil
Posts: 644
It's quite easy to just copy the same power supply that was used with the transformer, using the same components that were on the original board or new ones if they are damaged, adding changes in the control system if you want different voltages (not too far from the original ones) or different controls. I have made several useful power supplies in this way. After assembling one or two you know how to design one from scratch.
Registered Member #30
Joined: Fri Feb 03 2006, 10:52AM
Location: Glasgow, Scotland
Posts: 6706
The transformer in the picture isn't the mains transformer, it's the LOPT. The output voltage is low because it's used with an external tripler, so the secondary coil is quite small.
I'd be surprised if it were driven by anything other than a single-switch converter. I don't see how the two-switch will work, because it limits the flyback voltage to the same as the supply voltage. TV flybacks usually need to kick back about 1kV to work properly, which is why the transistor driving them is rated 1200V or more.
Registered Member #30
Joined: Fri Feb 03 2006, 10:52AM
Location: Glasgow, Scotland
Posts: 6706
Really :) I've seen Philips TVs with a SCR regulated power supply, but it was just the main supply of 150V or whatever. The EHT still came from a conventional flyback transformer driven at the line scan rate, 15.6kHz.
Registered Member #1565
Joined: Wed Jun 25 2008, 09:08PM
Location: Norway
Posts: 159
Antonio wrote ...
It's quite easy to just copy the same power supply that was used with the transformer, using the same components that were on the original board or new ones if they are damaged, adding changes in the control system if you want different voltages (not too far from the original ones) or different controls. I have made several useful power supplies in this way. After assembling one or two you know how to design one from scratch.
That's what I want to do, except the controller is rather dead/hard to figure out. I have quite a bit of a problem tracing out the old board since the diodes and capacitors seems to be all over the main board, and I can't find a clear feedback point.
The primary have dual switches driven by a common pulse(GDT alike) transformer, the transistors are connected like the schematic (the diode the wrong way around is a typo), and some self-oscillator to start. I want it started for the sake of it and 15V is close enough to 5V, the HV is actually less interesting to me. My goal is +/- something in the 10-30V area, + something in the 50-90V area and whatever else I actually find. I also plan to use it as PSU to power LOPT's.
Steve McConner: It's actually the mains transformer, I got the original board. and I hope I can get 50-100W out of the transformer. And NO it's the deflection coil that NEEDS 1 KV kick, I have 39 KV board from a monitor that use a 400V FET to drive a LOPT where the HOT is connected to the deflection coils and not at all connected to the LOPT except common ground and possibly shared 80V rail(I have removed the HOT without killing the HV).
GeordieBoy: It's the same transformer, but the pin placement is NOT the same on the symbol compared to the actual transformer. (I copied the drawings on the TV boards regarding pin connections) I also except the output voltage to be variable based on feedback from the secondary regulator. And there IS a winding below the primary winding so I except to get some power from it. Otherwise the whole project is the for the heck of it.
Dr. Kilovolt: Actually, the self-start oscillator is based around a SCR as far as I can tell.
Registered Member #30
Joined: Fri Feb 03 2006, 10:52AM
Location: Glasgow, Scotland
Posts: 6706
Oops, my mistake :(
I've seen CRT monitors where the line scan circuit and HV supply were two separate circuits as you mentioned (and all driven off the mains by a third SMPS containing another ferrite transformer!)
But I didn't know they did it in TVs, I thought it was done only in monitors to make multisync operation easier. And it's the first time I've seen the EHT coming straight from the off-line power supply like that.
I can help with the current sense resistor for the UC384x... you choose it to set the peak current limit below the saturation current of your transformer. Or the magic smoke releasing current of your MOSFETs, whichever is smaller
Registered Member #1565
Joined: Wed Jun 25 2008, 09:08PM
Location: Norway
Posts: 159
Steve McConner wrote ...
I can help with the current sense resistor for the UC384x... you choose it to set the peak current limit below the saturation current of your transformer. Or the magic smoke releasing current of your MOSFETs, whichever is smaller
So far so good.. but how do I know the saturation current? Can you suggest any tests? The primary circuit is quite much as shown except a RC snubber over the coil, and some series resistor stuff to limit inrush current(?)
Edit: I got the yoke, but I don't need(or want) a yoke in the circuit, the yoke belongs to a different circuit that may or may not work in sync with the SMPS. I will try to make a DC-DC converter with the yoke core + windings some other time. The only possibly use I can see for the yoke is a bulky output/input filter in this context.
And b.t.w. remind me to get a kit made to put the magic smoke back into parts :D
This site is powered by e107, which is released under the GNU GPL License. All work on this site, except where otherwise noted, is licensed under a Creative Commons Attribution-ShareAlike 2.5 License. By submitting any information to this site, you agree that anything submitted will be so licensed. Please read our Disclaimer and Policies page for information on your rights and responsibilities regarding this site.


 "LOPT" alike transformer used for aux (& HV supply)