If you need assistance, please send an email to forum at 4hv dot org. To ensure your email is not marked as spam, please include the phrase "4hv help" in the subject line. You can also find assistance via IRC, at irc.shadowworld.net, room #hvcomm.
Support 4hv.org!
Donate:
4hv.org is hosted on a dedicated server. Unfortunately, this server costs and we rely on the help of site members to keep 4hv.org running. Please consider donating. We will place your name on the thanks list and you'll be helping to keep 4hv.org alive and free for everyone. Members whose names appear in red bold have donated recently. Green bold denotes those who have recently donated to keep the server carbon neutral.
Special Thanks To:
Aaron Holmes
Aaron Wheeler
Adam Horden
Alan Scrimgeour
Andre
Andrew Haynes
Anonymous000
asabase
Austin Weil
barney
Barry
Bert Hickman
Bill Kukowski
Blitzorn
Brandon Paradelas
Bruce Bowling
BubeeMike
Byong Park
Cesiumsponge
Chris F.
Chris Hooper
Corey Worthington
Derek Woodroffe
Dalus
Dan Strother
Daniel Davis
Daniel Uhrenholt
datasheetarchive
Dave Billington
Dave Marshall
David F.
Dennis Rogers
drelectrix
Dr. John Gudenas
Dr. Spark
E.TexasTesla
eastvoltresearch
Eirik Taylor
Erik Dyakov
Erlend^SE
Finn Hammer
Firebug24k
GalliumMan
Gary Peterson
George Slade
GhostNull
Gordon Mcknight
Graham Armitage
Grant
GreySoul
Henry H
IamSmooth
In memory of Leo Powning
Jacob Cash
James Howells
James Pawson
Jeff Greenfield
Jeff Thomas
Jesse Frost
Jim Mitchell
jlr134
Joe Mastroianni
John Forcina
John Oberg
John Willcutt
Jon Newcomb
klugesmith
Leslie Wright
Lutz Hoffman
Mads Barnkob
Martin King
Mats Karlsson
Matt Gibson
Matthew Guidry
mbd
Michael D'Angelo
Mikkel
mileswaldron
mister_rf
Neil Foster
Nick de Smith
Nick Soroka
nicklenorp
Nik
Norman Stanley
Patrick Coleman
Paul Brodie
Paul Jordan
Paul Montgomery
Ped
Peter Krogen
Peter Terren
PhilGood
Richard Feldman
Robert Bush
Royce Bailey
Scott Fusare
Scott Newman
smiffy
Stella
Steven Busic
Steve Conner
Steve Jones
Steve Ward
Sulaiman
Thomas Coyle
Thomas A. Wallace
Thomas W
Timo
Torch
Ulf Jonsson
vasil
Vaxian
vladi mazzilli
wastehl
Weston
William Kim
William N.
William Stehl
Wesley Venis
The aforementioned have contributed financially to the continuing triumph of 4hv.org. They are deserving of my most heartfelt thanks.
I recently acquired two used but very healthy Toshiba D-138B X-Ray tubes. One is marked D-138BS. I plan on using these for radiography of circuitry to help with reverse engineering and repairs. I've built a suitable HV supply for running the tubes and confirmed x-ray output starts at 2Volts on the filament. I can't seem to find a lick of data on these tubes online though. All I need is the rated filament voltage range.
The filament glows brightly at about 1.5V dc, and detectable x-ray emission of even very soft x-rays (20KeV) occurs around 1.95V. I've tested the filament up to around 2.6V where current draw doesn't increase as rapidly with increase of voltage as it does previously, so this appears to be a knee point or at least a reduction in the resistance slope. It seems to run happily at 2.5V, and I'm pretty sure I can get enough x-ray flux out for my needs at this voltage, but if it is meant to run higher I could be hurting the lifetime of the tube, as well as making my sensor exposures needlessly long. It was hard to source quality x-ray tubes in the first place so I *really* don't want to burn out the filament on one of these by overvoltage. What is a good method of empirically determining the proper filament voltage for a dental x-ray tube like this? Modern lookalikes from Toshiba seem to have a 2-5V filament range but with how bright the filament looks at 2.6V I've been too afraid to turn up the voltage any higher.
Registered Member #1667
Joined: Sat Aug 30 2008, 09:57PM
Location:
Posts: 374
Given the same type of heater (directly heated tungsten filament) differences among tubes should only stem from different heater surface areas, but you'd need to compare the filament glow colours to draw any conclusions. An indirect way would be to normalize HV vs. filament voltage curves and measure your tube in question up to a little above the onset of significant HV current.
The type of tube in my current test setup has an onset of HV emission at 2.05V filament voltage and is spec'ed at 2.8V absolute max. The same scaling laws should apply to your (dental?) tube. The onset should be detectable irregardless of the acceleration voltage - only your radiation detector sensitivity and the actual fiament temperature should matter, where 20-30kV should be plenty with a glass envelope.
so in conclusion: stay below both the maximum dissipation, below 2.65V heater voltage and ramp up the heater current slowly. Go up to 2.65V, get the steady-state current reading and use this as an absolute current limit. This gives you the Safe Operating Area for the heater and during power-up the operating point will wander around inside it (primarily along the current limit line until the resistance has become sufficiently high for it to fall out of current limit).
Registered Member #2099
Joined: Wed Apr 29 2009, 12:22AM
Location: Los Altos, California
Posts: 1716
In my experience, Coolidge tubes for dental imaging need "white-hot" filaments to reach nominal emission current. I would guess that different tubes have similar cold-hot filament resistance ratios in normal operation.
How bright is your filament to get 10 milliamps in a DC high voltage circuit? That ought to give plenty of x-ray flux. Don't overheat the anode by running too long.
There are other considerations if your tube has three terminals at the cathode end. The one not connected to filament normally gets a negative "grid" bias voltage, developed by resistor between filament transformer and negative HV, to reduce/regulate the anode current.
I have not approached white hot yet, 2.5V is "yellow hot", with 2.0V being "golden".
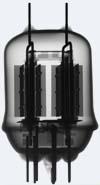
There are actually five terminals at the cathode end. Two are the filament, and three are connected to the 'can' around the filament, what I assume is an electron focusing mechanism. The filament sits recessed inside the flat surface of the 'can', within a cutout. Two of the terminals on the 'can' are internally bonded together. There is a fourth terminal connected to the 'can' which is clipped at the glass-metal seal by the manufacturer.
The pinout matches the one in this modern Toshiba tube with one exception; the modern tube has the cathode internally bonded to the filament line, and in my vintage tubes there is no such internal bond, instead the cathode is bonded to the tube marked "N not for use" in the pictured diagram.
During low voltage testing I tried applying cathode connection to the cathode pins without it being connected to the filament and got negligible current flow and no x-ray output.
Unfortunately, I'm not set up to measure anode current as the HV supply is a DIY royer inverter feeding a modern AC flyback, which feeds a 5 stage CW Multiplier. The royer operates at low RF frequencies, which capacitively couples so strongly to any digital meter I being near that it swamps out the small voltage formed across a resistor (or inside my current transformer probe for my scope). Likewise, my scope doesn't have the vertical resolution to resolve such a small voltage even if I could somehow prevent the inverter noise from getting into the signal. I'm currently looking for an old analog galvanometer style milliammeter to perform this role.
Anyway, I'm only expecting about 3mA out of the CW multiplier before the voltage sags greatly; it's only about 150W input power.
Registered Member #230
Joined: Tue Feb 21 2006, 08:01PM
Location: Gracefield lower Hutt
Posts: 284
The cylinder that the filament is in is known as a Wehnelt electrode This is a form of grid that controls electron emission and also focuses the electron beam. A well focused beam is required to get good fine detail so that the x-ray emission point on the anode becomes a true point source. The Wehnelt cylinder electrode will require about 300 to 500volts more negative than the cathode/ filament. This is sometimes arranged as an extra multiplier stage on the end of the multiplier stack. I have seen this last stage use a 100p cap in the multiplier while all the other caps in the stack where 2000pf. The Wehnelt does not draw any current itself hence the low capacitance cap on the end of the multiplier
Registered Member #1667
Joined: Sat Aug 30 2008, 09:57PM
Location:
Posts: 374
regarding HV measurements: I've had success with single layer common-mode filters and polystyrene caps. EMI line filters might also work once the bleeder resistors are removed and they're everywhere.
Registered Member #33
Joined: Sat Feb 04 2006, 01:31PM
Location: Norway
Posts: 971
johnf wrote ...
The cylinder that the filament is in is known as a Wehnelt electrode This is a form of grid that controls electron emission and also focuses the electron beam. A well focused beam is required to get good fine detail so that the x-ray emission point on the anode becomes a true point source. The Wehnelt cylinder electrode will require about 300 to 500volts more negative than the cathode/ filament. This is sometimes arranged as an extra multiplier stage on the end of the multiplier stack. I have seen this last stage use a 100p cap in the multiplier while all the other caps in the stack where 2000pf. The Wehnelt does not draw any current itself hence the low capacitance cap on the end of the multiplier
Excellent information. Dental tubes are often designed to have the wehnelt electrode at cathode potential for simplicity. This comes at the cost of focal spot geometry, but with the usually large focal spot in dental tubes, it works reasonably well
The filament glows brightly at about 1.5V dc, and detectable x-ray emission of even very soft x-rays (20KeV) occurs around 1.95V. I've tested the filament up to around 2.6V where current draw doesn't increase as rapidly with increase of voltage as it does previously, so this appears to be a knee point or at least a reduction in the resistance slope. It seems to run happily at 2.5V, and I'm pretty sure I can get enough x-ray flux out for my needs at this voltage, but if it is meant to run higher I could be hurting the lifetime of the tube, as well as making my sensor exposures needlessly long.
There are several effects at play at the same time here. Initially, as you increase the filament voltage, the cathode current will increase as more electrons are emitted. The knee point is likely caused by space charge effects within the tube. For a given anode voltage, space charge will limit how much anode current you can pull regardless of the filament voltage. If you're in the space charge limited region, increasing the anode voltage will increase the anode current, while in the emission-limited mode the current will be almost constant regardless of the anode voltage. Note that your andode voltage could be significantly lower under load compared to unloaded.
There are several tradeoffs to figuring out the proper operating point for your tube. Anode heating is a major factor, this is usually specified as how much energy you can dump into the anode without heating it to an unsafe temperature. As you approach higher anode currents, the apparent heat capacity goes down because thermal resistance within the anode means that only part of it is heated during the exposure. You want to limit the current to some reasonable value to properly utilize the heat capacity of the anode. In dental service, they usually run the tubes far beyond this point to get a short exposure time, with the typical short tube-to-film distance used in dental radiography they only need a small fraction of the anode heat capacity to get a good exposure and motion blur is more of a problem. For the dental tubes I know well, 3 mA at 70 kV is usually around the knee point for anode heat capacity.
For the filament voltage, you want to keep it as low as possible, so going for a somewhat lower anode current is also advantageous for filament life. In short, choose an anode voltage that gives you enough penetration, then choose an anode current that gives you reasonable anode heat capacity, then choose a filament voltage that will give you your desired anode current at your chosen anode voltage. If space charge limits your anode current, then you need to increase your anode voltage or just live with the cathode current you get.
Registered Member #1667
Joined: Sat Aug 30 2008, 09:57PM
Location:
Posts: 374
Great practical info, thanks Wolfram! Just let me throw in a lifetime vs. filament voltage graph to stress the importance of achieving a low filament voltage p. 3 -> continuous operating time diminished by two orders of magnitude within a 20% window of the filament voltage, quite shocking actually. Makes me completely ignore possible filament sag - ah never mind, that appears to be almost unheard of in x-ray tubes.
Thank you everyone, you've provided invaluable help and information!
I 'finished' the device yesterday and gave it a go! It works! I got my first radiographs successfully. I'm still waiting on the buck converter for filament supply for portable operation to come in the mail, and I haven't worked out any Wehnelt electrode bias supply yet.
Some observations:
1) my HV supply isn't quite up to the task; as filament voltage is increased the hardness of the xrays decreases, signifying a sagging HV output from the multiplier cascade.| -At 2.2V xray flux is low, but usable with long exposures (15-20sec) and hardness appears to be at maximum. -At 2.65V the sweet spot of hardness and xray flux appears to result; exposures are cut down to 3-6sec and 2mm or less aluminium appears to be nearly transparent. -At 2.85V maximum xray flux is achieved, but hardness is severely diminished; 2mm PCB greatly attenuates the beam. -At 3V the flux at the target is undetectable by xray intensifier screen. Either the supply is loaded down below the minimum voltage of the tube or the hardness is insufficient to escape the tube envelope and polycarbonate tube vessel in adequate flux quantity.
2) Longest exposure was 20sec at 'nominal' anode current as described above, with filament at 2.65V. Anode heatsink remained under 100F at all times, and oil temperature only peaked at 94F - likely mostly from cathode side heating from filament. Exposures were roughly at once every two minutes, for over an hour. Anode power rating seems to greatly exceed this power supply's output capability.
3) X-ray images obtained were of low resolution due to several factors: a) xray intensifier screen I have saved turned out to be a BLUE phosphor type, emitting somewhere around 425nm, which is poorly resolved and detected by digital photographic equipment. It was also a 'rapid' screen, having very coarse grain phosphor. I am now looking to obtain a fine grain GREEN emission screen. b) x-ray spot was poorly focused resulting in a rather divergent beam. At 10cm from emission spot on outer envelope of tube the detected beam was already larger than 20cm*25cm. I will consider adding a Wehnelt bias supply if I can find/design one that is portable and compact enough to fit.
4) X-ray emission was soft enough that 1.3mm steel sheeting provided excellent shielding in the off-axis (90deg) areas. The planned 1mm lead sheeting should do quite well. a) the 180deg axis emission was much higher than anticipated; completely saturating my 1mm Al shielded Geiger tube detector in under 100mS. I will double shielding in this axis.
Edit: Write up is finished and visible here, including numerous photos!
Registered Member #1667
Joined: Sat Aug 30 2008, 09:57PM
Location:
Posts: 374
Great write-up there, thank you. Since the Wehnelt bias supply needs to provide only a few microamps at most you could even hack together something with a 1-10k load resistor and a cheap high power LED + small solar cells around a thick glass plate. May need temperature compensation but I'd love to see that hack
This site is powered by e107, which is released under the GNU GPL License. All work on this site, except where otherwise noted, is licensed under a Creative Commons Attribution-ShareAlike 2.5 License. By submitting any information to this site, you agree that anything submitted will be so licensed. Please read our Disclaimer and Policies page for information on your rights and responsibilities regarding this site.


 Toshiba D-138B(s) X-Ray Tubes: Filament Voltage and Wehnelt Bias