If you need assistance, please send an email to forum at 4hv dot org. To ensure your email is not marked as spam, please include the phrase "4hv help" in the subject line. You can also find assistance via IRC, at irc.shadowworld.net, room #hvcomm.
Support 4hv.org!
Donate:
4hv.org is hosted on a dedicated server. Unfortunately, this server costs and we rely on the help of site members to keep 4hv.org running. Please consider donating. We will place your name on the thanks list and you'll be helping to keep 4hv.org alive and free for everyone. Members whose names appear in red bold have donated recently. Green bold denotes those who have recently donated to keep the server carbon neutral.
Special Thanks To:
Aaron Holmes
Aaron Wheeler
Adam Horden
Alan Scrimgeour
Andre
Andrew Haynes
Anonymous000
asabase
Austin Weil
barney
Barry
Bert Hickman
Bill Kukowski
Blitzorn
Brandon Paradelas
Bruce Bowling
BubeeMike
Byong Park
Cesiumsponge
Chris F.
Chris Hooper
Corey Worthington
Derek Woodroffe
Dalus
Dan Strother
Daniel Davis
Daniel Uhrenholt
datasheetarchive
Dave Billington
Dave Marshall
David F.
Dennis Rogers
drelectrix
Dr. John Gudenas
Dr. Spark
E.TexasTesla
eastvoltresearch
Eirik Taylor
Erik Dyakov
Erlend^SE
Finn Hammer
Firebug24k
GalliumMan
Gary Peterson
George Slade
GhostNull
Gordon Mcknight
Graham Armitage
Grant
GreySoul
Henry H
IamSmooth
In memory of Leo Powning
Jacob Cash
James Howells
James Pawson
Jeff Greenfield
Jeff Thomas
Jesse Frost
Jim Mitchell
jlr134
Joe Mastroianni
John Forcina
John Oberg
John Willcutt
Jon Newcomb
klugesmith
Leslie Wright
Lutz Hoffman
Mads Barnkob
Martin King
Mats Karlsson
Matt Gibson
Matthew Guidry
mbd
Michael D'Angelo
Mikkel
mileswaldron
mister_rf
Neil Foster
Nick de Smith
Nick Soroka
nicklenorp
Nik
Norman Stanley
Patrick Coleman
Paul Brodie
Paul Jordan
Paul Montgomery
Ped
Peter Krogen
Peter Terren
PhilGood
Richard Feldman
Robert Bush
Royce Bailey
Scott Fusare
Scott Newman
smiffy
Stella
Steven Busic
Steve Conner
Steve Jones
Steve Ward
Sulaiman
Thomas Coyle
Thomas A. Wallace
Thomas W
Timo
Torch
Ulf Jonsson
vasil
Vaxian
vladi mazzilli
wastehl
Weston
William Kim
William N.
William Stehl
Wesley Venis
The aforementioned have contributed financially to the continuing triumph of 4hv.org. They are deserving of my most heartfelt thanks.
Registered Member #1403
Joined: Tue Mar 18 2008, 06:05PM
Location: Denmark, Odense C
Posts: 1968
Project website with all photoes:
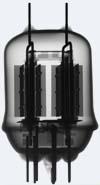
Specifications (incomplete due to some future minor changes) Bridge: 2x CM600DU-24FA IGBTs in a full bridge configuration Bridge supply: Full wave rectified 3x400VAC, 4x 6000uF 350V filtering capacitors, two in series, two string in parallel for 6000uF at 700V. Primary coil: 8 turns, flat primary. MMC: 5 in series 4uF GTO snubber capacitors, rated at 3kV / 5kA peak for 0,8uF at 15kV. Secondary coil: 315 mm diameter, 1500 mm long, 2200 windings, 0,75 mm enamelled copper wire. Topload: 7 rings of 25 mm aluminium tubing. Resonant frequency: Around 38 kHz.
My first attempt on building a large DRSSTC, it is a costly affair and I have chosen to go the high impedance way, mostly for the cost reason, going low just is expensive :)
TODO LIST: Finish enclosure Tune for maximum power
COMPLETED LIST: Gathering all parts Winding secondary coil Build enclosure Build primary coil Build driver Build bridge Test driver Test bridge Finish secondary coil with end caps Build topload Finish primary Test bridge
24th December 2011 Actually construction on the coil begins, secondary coil is wound in a mere 3 hours with a brand new and much more stable winding rig than the old I had. 7 layers of varnish was applied over the next week.
29th December 2011 Making of primary supports from 10 and 12 mm acryllic from LCD monitors begin, a good week later they are finished and ready to be mounted on the primary base. The acryllic was almost rock hard to work with and splintered very easy, to our huge disappointment they cracked like nothing after drilling holes to mount them. We suspect it is either tensions from the milling or the acryllic type, cast, extruded, we dont know. We just lost many hours work in this.
14th May 2012 When I first found these pieces of scrap PVC, my first thought was to use the already made holes to put the leads through and distance the capacitors that way. But recalling that Finn Hammer made a fishbone like skeleton fos his MMC, I tried something like it and ended up using all the plastic, even the cut outs that is used for the backbone. The end terminals of 20×10 mm copper is overkill, but was what the scrapyard had at hand that day, they do however make a good connection in the sides for the capacitor strings.
The result is half of the MMC is completed. 0,2uF at 12kV. The completed MMC will be 0,4uF at 12kV.
17th May 2012 New primary supports was made from scrap PVC, I found some good pieces of 20 mm thick PVC to use for these.
18th May 2012 The enclosure have been put together with wheel mounted, the primary platform is raised from the enclosure to allow for taking the complete Tesla coil apart, make connections of cables and possible water cooling easier and to gain distance to metal objects in respect to the primary coil.
The enclosure and primary platform is entirely put together with only glue and wooden nails, nearest metal in the current construction is the wheels at the bottom.
6th October 2012 Copper bus bars for the bridge and spacers for capacitor mounting machined and milled. 260 mm² copper bars are used for the DC connection with the capacitors.
20th October 2012 Material for topload toroid construction was bought cheap from the scrap yard. 7 large rings of 25 mm diameter coaxial antenna cable, aluminium shield with PE foam filling and copper tubing core.
IGBTs mounted on heat sink, support for capacitors constructed and capacitors mounted on IGBTs. Construction of 3 phase rectifier bridge on heat sink and preparing mounting on the bridge supports.
3rd November 2012 Finished installation of wheels on the enclosure and secondary coil was sawn over in both ends to get the right secondary tube length.
10th November 2012 Winding of the two GDTs, etching of gate PCBs and soldering of the gate PCBs and the GDTs.
Mounted 3 phase bridge rectifier, DC cables, snubber capacitors and TVS strings.
All the busbar work have been done, in 30×10 mm copper and brass.
The new MMC consisting of 5x 4 uF at 3 kVDC for 0,8 uF at 15 kVDC have been installed with the bridge.
1st May 2013
Bench test of driver was carried out. This is Steve Wards universal driver 2.1 converted to single sided board for through hole components only. Still some bugs and misroutings that was worked out during the test. The pulsewidth limiting network was bridged over as it caused some oscillations that made the driver turn the output on dispite no input from the interuptor.
21st August 2013
Construction of primary tap. It is made from a old clamp from mains distribution lines. 3x 35mm^2 is used.
Fall 2013
I had the same problem with my phase lead driver as Kizmo describes and troubleshoots in this thread:
Due to travelling around Europe as my job I had very little time to partake in the fault finding, Sync was kind enough to have my driver send to him and test it out. He found no problems and meanwhile the solution was found in Kizmo's thread.
Residual charge in the MMC can give the driver a false start. The solution is adding bleeder resistors to the MMC, but as we use large GTO snubber capacitors they have to have the same rating, an easy workaround is to place the bleeder resistor across the inverter output and burn the charge through the primary coil, thus the voltage rating only need to be that of the inverter output.
17th April 2014
First test where the CM600 bridge is running stable was conducted. At around 270VDC it is running 1000 Apeak over 240uS ontime. Yellow trace is primary current, 500A/div and blue is inverter voltage output, 250V/div.
Static load test on a metal bucket with water in.
20th April 2014
At around 320VDC it is running 1500 Apeak over 300uS ontime. Yellow trace is primary current, 500A/div and blue is inverter voltage output, 250V/div.
12th July 2015
It has been a long while without progress, mainly due to being a small family takes time from the hobby :)
A good while also lasted to have the topload arms waterjet cutted at a reasonable price when there was a job with spare material at the cutter.
The rings was rolled on a quick mockup for a motorized tubing roller that could easily bend the soft coaxial antenna cable used.
We assembled the rings and arms with rivets from the inside, unfortunately the thin walled aluminium shielding of the cable was not as strong as anticipated and it would let go of the rivets in several places, we had to cable tie it all together just so that no more would let go. Which kind of final solution we find or it will just be ties, no idea yet.
Secondary coil end terminations and topload insert mount
Topload sitting on top of the secondary coil
Next job to be done is finishing up the enclosure and primary coil platform, painting, mounts for putting it all on top of each other with splits, water cooling for the primary coil. :)
24th January 2016
A 32A CEE plug is used for 3 phase mains input connection, we only used the plug itself and made a custom fitting for it.
The split that holds the secondary in place.
Coiler and coil :)
Test setup outside of the garage
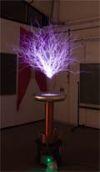
First light test and it was unfortunately under horrible conditions. We finished all the cabling and other small parts, bits and missing stuff in a days hectic work that lasted all night. So we missed the opportunity of testing in darkness.
There was no tuning performed due to lack of time, input was limited by a smaller 6A variac, BPS was kept down for the same reason, it was broad day light, foggy and wet day, the coil was just pushed outside of the garage and no cables was long enough to get it further away from the tree/house.
Sparks are about 60-70 cm and we killed the LED christmas light chain that was in the tree, it was unplugged before we started, but left the LEDs black rather than clear white.
31st March 2016
Like the first test, we were once again only able to test in the early evening due to noise in the neighborhood.
There was no tuning performed due to lack of time.
The big surprise was however that we ran on the same 6A 3 phase variac as last time, and it did not heat/or scream one bit from the runs shown in the video + a handful more.
The supply for the variac is only a 3x400VAC fused at 16A, the OCD set at 1500A never tripped even once, running BPS up to 350, 200uS on-time and ground strikes. Power meter gave an average of 0.75 power factor for our total runs.
This was a triumph! I'm making a note here: Huge success!
It's hard to overstate my satisfaction.
10th September 2016
I have cut out the bonding wires to the RTC circuit of the CM600-24FA IGBT bricks, which we thought could be one of the reasons that we were not able to trip the 1500 A OCD setting. While it might have limited the operation a little bit, it was nowhere near hindering performance, this coil is just so high impedance that it runs long on-times instead of high peak currents.
Fed with 3x400VAC through a variac resulted in a 0.6 power factor. After roughly 8-10 test runs at up to 2 minutes, with peak power consumption hitting 14 kW at 500 BPS, 200uS, the total power consumption over all the tests was 0.281 kW/h, 0.331 kVAr/h and 0.481 kVA/h.
Heating up a 3 mm iron plate with some high BPS
Playing a MIDI, Bach - Tocatta Fugue, on the 3 mm iron plate
Full power, all that we could pull from the wall and let it run, 120-500 BPS at 200 to 300 uS on-time. Peak consumption is again around 14 kW.
Registered Member #33
Joined: Sat Feb 04 2006, 01:31PM
Location: Norway
Posts: 971
Mads Barnkob wrote ...
MMC: Cornell Dubilier (CDE) 942C20P15K-F
Don't do this unless you already have the capacitors. They are simply way off for big DRSSTCs, with way too much peak current handling capacity in relation to the capacitance and RMS voltage rating. What I mean is, if you design it for the RMS voltage handling you need, the RMS and peak current ratings will be many times what you need. Which isn't a problem in itself, but the current handling is what you're paying for with these caps. So you will end up with a cap bank costing thousands of dollars if you want a sensible voltage rating. You can always exceed the datasheet voltage rating, but you'll sacrifice reliability and still pay more than if you chose some more suited caps to begin with (and then you won't even have to exceed any of the ratings).
Many standard metallized polypropylene film caps will work fine in big DRSSTCs, some people state that only the 942C series are good enough for TCs, but this is in cases where the caps are pushed so far beyond their ratings that it's a wonder they survive at all. The wonderfull thing about large DRSSTCs, especially low impedance ones, is that a proper MMC can be made for not very much money if you chose the right caps. You can even design the MMC so that you don't have to exceed ANY datasheet ratings without it costing a fortune, and reliability will be guaranteed.
Look at the biggest DRSSTCs, most of them use other capacitors than 942Cs.
Edit: forgot to mention, very nice work. Looks solid.
Registered Member #1403
Joined: Tue Mar 18 2008, 06:05PM
Location: Denmark, Odense C
Posts: 1968
Finally it is time for an update on this project, read it all in the first post of the thread! All the detailed construction pictures can found on my website.
Wolfram wrote ...
Mads Barnkob wrote ...
MMC: Cornell Dubilier (CDE) 942C20P15K-F
Don't do this unless you already have the capacitors. They are simply way off for big DRSSTCs, with way too much peak current handling capacity in relation to the capacitance and RMS voltage rating. What I mean is, if you design it for the RMS voltage handling you need, the RMS and peak current ratings will be many times what you need. Which isn't a problem in itself, but the current handling is what you're paying for with these caps. So you will end up with a cap bank costing thousands of dollars if you want a sensible voltage rating. You can always exceed the datasheet voltage rating, but you'll sacrifice reliability and still pay more than if you chose some more suited caps to begin with (and then you won't even have to exceed any of the ratings).
Many standard metallized polypropylene film caps will work fine in big DRSSTCs, some people state that only the 942C series are good enough for TCs, but this is in cases where the caps are pushed so far beyond their ratings that it's a wonder they survive at all. The wonderfull thing about large DRSSTCs, especially low impedance ones, is that a proper MMC can be made for not very much money if you chose the right caps. You can even design the MMC so that you don't have to exceed ANY datasheet ratings without it costing a fortune, and reliability will be guaranteed.
Look at the biggest DRSSTCs, most of them use other capacitors than 942Cs.
Edit: forgot to mention, very nice work. Looks solid.
Thanks and I am well aware that the 942C is less ideal for a large DRSSTC, but money rules in some of the decisions. I have looked at multiply alternatives with snubber caps, large mica caps from transmitters etc. all would be many times more expensive than buy the few more 942Cs I would need.
Registered Member #1403
Joined: Tue Mar 18 2008, 06:05PM
Location: Denmark, Odense C
Posts: 1968
Time passes by and a lot of things have changed and not so much have been built :)
I have upgraded the planned CM300 brigde to CM600 as I came by some reasonble priced ones.
Material for the 7 ring topload was found incredible cheap.
MMC have been upgraded from 96 pieces of CDE942C capacitors to a massive GTO snubber capacitor mmc consisting of 5 in series 4uF/3kV/5kA peak capacitors.
Bridge is finished and need only gate boards and GDT mounted. Next up is getting the driver board done, tested and bridge testing can begin.
Registered Member #2694
Joined: Mon Feb 22 2010, 11:52PM
Location: Russia, Volgograd (Stalingrad).
Posts: 97
Hi Mads,
Good job!
Looks like upper copper wire between coil and toroid plate are extremely tiny for current it will have. Eric Goodchild had a problem with that and he remade it from tiny wire to copper bus.
Registered Member #1403
Joined: Tue Mar 18 2008, 06:05PM
Location: Denmark, Odense C
Posts: 1968
Intra wrote ...
Hi Mads,
Good job!
Looks like upper copper wire between coil and toroid plate are extremely tiny for current it will have. Eric Goodchild had a problem with that and he remade it from tiny wire to copper bus.
Thank you Intra.
It is just the continuation of the secondary wire, it is a 0.75 mm copper wire, it is carefully put in a slit to avoid sharp edges where break out might occur. Is the secondary circuit current distribution really so that the last 30 cm of wire carries more current than other parts of the coil?
This site is powered by e107, which is released under the GNU GPL License. All work on this site, except where otherwise noted, is licensed under a Creative Commons Attribution-ShareAlike 2.5 License. By submitting any information to this site, you agree that anything submitted will be so licensed. Please read our Disclaimer and Policies page for information on your rights and responsibilities regarding this site.


 Kaizer DRSSTC III