If you need assistance, please send an email to forum at 4hv dot org. To ensure your email is not marked as spam, please include the phrase "4hv help" in the subject line. You can also find assistance via IRC, at irc.shadowworld.net, room #hvcomm.
Support 4hv.org!
Donate:
4hv.org is hosted on a dedicated server. Unfortunately, this server costs and we rely on the help of site members to keep 4hv.org running. Please consider donating. We will place your name on the thanks list and you'll be helping to keep 4hv.org alive and free for everyone. Members whose names appear in red bold have donated recently. Green bold denotes those who have recently donated to keep the server carbon neutral.
Special Thanks To:
Aaron Holmes
Aaron Wheeler
Adam Horden
Alan Scrimgeour
Andre
Andrew Haynes
Anonymous000
asabase
Austin Weil
barney
Barry
Bert Hickman
Bill Kukowski
Blitzorn
Brandon Paradelas
Bruce Bowling
BubeeMike
Byong Park
Cesiumsponge
Chris F.
Chris Hooper
Corey Worthington
Derek Woodroffe
Dalus
Dan Strother
Daniel Davis
Daniel Uhrenholt
datasheetarchive
Dave Billington
Dave Marshall
David F.
Dennis Rogers
drelectrix
Dr. John Gudenas
Dr. Spark
E.TexasTesla
eastvoltresearch
Eirik Taylor
Erik Dyakov
Erlend^SE
Finn Hammer
Firebug24k
GalliumMan
Gary Peterson
George Slade
GhostNull
Gordon Mcknight
Graham Armitage
Grant
GreySoul
Henry H
IamSmooth
In memory of Leo Powning
Jacob Cash
James Howells
James Pawson
Jeff Greenfield
Jeff Thomas
Jesse Frost
Jim Mitchell
jlr134
Joe Mastroianni
John Forcina
John Oberg
John Willcutt
Jon Newcomb
klugesmith
Leslie Wright
Lutz Hoffman
Mads Barnkob
Martin King
Mats Karlsson
Matt Gibson
Matthew Guidry
mbd
Michael D'Angelo
Mikkel
mileswaldron
mister_rf
Neil Foster
Nick de Smith
Nick Soroka
nicklenorp
Nik
Norman Stanley
Patrick Coleman
Paul Brodie
Paul Jordan
Paul Montgomery
Ped
Peter Krogen
Peter Terren
PhilGood
Richard Feldman
Robert Bush
Royce Bailey
Scott Fusare
Scott Newman
smiffy
Stella
Steven Busic
Steve Conner
Steve Jones
Steve Ward
Sulaiman
Thomas Coyle
Thomas A. Wallace
Thomas W
Timo
Torch
Ulf Jonsson
vasil
Vaxian
vladi mazzilli
wastehl
Weston
William Kim
William N.
William Stehl
Wesley Venis
The aforementioned have contributed financially to the continuing triumph of 4hv.org. They are deserving of my most heartfelt thanks.
Registered Member #56
Joined: Thu Feb 09 2006, 05:02AM
Location: Southern Califorina, USA
Posts: 2445
The initial problem- I have a text book that was provided to us as an unbound pile of pages (I suppose that $80 just doesn't go as far as it used to...), which is inconvenient to use.
The initial solution- Run the book through a scanner (HP C7190) I found in the trash pile at school, using the auto paper feeder (C5195) on it, using the xsane tools under linux (since from what I have heard, these scanners are iffy at best to support under a modern windows install). That all works fine and dandy and I can load a 30 page stack into the printer and get 30 png files out 10 minutes later.
The new problem- The CCD on the scanner has some hot and dead pixels, which cause streaks through the image. I am not sure if that was the best that $800 could do back in the 20th century or if the sensor has since degraded over the last decade, but in any case I want to try and clean them up a little bit. It seems like this is the process that astronomers use. I envision a piece of software that I can feed a white image and black image to for it to map out the bad pixles, and then a directory with 2000 png files and come back in a few hours with a directory of corrected files.
Does such a piece of software exist? I have been looking and short of a few buyware programs, I have found pixelzap which seems close to what I want, but it only appears to deal with hot pixels, and looking at my scans I think I have some dark pixels as well.
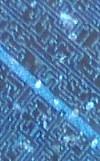
Here is a picture of a white piece of paper that was scanned to give you an idea of what I am working with
Registered Member #30
Joined: Fri Feb 03 2006, 10:52AM
Location: Glasgow, Scotland
Posts: 6706
Have you tried opening the scanner up and blowing dust out of it? Those dead pixels might just be lumps of dirt in the optics. I spotted one that changes colour and disappears, which is surely impossible if it's a real dead pixel...
Registered Member #27
Joined: Fri Feb 03 2006, 02:20AM
Location: Hyperborea
Posts: 2058
That is common for uncalibrated CCD chips, even space probes with carefully selected chips have those problems. Usually the firmware in the scanner or the driver will fix it by scanning a neutral area utside the scanning window.
Unless the paper got stripes you have some electronic interference too.
I write programs to solve such problems for fun so I might be talked into giving it a go. Try to upload a white page and a page with text in .png format, that should be enough to make a quick test.
Registered Member #56
Joined: Thu Feb 09 2006, 05:02AM
Location: Southern Califorina, USA
Posts: 2445
The first thing I tried was giving the scanner a good dusting, and while I managed to get a few stripes to go away I didn't have much luck.
I never considered that it might be EMI, it wouldn't surprise me if there is a leaky cap or the likes in it that is causing the issues.
What I do find interesting is that the scans I took this morning seem noticeably better than the ones taken last night, although they still aren't really that great. I am starting to wonder if there is some kind of heat related issue or if the sensor calibration is set to only make small corrections, so it has slowly been improving as I make scans.
Registered Member #27
Joined: Fri Feb 03 2006, 02:20AM
Location: Hyperborea
Posts: 2058
Everything take 10 times as long when using only one arm so I did not get around to look at this before now. The stripes are not very consistent so I took the calibration data from the bottom of the same page.
This was my first attempt and it turned out quite well.
Registered Member #1533
Joined: Wed Jun 11 2008, 02:13PM
Location: ReykjavÃk, Iceland
Posts: 46
I've heard that old scanners sometimes need to be "warmed up". This problem seems to have been solved but in case you run into problems like this in the future, I'd like to point out the fft feature in ImageMagick
Anyway, that's not really relevant since the problem can be solved by simple contrast manipulation. Using the command: $ convert -level 0%,55% -normalize -colorspace Gray -scale 50% 1260037007_56_FT80625_title0015.png out.png on the picture from the second post yields this
I wrote a script the other day which merges a group of images and fixes the contrast and then merges them into a pdf file.
Registered Member #27
Joined: Fri Feb 03 2006, 02:20AM
Location: Hyperborea
Posts: 2058
Here is the program I used, if someone can make a portable version in Python I would be very interested. If something looks strange in the code it is most likely the forum parser that is messing up the text.
Dim gr As Graphics
Dim bmdR As System.Drawing.Imaging.BitmapData
Dim pictureArray() As Byte
Dim Picture1, Picture2 As Bitmap
Dim red, green, blue, x, y, offset, frameSize, bytesPerPixel, calibrationN, calibrationY As Integer
Dim rCalAverage, gCalAverage, bCalAverage As Single, rCalibration(8192), gCalibration(8192), bCalibration(8192) As Single

calibrationN = 300
calibrationY = 2500

'Load and display picture
Picture1 = New Bitmap(My.Application.Info.DirectoryPath & "/stripe1.png")
PictureBox1.Image = Picture1
Application.DoEvents()

'Convert picture format if needed
Select Case Picture1.PixelFormat
    Case Imaging.PixelFormat.Format24bppRgb, Imaging.PixelFormat.Format32bppArgb, Imaging.PixelFormat.Format32bppPArgb, Imaging.PixelFormat.Format32bppRgb
        'Nothing to do here, this is our native format
    Case Else
        'Convert all other formats to our native format of RGB 8 bit per primary colour
        Picture2 = New Bitmap(Picture1.Width, Picture1.Height, Imaging.PixelFormat.Format32bppArgb)
        gr = Graphics.FromImage(Picture2)
        gr.DrawImageUnscaled(Picture1, 0, 0)
        Picture1 = Picture2
End Select

'Move the bitmap into a byte array for easy access
bmdR = Picture1.LockBits(New Rectangle(0, 0, Picture1.Width, Picture1.Height), System.Drawing.Imaging.ImageLockMode.ReadOnly, Picture1.PixelFormat)
frameSize = bmdR.Stride * bmdR.Height
ReDim pictureArray(frameSize)
System.Runtime.InteropServices.Marshal.Copy(bmdR.Scan0, pictureArray, 0, frameSize)
Picture1.UnlockBits(bmdR)

'Extract calibration data
bytesPerPixel = System.Drawing.Image.GetPixelFormatSize(Picture1.PixelFormat) >> 3
For y = calibrationY To (calibrationY + calibrationN) - 1
    offset = bmdR.Stride * y
    For x = 0 To Picture1.Width - 1
        rCalibration(x) += pictureArray(offset + 2)
        gCalibration(x) += pictureArray(offset + 1)
        bCalibration(x) += pictureArray(offset)

        offset += bytesPerPixel
    Next
Next

'Average each calibration channel
For x = 0 To Picture1.Width - 1
    rCalibration(x) /= calibrationN
    gCalibration(x) /= calibrationN
    bCalibration(x) /= calibrationN
    rCalAverage += rCalibration(x) / (Picture1.Width - 1)
    gCalAverage += gCalibration(x) / (Picture1.Width - 1)
    bCalAverage += bCalibration(x) / (Picture1.Width - 1)
Next

'Subtract the average so that there will be no colour or brightness change of a line
For x = 0 To Picture1.Width - 1
    rCalibration(x) -= rCalAverage
    gCalibration(x) -= gCalAverage
    bCalibration(x) -= bCalAverage
Next

'Subtract the calibration data from every line in the picvture
For y = 0 To Picture1.Height - 1
    offset = bmdR.Stride * y
    For x = 0 To Picture1.Width - 1
        red = pictureArray(offset + 2) - rCalibration(x)
        green = pictureArray(offset + 1) - gCalibration(x)
        blue = pictureArray(offset) - bCalibration(x)

        pictureArray(offset + 2) = Math.Max(Math.Min(red, 255), 0)
        pictureArray(offset + 1) = Math.Max(Math.Min(green, 255), 0)
        pictureArray(offset) = Math.Max(Math.Min(blue, 255), 0)

        offset += bytesPerPixel
    Next
Next

'Move byte array back to the bitmap and display picture
bmdR = Picture1.LockBits(New Rectangle(0, 0, Picture1.Width, Picture1.Height), System.Drawing.Imaging.ImageLockMode.WriteOnly, Picture1.PixelFormat)
frameSize = bmdR.Stride * bmdR.Height
System.Runtime.InteropServices.Marshal.Copy(pictureArray, 0, bmdR.Scan0, frameSize)
Picture1.UnlockBits(bmdR)
PictureBox1.Image = Picture1
Application.DoEvents()

Picture1.Save(My.Application.Info.DirectoryPath & "/processed.png", System.Drawing.Imaging.ImageFormat.Png)
Registered Member #56
Joined: Thu Feb 09 2006, 05:02AM
Location: Southern Califorina, USA
Posts: 2445
Thanks for the input guys, these results are looking very promising! I have been busy over the last month or so with Christmas break, but hopefully now that school has started I can spend some time thinking about how to best tackle the issue, I will keep you posted of any progress.
As to the warming up, the results definitely get better with time, but the images shown are after sitting overnight powered up (this scanner runs the tube CCFL tube at all times while powered up, probably to solve the warmup issue). The variation in the stripes definitely leads me to think it is heat related, although I still suspect it may be related to some of the caps getting old and leaky/high resistance.
Registered Member #27
Joined: Fri Feb 03 2006, 02:20AM
Location: Hyperborea
Posts: 2058
I have added automatic detection of the most suitable lines for the calibration data and a median function so it discards any spots. With multithreading it processes two images per second on a fast PC, most of the time is spent on compressing the huge .png files.
Registered Member #2140
Joined: Tue May 26 2009, 09:16PM
Location:
Posts: 53
Also, XSane scanner has alot of options. You can take a preview scan, tell it which what scanned color is really white, gray, and black. It should automatically correct the scan.
Set the scan to binary (Black or White), and you should have a usable scan.
This site is powered by e107, which is released under the GNU GPL License. All work on this site, except where otherwise noted, is licensed under a Creative Commons Attribution-ShareAlike 2.5 License. By submitting any information to this site, you agree that anything submitted will be so licensed. Please read our Disclaimer and Policies page for information on your rights and responsibilities regarding this site.


 Image Correction Software