If you need assistance, please send an email to forum at 4hv dot org. To ensure your email is not marked as spam, please include the phrase "4hv help" in the subject line. You can also find assistance via IRC, at irc.shadowworld.net, room #hvcomm.
Support 4hv.org!
Donate:
4hv.org is hosted on a dedicated server. Unfortunately, this server costs and we rely on the help of site members to keep 4hv.org running. Please consider donating. We will place your name on the thanks list and you'll be helping to keep 4hv.org alive and free for everyone. Members whose names appear in red bold have donated recently. Green bold denotes those who have recently donated to keep the server carbon neutral.
Special Thanks To:
Aaron Holmes
Aaron Wheeler
Adam Horden
Alan Scrimgeour
Andre
Andrew Haynes
Anonymous000
asabase
Austin Weil
barney
Barry
Bert Hickman
Bill Kukowski
Blitzorn
Brandon Paradelas
Bruce Bowling
BubeeMike
Byong Park
Cesiumsponge
Chris F.
Chris Hooper
Corey Worthington
Derek Woodroffe
Dalus
Dan Strother
Daniel Davis
Daniel Uhrenholt
datasheetarchive
Dave Billington
Dave Marshall
David F.
Dennis Rogers
drelectrix
Dr. John Gudenas
Dr. Spark
E.TexasTesla
eastvoltresearch
Eirik Taylor
Erik Dyakov
Erlend^SE
Finn Hammer
Firebug24k
GalliumMan
Gary Peterson
George Slade
GhostNull
Gordon Mcknight
Graham Armitage
Grant
GreySoul
Henry H
IamSmooth
In memory of Leo Powning
Jacob Cash
James Howells
James Pawson
Jeff Greenfield
Jeff Thomas
Jesse Frost
Jim Mitchell
jlr134
Joe Mastroianni
John Forcina
John Oberg
John Willcutt
Jon Newcomb
klugesmith
Leslie Wright
Lutz Hoffman
Mads Barnkob
Martin King
Mats Karlsson
Matt Gibson
Matthew Guidry
mbd
Michael D'Angelo
Mikkel
mileswaldron
mister_rf
Neil Foster
Nick de Smith
Nick Soroka
nicklenorp
Nik
Norman Stanley
Patrick Coleman
Paul Brodie
Paul Jordan
Paul Montgomery
Ped
Peter Krogen
Peter Terren
PhilGood
Richard Feldman
Robert Bush
Royce Bailey
Scott Fusare
Scott Newman
smiffy
Stella
Steven Busic
Steve Conner
Steve Jones
Steve Ward
Sulaiman
Thomas Coyle
Thomas A. Wallace
Thomas W
Timo
Torch
Ulf Jonsson
vasil
Vaxian
vladi mazzilli
wastehl
Weston
William Kim
William N.
William Stehl
Wesley Venis
The aforementioned have contributed financially to the continuing triumph of 4hv.org. They are deserving of my most heartfelt thanks.
Registered Member #205
Joined: Sat Feb 18 2006, 11:59AM
Location: Skørping, Denmark
Posts: 741
Matt,
I made some Wimshurst machines for the local Electricity Museum some couple of years ago. They had the disks made from FR4 pcb material, and with soldermask covering the area between the gold plated sectors, and 1 mm into them. The small holes at the inner end of the sectors were occupied by round headed phillips screws, which acted as buttons to make contact with the neutralizer brushes.
Another thing always anoyed me, was the crossing belt, which tends to wear out and spray the surface of the plates with rubber dust. Crossing belts to reverse the direction of rotation is an unacceptable makeshift way of doing things. Using only one belt, double growed big pulleys and 2 extra small intermediate pulleys, this problem was overcome:
Registered Member #834
Joined: Tue Jun 12 2007, 10:57PM
Location: Brazil
Posts: 644
Finn Hammer wrote ...
I made some Wimshurst machines for the local Electricity Museum some couple of years ago. They had the disks made from FR4 pcb material, and with soldermask covering the area between the gold plated sectors, and 1 mm into them. The small holes at the inner end of the sectors were occupied by round headed phillips screws, which acted as buttons to make contact with the neutralizer brushes.
Another thing always anoyed me, was the crossing belt, which tends to wear out and spray the surface of the plates with rubber dust. Crossing belts to reverse the direction of rotation is an unacceptable makeshift way of doing things. Using only one belt, double growed big pulleys and 2 extra small intermediate pulleys, this problem was overcome:
Nice disks. Screws to access enclosed sectors shall be used with care because they can't perforate the disks. The disks have to be thick enough, or an insulating layer must be laminated on the inner side. In the Wimshurst I just glued the buttons over thin metal strips contacting the sectors below. A fragile solution, but worked. There are several methods to avoid crossed cords. One is to mount the lower axle perpendicular to the upper axle, and use a single cord with an idle pulley: Another is to mount the lower axle inclinated to one side, so the crossed cords don't touch.
AwesomeMatt wrote ...
Sadly, aesthetically, I think having visible sectors is desirable. If I could cover them with a clear film (48" wide packing tape) I would do that. It would keep the sectors nice and purdy but, I guess it would look like old packing tape after a while.
So, the space between sectors must cumulatively add up to more than the desired spark gap, else it will short across the disc (another reason to laminate an insulator over them), right?
Is that basically the only reason you need a bigger wheel? Just to have sufficient space between sectors to actually get that arc, or are there other elements of physics in play?
I'm curious about the number of sectors. Why have, for example, 24 instead of 240? What impact does the number of sectors have on a machine?
I used adhesive plastic foil. It keeps the same look for long time. Could be transparent too.
The machine sparks through the disks if a too long spark is attempted, in the path going from one collector across the spacings of sectors to one neutralizer, continuing to the other collector through sector spacings from the other side of the neutralizer.
Longer sparks are the reason for larger disks, that also produce greater current due to the greater area of the sectors.
More sectors accelerate the startup of the machine and increase the spark length, but up to a point. There is no great reason to use more than 40 sectors. 32 is a good number, 24 is ok too, 16 causes some degradation, 8 is about the minimum.
Registered Member #4454
Joined: Sun Feb 26 2012, 12:47AM
Location: Western Canada
Posts: 74
I'm now in charge of building a prototype, not just giving some electrical specs.
Monday: "So how long do I have to build this thing?", "Well, soon, about 3 weeks, is that enough?", "It seems like lots, so it's probably not long enough."
Today: "We need it built and fully documented in a week."
Well okay then. Off I go.
Trying to decide on the right thickness of acrylic to use. It's expensive and I won't know until I get it wrong that it's wrong.
- Can't be too thick, or the current will be low. - Can't be too thick, or it'll be a scary flywheel with a lot of energy (already looking like, 150 pounds of wheel weight). - Can't be too thin, or mechanically it won't be stable. - Can't be too thin, or electrostatic attraction will smash discs together.
No thinner than 1/4"... hopefully not as thick as 1/2". 1/4" was pretty wobbly with the 36" piece I held up.
I will probably buttress it with a thicker disc in the middle inside of the sectors. Another option is sandwiching the sectors between two discs, so that they're at least electrically close to the other wheel. Fill in the gap with silicone and smush it together with clamps.
Acrylic will be hundreds of dollars to maybe a thousand.
So, the wheels spin in opposite directors. Thus, they can't be locked to a shaft. Which is fine, they're driven by the other pulleys.
I had a hell of a time trying to figure how I'm going to attach smooth bearings to pulleys to the big wheels, all while not locking onto a shaft. This was my "solution".
Use bushings instead of bearings. 1/2" shaft, 3/4" bushings. Bushings fit inside the pulley and the collar thing. I weld a giant washer type plate to the collar, and then screw/bolt that through to the plate, flush.
I can't just use the pulley itself, because there's nowhere to bolt it to the big wheel. No material. And I can't weld a disc around it, because, well, at least at Princess they said it was cast iron. I dunno, looks pretty smooth for cast iron. It doesn't have the crumbly texture like other cast iron ones did. Anyone figure it's gotta be steel? It's no alum...
Also, I mentioned contacting the local power company for old stuff. They said "Oh, we were just there the other day, I'm going back this week, want to come with?" Here's what they pulled out just 'cause it looked interesting.
Apparently about half of the insulator thingies are actually not insulators, they're explosive fuses with a shotgun shell in them to blow apart the wires if they overload she said. I thought that was pretty interesting. The discs are rubbery on those, not ceramic.
Mmmmm.... tasty Pole Pig. Maybe I can score one for a Tesla Coil :)
Oh, and a few more questions...
In the previous post, the end caps for the 5/8" tubing, will that work? I'm not actually sure how to terminate the pipes. I've seen brass balls and stuff, is that too ugly/sharp? Do they need to be spheres?
Will the tubing be enough for the neutralizer bar and comb supports? I was planning on only using the 1" straight pipe for the output rods.
Do the combs actually touch the wheel? Some people said no, but in the tabletop one they do. In the tabletop one both the brushes and combs are made out of solder wick. I was thinking of using photocopier destatic brushes, hovering just barely.
Are the Leyden Jars connected to each other? I think the outer conductor is connected in common?
How thick do my Leyden insulators need to be? I was hoping to use just 4-6" PVC tube, cut however long. So, that stuff is.. I dunno, 1/8"-1/4" thick.
I'm a little bit panicking for time. I have enough time to build, but not a lot of time for things to go wrong with the build.
Registered Member #33460
Joined: Tue Aug 27 2013, 06:23PM
Location: Seattle
Posts: 46
Since this is a prototype, I suggest you use the tallest and most narrow plastic trash containers you can find for the Leyden jars. They will be made out of polypropylene, which is a much better choice than PVC, and you won't have to worry about sparks at both ends. Yes, connect the outer foils of each jar to one another.
When it comes to your brushes, those stiff brass ones you purchased are much too abrasive. They will scratch and ruin your sectors and disks. The neutralizer brushes should definitely touch the sectors. The high voltage collectors don't have to touch the sectors, but it may work better if they do.
You can also use wooden spheres for the joints in the high voltage conductors, so long at the metal bits make contact inside the sphere. Be sure to give them a smooth, glossy coating of paint or varnish.
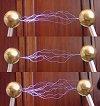
The cheapest source for hollow metal spheres I have found are stainless steel gazing globes. A web search should turn up plenty of sellers. You really need something like these to terminate your high voltage conductors if you want to see some long sparks. Weld on a small stub of threaded bolt stock and drill a hole in the center of one of your copper pipe end caps, use a nut and lock washer to secure it, then just slip onto the end of the pipe.
My best performer uses a 4" stainless gazing globe on one side, and a 1.25" sphere stacked on a 2" sphere on the other. The latter were taken from two sets of Baoding balls (Chinese exercise balls).
I know you only have a week for this prototype, but when it comes to building the real beast I highly suggest you purchase a copy of Homemade Lightning by R.A. Ford and read the sections on Wimshurst machines as it contains a lot of best practices, though he focuses on sectorless designs.
The anti-static brushes from a photocopier will work very well as neutralizer brushes.
Registered Member #4454
Joined: Sun Feb 26 2012, 12:47AM
Location: Western Canada
Posts: 74
wrote ... Since this is a prototype, I suggest you use the tallest and most narrow plastic trash containers you can find for the Leyden jars. They will be made out of polypropylene, which is a much better choice than PVC, and you won't have to worry about sparks at both ends.
Very interesting, thank you. I am somewhat scared of Leyden jars and I almost don't want to use them, or at least at first, as little as possible.
I actually need to read up on Leyden Jar construction more, what parts have to be insulated from what, etc. I don't have bottoms for the PVC right now.
wrote ... When it comes to your brushes, those stiff brass ones you purchased are much too abrasive. They will scratch and ruin your sectors and disks.
The other feedback I've got on it was that they are not hard and springy enough. Heh.
On a prototype, I don't care much, but, also within a week, I need to have documents written up describing to an artist and a fabrication shop how to make these decisions and build one (they'll decide how to build it, I have to tell them what they can and cannot do). I found some stainless foil on McMaster, so, I'll suggest that for the final build.
wrote ... You can also use wooden spheres for the joints in the high voltage conductors
Why would I use them at all? For example, why not *only* have the metal?
Will the wood prevent corona discharge from bad/pointy joints or is it purely mechanical the way you're suggesting it?
wrote ... The cheapest source for hollow metal spheres I have found are stainless steel gazing globes. A web search should turn up plenty of sellers.
Bingo. Thank you muchly. $110 for 2x 4" and 2x 2" on McMaster for stainless floats. Instead of doing that, $70 for 4x 5" and 4x 2.75" for Gazing Globes from Amazon. Great.
wrote ... Weld on a small stub of threaded bolt stock and drill a hole in the center of one of your copper pipe end caps, use a nut and lock washer to secure it, then just slip onto the end of the pipe.
Thanks for the tip, I think I will use this method. But, won't there be weird angles and hollow spaces between the two? Do I need to fill those with solder?
For exaggerated example, I am imagining a Basketball sitting on a table, there's all that convex space underneath it.
wrote ... My best performer uses a 4" stainless gazing globe on one side, and a 1.25" sphere stacked on a 2" sphere on the other. The latter were taken from two sets of Baoding balls (Chinese exercise balls).
Interesting. So, why did you go with the
Large <--> Medium/Small
paring rather than
Medium/Small <--> Small/Medium
pairs on each side?
wrote ... I highly suggest you purchase a copy of Homemade Lightning by R.A. Ford
Told them to buy the E-book and I'll rifle over it at nights when their shop is closed.
Registered Member #33460
Joined: Tue Aug 27 2013, 06:23PM
Location: Seattle
Posts: 46
The machine will run without Leyden jars, but the sparks will be weak and not as long. It will be very informative if you run it in a dark room after you've let your eyes adjust for 10 minutes. Set the elcetrodes far enough apart that no sparks appear, and the whole thing will light up with purple and white glow discharges, and you will see a stark difference between the side with negative charge and the side with positive charge. You will also see all the points of corona leakage on your high voltage conductors, like little purple down feathers. The fewer of these that occur, the better your machine will perform.
The neutralizer brushes only need to make electrical contact with the sectors, and since we are talking about very high voltage with extremely miniscule current, even something with a very high resistance like the anti-static brushes from a photocopier will work as well as something much more conductive. Those brass brushes you bought are intended to be abrasive - you can remove rust and corrosion with them while not leaving deep scratches in steel. The carbon fiber brushes from the photocopier are designed to do exactly what you want them for - to pick up a static charge from a delicate surface - whether it's paper or foil or plastic doesn't matter. You could use the brass brushes as collector combs for the high voltage pickups, but don't let them touch the sectors. Also, bear in mind that you do not need the collector brushes/combs to cover the whole length of the sectors. So long as at least some part of the sectors pass underneath the brushes, pickup will occur. The further inward that your brushes reach, the lower the ultimate voltage of the machine.
The wood suggestion is for ease of machining and lower cost. The wood will shield the joint in much the same way that metal would. I have not done this myself, but from what I've read this is a viable alternative. It will be much easier to carve a wooden sphere to have involute edges around the conductors than to machine a hunk of aluminum or brass to the same shape. The involute edges are a refinement, don't worry about it unless you get to the point of tweaking things. I've used normal plumbing pipe T-unions with good results, though the edges of the union are a source of leakage. a bead of solder run around the edge and then filed/sanded/buffed smooth to make a gentle transition should eliminate this as a problem. I didn't do this since I wanted the parts to remain removable. I filed down the edges anyways, which may have helped.
A better solution than directly welding a stub would be to use a steel T-nut deformed into a cup shape that matches the curvature of the sphere, and silver-solder it in place. The stud would be secured to the pipe end-cap and then the T-nut would thread down onto this. The proximity of the sphere will shield the "sharp" shape of the conductor immediately beneath it - the large radius of the sphere forces the E-field to have a small gradient.
The electrode configuration was chosen since that's what the machines making the biggest sparks use. It was also limited by what I had on hand.
Registered Member #3343
Joined: Thu Oct 21 2010, 04:06PM
Location: Toronto
Posts: 311
Awesomatt,
Well, a good start.
Maybe you may start with sketching the wood base, adding the dimensions and the details how to joint the structural elements... The wood base has to provide suport to the drive shaft and weells shaft... If you post the sketch I can draw in Autocad Regards Newton
Registered Member #4454
Joined: Sun Feb 26 2012, 12:47AM
Location: Western Canada
Posts: 74
wrote ... Also, bear in mind that you do not need the collector brushes/combs to cover the whole length of the sectors. So long as at least some part of the sectors pass underneath the brushes, pickup will occur. The further inward that your brushes reach, the lower the ultimate voltage of the machine.
Oh, that's new info to me. Why do neutralizer brushes farther inside reduce the voltage?
Is that true of the combs as well? I was figuring the combs should cover the full length of the contacts.
wrote ... I've used normal plumbing pipe T-unions with good results, though the edges of the union are a source of leakage. a bead of solder run around the edge and then filed/sanded/buffed smooth to make a gentle transition should eliminate this as a problem.
I was planning on using plumbing fixtures as much as possible, yeah.
Newton - Thank you very much for the offer but they have in-house people to do that for them. I just have to have things ready for them to describe how much artistic and engineering license they have with it.
This site is powered by e107, which is released under the GNU GPL License. All work on this site, except where otherwise noted, is licensed under a Creative Commons Attribution-ShareAlike 2.5 License. By submitting any information to this site, you agree that anything submitted will be so licensed. Please read our Disclaimer and Policies page for information on your rights and responsibilities regarding this site.


 Giant Wimshurst Machine - could use some guidance