
Qickie Coilgun
..., Mon Jun 18 2007, 10:35PMWell, on the 14th I finished my Jr year on High School, and was looking to make something that, you know, launched pieces of metal at high velocities or exploded or at least burned like heck. I started by setting a few pieces of Mg (salvaged from a broken laptop) ablaze, but that wasn't quite as impressive as I hoped, and I didn't feel like grinding it to a powder to get what I wanted. From there I fired up a small gas powered RC car for for a while, but it kept overheating and was being a general pain in the ass. So then I decided to dig out an old coil gun that I had started about 2 yeas ago. I at least wanted it to be quick, but I ended up putting about 10hrs into it, which is still pretty quick by my standards...
I had wanted to fire it using an IGBT, as to maximize efficiency, so I had designed the coil to be about 1r of resistance--so I would pull the rated 700a of my IGBT brick at 700v. Of course, you can't get any real energy out of a mere .5MW Ipk, unless you want to launch 10lb projectiles, so the project got scraped.
But I decided, what the heck, lets give it a try. For the pulse generation I wired up a pic18f1220 (since I was doing devel work with one at the time, so the IDE was all set up) feeding a pair of tc4421/tc4422's and into a SKM300GB063D brick, which dumped a 5mf/350v cap into my 1r coil would over a .675" former. Then I strapped I mot that was sitting there with a rectifier all ready to go, a ton of electrical tape and I was here:
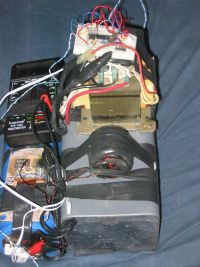
It was about midnight at this point, so I set the pulse for 1ms, charged to like 30v and hit the button, and it actually sorta shot a little. So then I decided to try for 100v, so I hit the button and the projectile did leave with a bit of force, but the cap voltage was still like 98v--so I figured too short of a pulse. I decided to set it for 100ms for the heck of it, and let if fire. Time the projectile just oscillated in the coil. Then I rechecked my math, and realized that my time constant was about 10ms, and I needed it about .5ms.
So I hit the hay, spent the next day painting the house, and then got back on it Saturday. I did some calcs, and decided that I needed to run about 7kA to get what I wanted, and since there was no way to get that with an transistor I decided it was SCR time. So I dug out one of my 2 puck SCR's that I got a few years ago. Of course the part number didn't turn up anything but spam and me asking what the ratings where when I got it, so I broke out my trusty 1992 NTE product listing, and found the picture of a puck SCR that was the same size of mine (nte5595) and found the data for it, and determined that I should be able to run 10kA with it, so all I needed was a clamp. So I looked around form something to use, and spied an Al heat sink that was about 1.4" thick excluding the fins. I then cut it up with a circular say, and then spent about 2hrs trying to remove the fins I didn't need and drill some holes for 1/2" bolts. I ended up using a reciprocating saw and woodcutting blade to do it, after trying a large variety of dremel based solutions. But alas, I did get the clamp made. Next was was insulation, and I decided to just put a piece of 1/8" PVC on one side of the SCR, and hope that it doesn't ooze out over time...
Then I needed a new coil, this time rated to take 7kA, so I figured I had better use some pretty beefy wire. But I didn't have anything bigger than 20awg in stock, so
I started looking in the transformer pile, and found one I had stripped out of an UPS, with like #12 for the low voltage winding. So I spent about 2 hours (from 9-11pm) stripping the wire out while watching a movie. Then I started to look for a barrel, and since I couldn't find anything I decided to make one out of some OH transparencies, and a bit of CA glue for good luck.
Then I ripped out the coil coil/switch, and installed the new pair. and started charging. At 30v it did work, so I started upping the voltage, and things were going great until I noticed that I was getting pretty nasty voltage reversals (10v at 50v in) so it was time for some reverse protection. So I slapped a rurg8060 diode on there (80a) and fired at 150v and the diode died. So then I decided to use the diode out of the old IGBT switch, (which consisted of 2 dies that were about 3/8" on a side in parallel) but one of the dies shorted with a 200v shot. So I figured there must have been something wrong with it, and grabbed a SKM195GAL123D IGBT 1/2 brick, that had an extra diode in it. That on lasted for the full 350v, so I was happy.
But I wasn't really happy that I was having suckback problems; I had to have the projectile almost all of the way out of the coil at 350v. So I was thinking of removing a few turns of the coil (since I have plenty of headroom with the SCR) but then I realized that an even better solution would be to just add another cap in series. So I did

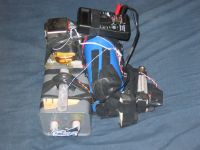
Then I deiced it was time to do some velocity measurements, but I didn't have/want to build a chrono, so I decided to shoot it up and then see how high it went. From there I could calculate the potential energy of a 25g weight at x feet, and that would be my muzzle velocity. So I took it outside, and shot at about 400v and lost sight of the slug, but heard it fall about 4 seconds later--which would imply about 1.5J of energy, from 200J, so about .8% efficiency. But then I started to realize that shooting a bullet strait up wasn't a very smart thing to do (since what goes up must come down....) so I decided to just shoot at a board for now. So I charged to 700v, hit the button, and made a pretty sweet dent in the piece of wood I was shooting at. But the next shot I was met with a pretty loud BANG as the diode exploded

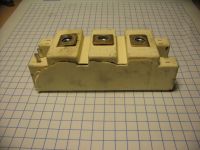
The die was pretty well vaporised, and there were wire bonds floating around in the goo.
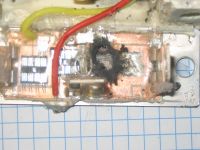
So I decide to use the biggest brick I had around (SKM400GB23D) but he died at about 650v. So then I decided I was tired of blowing up my IGBTs for the diodes, so I just grabbed another RURG8060 and a few .2R resistors so that I was running the diode in the safe zone.
So I headed back outside, and found a plumb laying on the ground, so I stuck it on a nail and set it a few inches from the barrel, and fired:
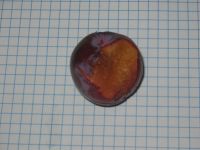
So then I decided to do a range test, and set the barrel as level as I could and aimed it down my driveway. The first shot went about 70ft, the second one was aimed down somehow and bounced (hard) at about 40ft, and then hit again about 100ft. And my driveway is sloped up at IIRC .25in/ft up. Really the numbers don't mean jack, but I am guessing a muzzle velocity about 40m/s based on my observations. And for a 25g slug, that is about 20J, which with 600J of input power is an astounding 3% efficiency. I would give that a +/- 200% error range, so I am getting at least 1%

peter
Re: Qickie Coilgun
Part Scavenger, Tue Jun 19 2007, 10:45PM
Looks like it took you longer to put the post together!!! LOL
Pretty cool man.
Part Scavenger, Tue Jun 19 2007, 10:45PM
Looks like it took you longer to put the post together!!! LOL
Pretty cool man.
Re: Qickie Coilgun
..., Tue Jun 19 2007, 11:17PM
Most of the insanely long posts I make (this being no exception) were composed while watching a movie with the family, so I am trapped with just a laptop for like 2 hours...
In any case, all wasn't lost with the IGBTs I killed (I finished off 2 1/2 dead SKM400GB063Ds a 1/2 dead SKM300GB063D, and a 1/2 dead SKM195GB123D) be blowing the diode in anti-parallel to the fet, wich quickly killed the fet), today took them apart and took a torch to them, liberating a little over a pound of oxygen-free 1/8" copper plate, and about 15 pieces of 1" by 1.5" .01" thick alumina that is copper plated on both sides :) Also, I think that there were 3 IGBTs that weren't killed (only the one in parallel to it died) so I have a few IGBTs that are just soldered to an alumina plate and covered in silicone goo that are rated for like 200a//1kv. Suppose they would make a good small coil gun or something...
Re: Qickie Coilgun
rupidust, Thu Jun 21 2007, 02:04AM
I decided count = 12. Try to only decide when presented with a choice. Equally important, CROP and SIZE images better.
rupidust, Thu Jun 21 2007, 02:04AM
I decided count = 12. Try to only decide when presented with a choice. Equally important, CROP and SIZE images better.
Print this page