
Semikron DRSSTC Twin Coils!
loneoceans, Fri Apr 17 2015, 01:35AMHi everyone,
I recently got some white Semikron IGBTs which seem to be more common in Europe than in the US, (vs the black Powerex / Mitsubishi IGBTs). So I thought it would be a good exercise to build a medium sized coil from these IGBTs, and I thought I'll start a thread to document the design and construction progress. These IGBTs are the ultra-fast variety (125 series 400A) which seem to be designed for high frequency resonant inverter operation. I have only used CMx00 IGBTs, so I'll find out how well these stack up against the competition, seeing that there aren't too many Semikron IGBT coils around the forum. Steve Conner's Odin coil comes to mind.
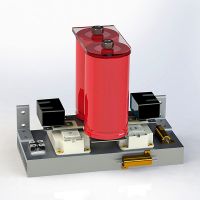
The first thing I did was to work around my constraints, and started designing the bridge in CAD as a very rough layout. I had a bunch of nice Itelcond capacitors on hand so these will form the main bus capacitors, which will be mounted on a laminated bus directly to the IGBTs for the lowest possible bus inductance. The frame will be made of basic 80-20 aluminium framing.
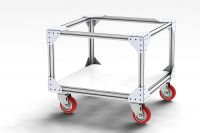
In deciding the operating frequency of the coil, I wanted to balance the frequency with being low enough for the IGBTs to handle, but not too low for it to become annoying to wind (too thin wire). I decided on a 8" secondary to reduce the number of turns, and the length to be about 30" - though the size was basically the largest pipe I could fit on a lathe I happen to have access to. Adding a suitably sized toroid about the same size of the coil, this gave me an operating frequency for about 60 - 65kHz with AWG 26 wire. I haven't decided how I would get the toroid done, but this could be a spun toroid, or a fancy spiral toroid inspired by zrg's large coil.
For the tank capacitors, I decided to use large snubber capacitors - again parts I had on hand, which will give me a good 375nF capacitor bank at lots of volts and lots of Irms capability. From this, I did a quick mockup of how the coil will look like and it should stand about 5 feet tall.
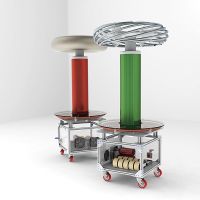
Since the coil looks about right, it's time for construction! Stay tuned as the project progresses.
Re: Semikron DRSSTC Twin Coils!
Mads Barnkob, Fri Apr 17 2015, 07:57AM
Looks good and you seem to have all the basic numbers in the proper ratios. A medium coil like this should pose no particular problem.
A few things you should consider
- The aluminium frame might be too close to the primary and could present a closed 1 turn loop that would eat power.
- Watch the voltage rating of the power resistors on the heat sink. If you are burning off two too different potentials, you might risk flash over to the heat sink .
Re: Semikron DRSSTC Twin Coils!
loneoceans, Fri Apr 17 2015, 04:52PM
Thanks these were indeed things I were considering during the design. I decided on 80/20 because they're easy to put together and the workshop I have access to has a lot of leftover small parts. Because of the same issue you talked about, you can see that I raised the primary up on stands away from that top square 'ring'. I believe it will eat power, but hopefully not too much. Depending on how this works, I'll also try to see if a gap is required or not.
For the resistor question, I was also concerned about this and checked the datasheet to make sure. It seems like the rated operating voltage is (P*R)^0.5, which puts me just around 1.2kV for the bleeder resistor. The 25W packages are rated for 1kVrms and the 50W packages 2kVrms, so I think they should hold up.
Right now I've got most of the parts of the bridge so I'll begin constructing that soon!
Question for people who have used Semikron bricks before - what sort of current do you push these guys to? Mine are 400A IGBTs so I think 800A would be good for robustness, and 1.2kA should still be ok, despite the Icrm being only 600A :)
loneoceans, Fri Apr 17 2015, 04:52PM
Mads Barnkob wrote ...
Looks good and you seem to have all the basic numbers in the proper ratios. A medium coil like this should pose no particular problem.
A few things you should consider
- The aluminium frame might be too close to the primary and could present a closed 1 turn loop that would eat power.
- Watch the voltage rating of the power resistors on the heat sink. If you are burning off two too different potentials, you might risk flash over to the heat sink .
Thanks these were indeed things I were considering during the design. I decided on 80/20 because they're easy to put together and the workshop I have access to has a lot of leftover small parts. Because of the same issue you talked about, you can see that I raised the primary up on stands away from that top square 'ring'. I believe it will eat power, but hopefully not too much. Depending on how this works, I'll also try to see if a gap is required or not.
For the resistor question, I was also concerned about this and checked the datasheet to make sure. It seems like the rated operating voltage is (P*R)^0.5, which puts me just around 1.2kV for the bleeder resistor. The 25W packages are rated for 1kVrms and the 50W packages 2kVrms, so I think they should hold up.
Right now I've got most of the parts of the bridge so I'll begin constructing that soon!
Question for people who have used Semikron bricks before - what sort of current do you push these guys to? Mine are 400A IGBTs so I think 800A would be good for robustness, and 1.2kA should still be ok, despite the Icrm being only 600A :)
Re: Semikron DRSSTC Twin Coils!
Hydron, Fri Apr 17 2015, 07:45PM
I've pushed the 200A 125s to at least 650A at ~80kHz without issue. Nice and quick, much less ringing than with CM300s. 400A at 300kHz (!) worked too for a short run :).
Saturation voltage is pretty high, otherwise they seem great. I ended up putting CM300s into my coil instead, but that was mainly because they were more proven performers for ~1kA peak current.
Edit: actually it was 750A, as in this post: Seems they've been pushed much harder too, that thread is probably quite useful for you.
Hydron, Fri Apr 17 2015, 07:45PM
I've pushed the 200A 125s to at least 650A at ~80kHz without issue. Nice and quick, much less ringing than with CM300s. 400A at 300kHz (!) worked too for a short run :).
Saturation voltage is pretty high, otherwise they seem great. I ended up putting CM300s into my coil instead, but that was mainly because they were more proven performers for ~1kA peak current.
Edit: actually it was 750A, as in this post:
 Seems they've been pushed much harder too, that thread is probably quite useful for you.
Re: Semikron DRSSTC Twin Coils!
Hazmatt_(The Underdog), Sat Apr 18 2015, 01:46AM
Hey I got a question here, When you guys build these things on a metal base, which acts like a shorted secondary turn, how do you deal with the current flowing through the metal?
At high power does the base even get warm? and how much actual power loss is there would you estimate?
Re: Semikron DRSSTC Twin Coils!
loneoceans, Sat Apr 18 2015, 04:13AM
Hydron thanks that was very useful! It's good to hear that the 200A 125s have had good performance from some coils! so I think I can safely push these IGBTs to 1.2kA I think! That's correct as well, it looks like conductive losses will be higher due to the higher saturation voltage, but they do seem to have less switching loss than the CM300s. It also seems like Steve Conner's Odin coil didn't have good luck with the T4 IGBTs, but his new bridge of 400A 123s look to be doing well making 9 feet of spark at around 1+kA, as with Eric reporting 1.2kA with 200A 125s. So with this coil, hopefully I'll be able to add another data point :) for these IGBTs.
What do you mean metal base? I found that any metal plate near or middle of the primary coil gets blisteringly hot in a short amount of time (tens of seconds), since my first DRSSTC had a metal plate at the bottom of the secondary acting as the ground connector, and I quickly found out how hot it got! However, it didn't seem to cause much % power loss since when I removed it I didn't see any noticeable change in performance.
loneoceans, Sat Apr 18 2015, 04:13AM
Hydron wrote ...
I've pushed the 200A 125s to at least 650A at ~80kHz without issue. Nice and quick, much less ringing than with CM300s. 400A at 300kHz (!) worked too for a short run :).
Saturation voltage is pretty high, otherwise they seem great. I ended up putting CM300s into my coil instead, but that was mainly because they were more proven performers for ~1kA peak current.
Edit: actually it was 750A, as in this post: Seems they've been pushed much harder too, that thread is probably quite useful for you.
I've pushed the 200A 125s to at least 650A at ~80kHz without issue. Nice and quick, much less ringing than with CM300s. 400A at 300kHz (!) worked too for a short run :).
Saturation voltage is pretty high, otherwise they seem great. I ended up putting CM300s into my coil instead, but that was mainly because they were more proven performers for ~1kA peak current.
Edit: actually it was 750A, as in this post:
 Seems they've been pushed much harder too, that thread is probably quite useful for you.
Hydron thanks that was very useful! It's good to hear that the 200A 125s have had good performance from some coils! so I think I can safely push these IGBTs to 1.2kA I think! That's correct as well, it looks like conductive losses will be higher due to the higher saturation voltage, but they do seem to have less switching loss than the CM300s. It also seems like Steve Conner's Odin coil didn't have good luck with the T4 IGBTs, but his new bridge of 400A 123s look to be doing well making 9 feet of spark at around 1+kA, as with Eric reporting 1.2kA with 200A 125s. So with this coil, hopefully I'll be able to add another data point :) for these IGBTs.
Hazmatt_(The Underdog) wrote ...
Hey I got a question here, When you guys build these things on a metal base, which acts like a shorted secondary turn, how do you deal with the current flowing through the metal?
At high power does the base even get warm? and how much actual power loss is there would you estimate?
Hey I got a question here, When you guys build these things on a metal base, which acts like a shorted secondary turn, how do you deal with the current flowing through the metal?
At high power does the base even get warm? and how much actual power loss is there would you estimate?
What do you mean metal base? I found that any metal plate near or middle of the primary coil gets blisteringly hot in a short amount of time (tens of seconds), since my first DRSSTC had a metal plate at the bottom of the secondary acting as the ground connector, and I quickly found out how hot it got! However, it didn't seem to cause much % power loss since when I removed it I didn't see any noticeable change in performance.
Re: Semikron DRSSTC Twin Coils!
loneoceans, Wed Apr 22 2015, 08:37PM
More progress has been made. Here are continued updates.
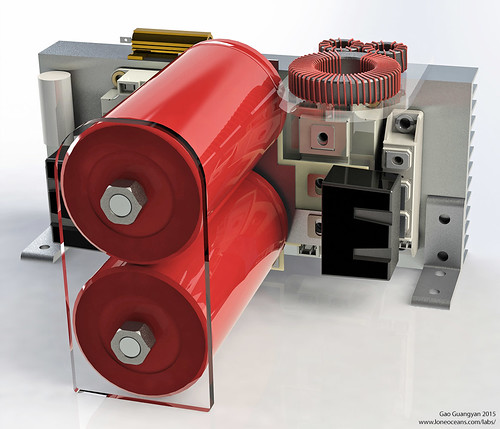
I finalized the bridge design and it uses an integrated rectifier, laminated bus and voltage doubler. This allows me to put all connections on the bus plates and it turned out better than I thought it would in the computer! So it's time to build it.
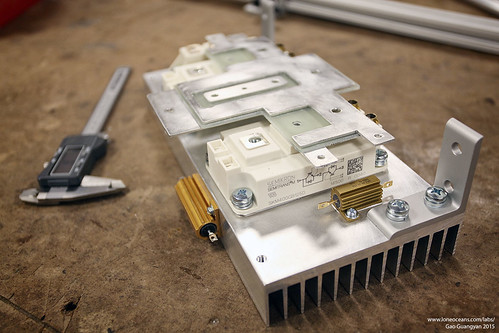
I drilled and tapped the mounting holes on a large heatsink. This went easily enough since I had everything in CAD and I could just print out a to-scale drawing and punch out the holes :). The mounting brackets and bleeder resistors were also mounted, along with the two Semikron bricks.
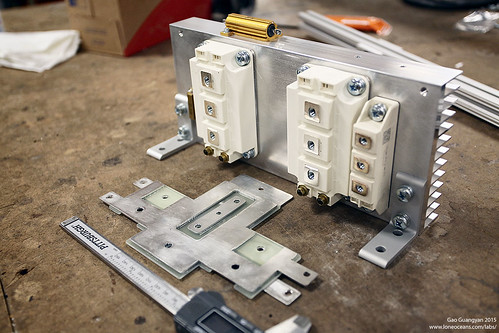
The laminated bus was cut out from aluminium and fiberglass sheeting and glued together. The result is a little bit rough on the edges since it's hand made, but I think it turned out pretty good.
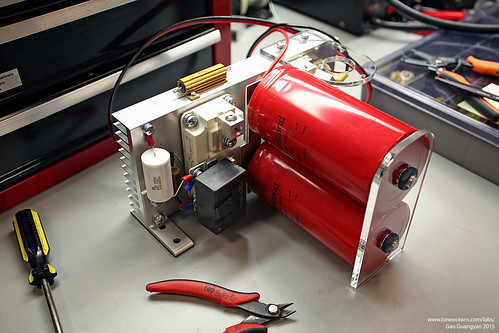
In goes the bus caps. It's nice how everything finally came together exactly as it looked like in CAD.
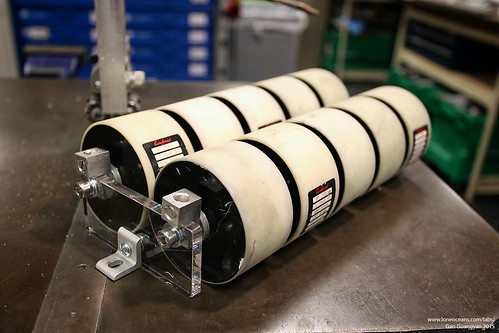
The MMC is pretty large, but at 150Arms it should be more than enough for the coil. I made some nice acrylic supports for it.
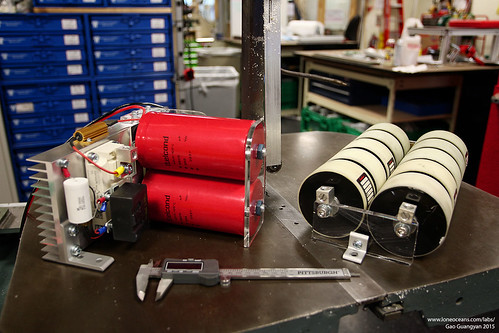
Overall I think I'm quite happy with how this came out.
Onwards to continue on the rest of the coil!
loneoceans, Wed Apr 22 2015, 08:37PM
More progress has been made. Here are continued updates.

I finalized the bridge design and it uses an integrated rectifier, laminated bus and voltage doubler. This allows me to put all connections on the bus plates and it turned out better than I thought it would in the computer! So it's time to build it.

I drilled and tapped the mounting holes on a large heatsink. This went easily enough since I had everything in CAD and I could just print out a to-scale drawing and punch out the holes :). The mounting brackets and bleeder resistors were also mounted, along with the two Semikron bricks.

The laminated bus was cut out from aluminium and fiberglass sheeting and glued together. The result is a little bit rough on the edges since it's hand made, but I think it turned out pretty good.

In goes the bus caps. It's nice how everything finally came together exactly as it looked like in CAD.

The MMC is pretty large, but at 150Arms it should be more than enough for the coil. I made some nice acrylic supports for it.

Overall I think I'm quite happy with how this came out.

Onwards to continue on the rest of the coil!
Re: Semikron DRSSTC Twin Coils!
Gabriel35, Thu Apr 23 2015, 03:42AM
State of the art work! Pretty clean and good looking, Congrats!
Gabriel35, Thu Apr 23 2015, 03:42AM
State of the art work! Pretty clean and good looking, Congrats!
Re: Semikron DRSSTC Twin Coils!
hen918, Thu Apr 23 2015, 04:57PM
+1!
I wish I had the attention span to get my stuff to look like that!
hen918, Thu Apr 23 2015, 04:57PM
Gabriel35 wrote ...
State of the art work! Pretty clean and good looking, Congrats!
State of the art work! Pretty clean and good looking, Congrats!
+1!
I wish I had the attention span to get my stuff to look like that!
Re: Semikron DRSSTC Twin Coils!
loneoceans, Fri Apr 24 2015, 05:32PM
Thanks for the comments everyone! Would also appreciate any suggestions or ideas as I go along.
Continuing on the project, the bridge and MMCs were getting hard to move around since they're quite heavy, so I got started working on the enclosure. I got some aluminium framing measured and sawed up, and started putting them together.
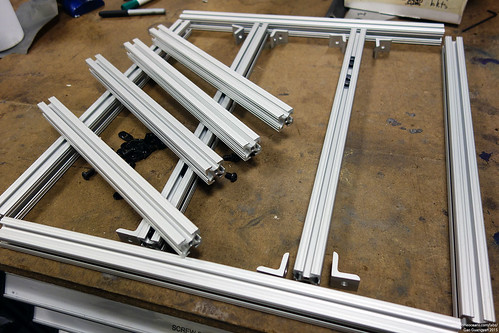
Framing is relatively easy to put together, if not somewhat expensive. However this got together quite fast with a cordless screwdriver.

I also bought some nice caster wheels for the coil since I expect this to be quite heavy when it's done.
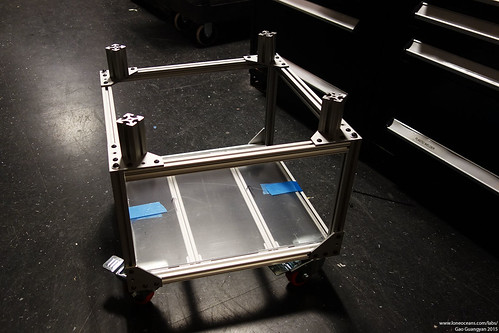
Finally I cut up a piece of polycarbonate which will act as the main base for the coil. The nice thing about using this framing is that I plan to simply cut out side-panels which will slot directly into the grooves of the frame. I tried to make the sides to be the golden ratio; no idea if this makes it look nicer or not
Next up will be to make the primary coil platform and supports, and to wind the primary coil. The secondary coil needs to be done early as well since it'll take some time for the varnish to dry once it is wound.
loneoceans, Fri Apr 24 2015, 05:32PM
Thanks for the comments everyone! Would also appreciate any suggestions or ideas as I go along.
Continuing on the project, the bridge and MMCs were getting hard to move around since they're quite heavy, so I got started working on the enclosure. I got some aluminium framing measured and sawed up, and started putting them together.

Framing is relatively easy to put together, if not somewhat expensive. However this got together quite fast with a cordless screwdriver.

I also bought some nice caster wheels for the coil since I expect this to be quite heavy when it's done.

Finally I cut up a piece of polycarbonate which will act as the main base for the coil. The nice thing about using this framing is that I plan to simply cut out side-panels which will slot directly into the grooves of the frame. I tried to make the sides to be the golden ratio; no idea if this makes it look nicer or not

Next up will be to make the primary coil platform and supports, and to wind the primary coil. The secondary coil needs to be done early as well since it'll take some time for the varnish to dry once it is wound.
Re: Semikron DRSSTC Twin Coils!
Steve Ward, Mon Apr 27 2015, 07:45AM
Just as in a shorted strike-rail, I'd bet there will be significant current flowing in your aluminum frame unless you take care to put a break in each square loop formed by it (not just the top, but the sides too). If the frame's resistance is low, then the result is simply that it shorts out some inductance of the primary coil, which is not ideal because its increasing the resistance to achieve that inductance.
Re: Semikron DRSSTC Twin Coils!
Mads Barnkob, Mon Apr 27 2015, 12:02PM
This was also my concern in a previous post, but now that I have given it some thought, I would like to see it run like it is and have him report back if there was any heat loss in the frame work.
Some years back when I worked with brewery automation, we had preform feeder consisting of two rolls that would sort them out before heating and blowing them up to bottles. We had great trouble with bus modules disconnecting from the network and after a reboot would seem fine again.
Long story short, sorter part of the machine was done in similar aluminium profiles, all interconnected by 10mm^2 wire for grounding. The problem turned out to be static electricity buildup and the profiles was close to be isolating rather than acting as a good ground.
Wether this profile only acts with high resistance to static because of the surface treatment or it also has high resistance against induction, not so sure :)
But prepare your work for a "quick-fix" so you can cut out a piece and avoid the closed loops if it turns out to be a problem. A problem might also take a while to find, it could still eat power but also dissipate it quite good.
Mads Barnkob, Mon Apr 27 2015, 12:02PM
Steve Ward wrote ...
Just as in a shorted strike-rail, I'd bet there will be significant current flowing in your aluminum frame unless you take care to put a break in each square loop formed by it (not just the top, but the sides too). If the frame's resistance is low, then the result is simply that it shorts out some inductance of the primary coil, which is not ideal because its increasing the resistance to achieve that inductance.
Just as in a shorted strike-rail, I'd bet there will be significant current flowing in your aluminum frame unless you take care to put a break in each square loop formed by it (not just the top, but the sides too). If the frame's resistance is low, then the result is simply that it shorts out some inductance of the primary coil, which is not ideal because its increasing the resistance to achieve that inductance.
This was also my concern in a previous post, but now that I have given it some thought, I would like to see it run like it is and have him report back if there was any heat loss in the frame work.
Some years back when I worked with brewery automation, we had preform feeder consisting of two rolls that would sort them out before heating and blowing them up to bottles. We had great trouble with bus modules disconnecting from the network and after a reboot would seem fine again.
Long story short, sorter part of the machine was done in similar aluminium profiles, all interconnected by 10mm^2 wire for grounding. The problem turned out to be static electricity buildup and the profiles was close to be isolating rather than acting as a good ground.
Wether this profile only acts with high resistance to static because of the surface treatment or it also has high resistance against induction, not so sure :)
But prepare your work for a "quick-fix" so you can cut out a piece and avoid the closed loops if it turns out to be a problem. A problem might also take a while to find, it could still eat power but also dissipate it quite good.
Re: Semikron DRSSTC Twin Coils!
loneoceans, Mon Apr 27 2015, 06:10PM
Thanks Steve and Mads for your comments :) I did some quick tests and I found that (as Mads mentioned) that the anodizing of the aluminium framing is actually pretty solid, which ended up being quite high resistance. This would as you can imagine, fluctuate greatly depending on how hard the connection screws 'bite' into the aluminium and break the anodizing. Since I have a setup going already though, I thought I might as well make this into an experiment to see how it works with or without a gap.
My backup plan is to simply replace the top connectors with fiberglass or similar flat plates instead of aluminium, with kapton tape between the member joints. Replacing just one of these opens the top square loop and two side loops, and replacing just two of them opens all 5 loops, so I'll see how it performs with and without.
Back to construction, more progress was made!
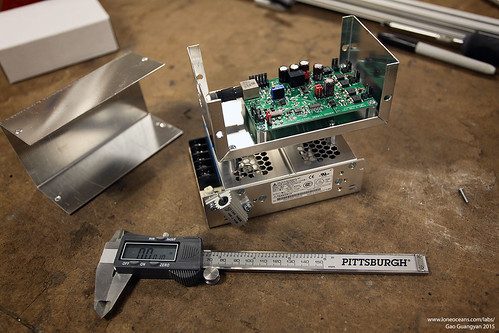
The driver will be powered by a 75W switching power supply, which will also run the fans and under-glow lights. I'm using my version of the UD2.7 here. I am planning to use the resistor for the lights because they seem a bit too bright. Appropriate holes were drilled into the grounded metal box which holds the driver.
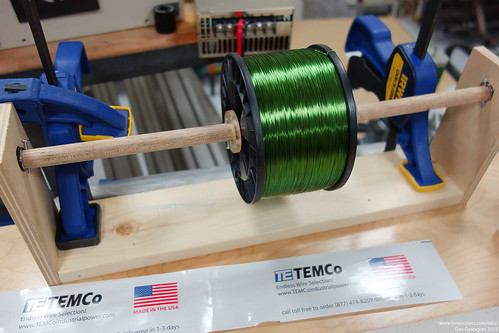
I bought a spool of wire on ebay and made a little jig for it.
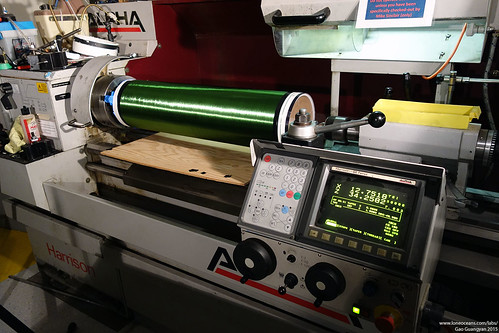
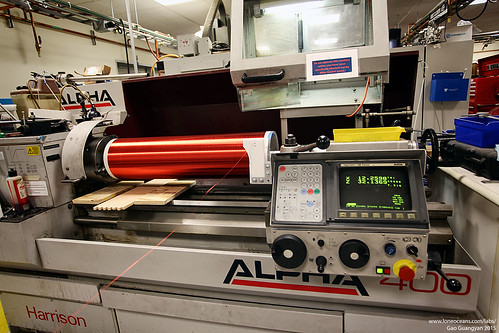
I got 8" PVC pipe and machined the end-caps for it out of polycarbonate, mounted it carefully on the lathe, and started winding it. I was also able to get the auto-feeder going, which was very cool to watch since the coil basically winds itself. I had to stop a few times to manually adjust the spacing since the wire thickness+insulation doesn't match the feed rate perfectly, but it worked out in the end. Also note that it basically takes up the entire lathe - couldn't have made a much bigger coil at all! Even with the lathe to help, this still took about an hour. Once done, I coated it with polyurethane varnish and left it on the lathe to dry. The coil will take several coats for durability.
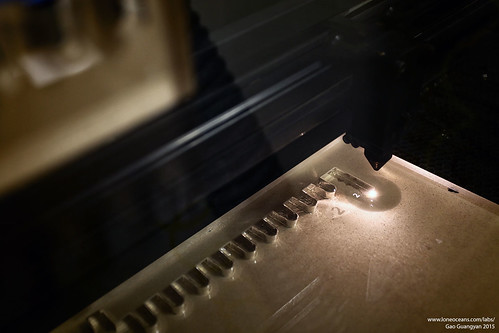
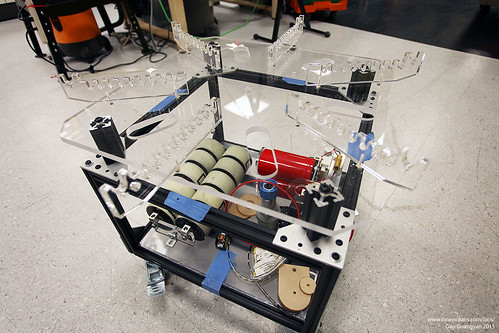
Primary supports were laser cut using a 75W laser cutter. I also engraved numbers on them since they are all individually different, to account for the spiral.
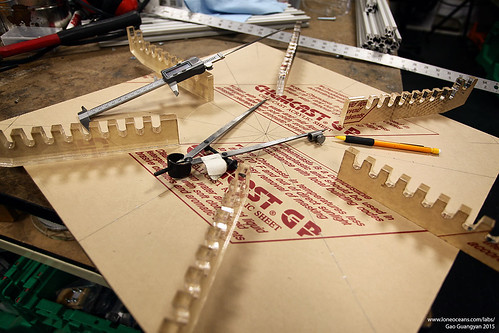
The primary table was made using a large acrylic sheet and marked the old-fashioned way with a compass and straight edge.
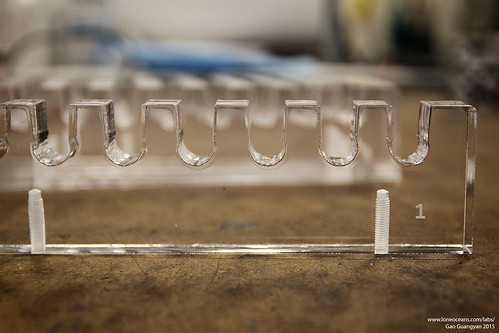
Primary supports then drilled and tapped and screwed onto the primary table.
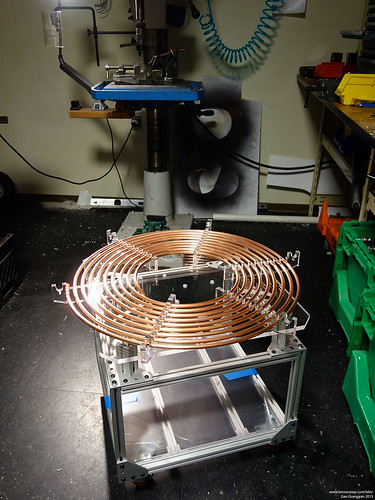
Finally, the primary goes together. This went quite easily with 3/8" copper tubing. I designed the primary supports to be a 'snap-in' fit, so they all fit together perfectly and in-place with no zip-ties required :)
Most of the components are done at this point, so the next time is to make all the small items like primary connectors and side panels, and the wiring which will definitely take more time than I think it will.
loneoceans, Mon Apr 27 2015, 06:10PM
Mads Barnkob wrote ...
This was also my concern in a previous post, but now that I have given it some thought, I would like to see it run like it is and have him report back if there was any heat loss in the frame work.
Some years back when I worked with brewery automation, we had preform feeder consisting of two rolls that would sort them out before heating and blowing them up to bottles. We had great trouble with bus modules disconnecting from the network and after a reboot would seem fine again.
Long story short, sorter part of the machine was done in similar aluminium profiles, all interconnected by 10mm^2 wire for grounding. The problem turned out to be static electricity buildup and the profiles was close to be isolating rather than acting as a good ground.
Wether this profile only acts with high resistance to static because of the surface treatment or it also has high resistance against induction, not so sure :)
But prepare your work for a "quick-fix" so you can cut out a piece and avoid the closed loops if it turns out to be a problem. A problem might also take a while to find, it could still eat power but also dissipate it quite good.
Steve Ward wrote ...
Just as in a shorted strike-rail, I'd bet there will be significant current flowing in your aluminum frame unless you take care to put a break in each square loop formed by it (not just the top, but the sides too). If the frame's resistance is low, then the result is simply that it shorts out some inductance of the primary coil, which is not ideal because its increasing the resistance to achieve that inductance.
Just as in a shorted strike-rail, I'd bet there will be significant current flowing in your aluminum frame unless you take care to put a break in each square loop formed by it (not just the top, but the sides too). If the frame's resistance is low, then the result is simply that it shorts out some inductance of the primary coil, which is not ideal because its increasing the resistance to achieve that inductance.
This was also my concern in a previous post, but now that I have given it some thought, I would like to see it run like it is and have him report back if there was any heat loss in the frame work.
Some years back when I worked with brewery automation, we had preform feeder consisting of two rolls that would sort them out before heating and blowing them up to bottles. We had great trouble with bus modules disconnecting from the network and after a reboot would seem fine again.
Long story short, sorter part of the machine was done in similar aluminium profiles, all interconnected by 10mm^2 wire for grounding. The problem turned out to be static electricity buildup and the profiles was close to be isolating rather than acting as a good ground.
Wether this profile only acts with high resistance to static because of the surface treatment or it also has high resistance against induction, not so sure :)
But prepare your work for a "quick-fix" so you can cut out a piece and avoid the closed loops if it turns out to be a problem. A problem might also take a while to find, it could still eat power but also dissipate it quite good.
Thanks Steve and Mads for your comments :) I did some quick tests and I found that (as Mads mentioned) that the anodizing of the aluminium framing is actually pretty solid, which ended up being quite high resistance. This would as you can imagine, fluctuate greatly depending on how hard the connection screws 'bite' into the aluminium and break the anodizing. Since I have a setup going already though, I thought I might as well make this into an experiment to see how it works with or without a gap.
My backup plan is to simply replace the top connectors with fiberglass or similar flat plates instead of aluminium, with kapton tape between the member joints. Replacing just one of these opens the top square loop and two side loops, and replacing just two of them opens all 5 loops, so I'll see how it performs with and without.
Back to construction, more progress was made!

The driver will be powered by a 75W switching power supply, which will also run the fans and under-glow lights. I'm using my version of the UD2.7 here. I am planning to use the resistor for the lights because they seem a bit too bright. Appropriate holes were drilled into the grounded metal box which holds the driver.

I bought a spool of wire on ebay and made a little jig for it.

I got 8" PVC pipe and machined the end-caps for it out of polycarbonate, mounted it carefully on the lathe, and started winding it. I was also able to get the auto-feeder going, which was very cool to watch since the coil basically winds itself. I had to stop a few times to manually adjust the spacing since the wire thickness+insulation doesn't match the feed rate perfectly, but it worked out in the end. Also note that it basically takes up the entire lathe - couldn't have made a much bigger coil at all! Even with the lathe to help, this still took about an hour. Once done, I coated it with polyurethane varnish and left it on the lathe to dry. The coil will take several coats for durability.

Primary supports were laser cut using a 75W laser cutter. I also engraved numbers on them since they are all individually different, to account for the spiral.

The primary table was made using a large acrylic sheet and marked the old-fashioned way with a compass and straight edge.

Primary supports then drilled and tapped and screwed onto the primary table.

Finally, the primary goes together. This went quite easily with 3/8" copper tubing. I designed the primary supports to be a 'snap-in' fit, so they all fit together perfectly and in-place with no zip-ties required :)
Most of the components are done at this point, so the next time is to make all the small items like primary connectors and side panels, and the wiring which will definitely take more time than I think it will.

Re: Semikron DRSSTC Twin Coils!
loneoceans, Fri May 01 2015, 06:34AM
After a lot more work, I managed to put the coil together
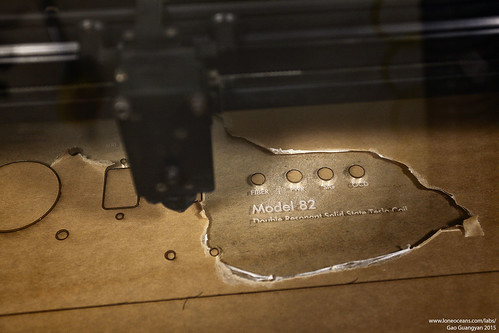
The side panels were cut out on the laser cutter. This went pretty fast and it's great to have technology to help.
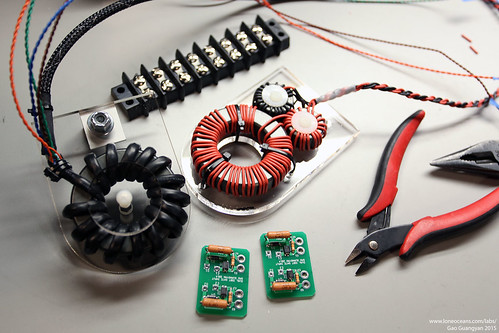
Here you can see the CT, GDT and gate drives all ready for assembly.
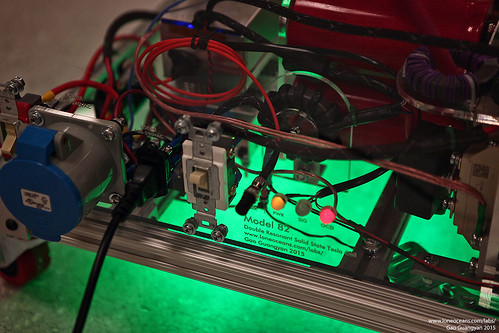
The wiring was a lot of work and still leaves a lot to be desired, but just wanted to get it together. Tested the wiring and started low-power testing without the secondary in place. Everything works great with perfect ZVS.
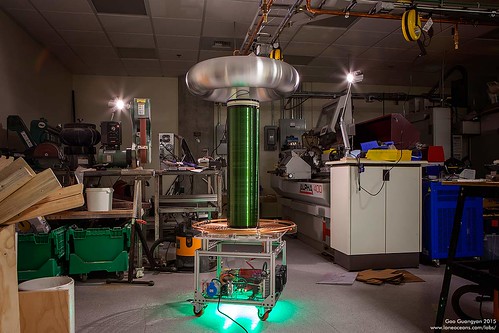
And the coil is completed, topped of with a spun toroid and green underglow. Time to plug it in!
loneoceans, Fri May 01 2015, 06:34AM
After a lot more work, I managed to put the coil together


The side panels were cut out on the laser cutter. This went pretty fast and it's great to have technology to help.

Here you can see the CT, GDT and gate drives all ready for assembly.

The wiring was a lot of work and still leaves a lot to be desired, but just wanted to get it together. Tested the wiring and started low-power testing without the secondary in place. Everything works great with perfect ZVS.

And the coil is completed, topped of with a spun toroid and green underglow. Time to plug it in!
Re: Semikron DRSSTC Twin Coils!
Mads Barnkob, Fri May 01 2015, 06:56AM
It looks real good, that laser cutter is really a improvement to good looking and fast made pieces :) I really like the idea of making the primary holder snap-in tight.
What kind of size / model / price is such a laser cutter machinery?
Where did you buy the toroid?
Re: Semikron DRSSTC Twin Coils!
loneoceans, Fri May 01 2015, 08:53AM
Thanks :) In fact I've been using all snap-in primary holders for almost all of my coils, usually setting the hole size to be the exact size of the primary conductor and the slot in to be a V-shape taper, just barely narrower than the diameter.
Usually I do one or two small test cuts to make sure the shape fits, and it helps with a bit of experience too since the laser cutter behaves differently depending on the thickness of the material. The laser cutter was available for use in the workshop I was building the coils in so I have no idea how much they cost, but this was a 75W Universal Laser, and they're pretty expensive, something like several 10,000s. There's also a 60W Epilog laser in the shop. I've seen people cut up to 2" thick acrylic with these guys with some tricks, so it's very impressive.
I got the toroid from Amazing1, of all places! They sell... somewhat sketchy tesla coils and other electronic things, but their toroids are very nice, and they even offer custom toroid spinning for any size you want.
Right now the safety folks are understandably a bit concerned with me running the coil from the shop's power, ...
...
Also, a surprise coming up soon!
loneoceans, Fri May 01 2015, 08:53AM
Mads Barnkob wrote ...
It looks real good, that laser cutter is really a improvement to good looking and fast made pieces :) I really like the idea of making the primary holder snap-in tight.
What kind of size / model / price is such a laser cutter machinery?
Where did you buy the toroid?
It looks real good, that laser cutter is really a improvement to good looking and fast made pieces :) I really like the idea of making the primary holder snap-in tight.
What kind of size / model / price is such a laser cutter machinery?
Where did you buy the toroid?
Thanks :) In fact I've been using all snap-in primary holders for almost all of my coils, usually setting the hole size to be the exact size of the primary conductor and the slot in to be a V-shape taper, just barely narrower than the diameter.
Usually I do one or two small test cuts to make sure the shape fits, and it helps with a bit of experience too since the laser cutter behaves differently depending on the thickness of the material. The laser cutter was available for use in the workshop I was building the coils in so I have no idea how much they cost, but this was a 75W Universal Laser, and they're pretty expensive, something like several 10,000s. There's also a 60W Epilog laser in the shop. I've seen people cut up to 2" thick acrylic with these guys with some tricks, so it's very impressive.
I got the toroid from Amazing1, of all places! They sell... somewhat sketchy tesla coils and other electronic things, but their toroids are very nice, and they even offer custom toroid spinning for any size you want.
Right now the safety folks are understandably a bit concerned with me running the coil from the shop's power,
 ...
...Also, a surprise coming up soon!

Re: Semikron DRSSTC Twin Coils!
kilovolt, Tue May 05 2015, 10:02AM
Wow, great coil and results, well done! I really love your projects in general, loneoceans. Thanks for posting.
Have a nice day.
kilovolt
kilovolt, Tue May 05 2015, 10:02AM
Wow, great coil and results, well done! I really love your projects in general, loneoceans. Thanks for posting.
Have a nice day.
kilovolt
Re: Semikron DRSSTC Twin Coils!
loneoceans, Wed May 06 2015, 05:39AM
Thanks
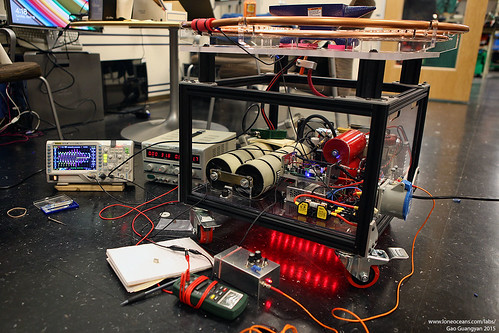
So while building the green coil, I thought, why not build another one to go along with it? Everything's better in red and black.
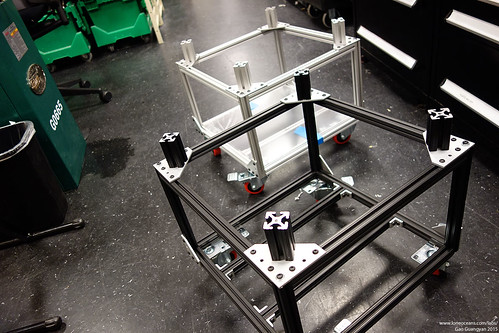
loneoceans, Wed May 06 2015, 05:39AM
kilovolt wrote ...
Wow, great coil and results, well done! I really love your projects in general, loneoceans. Thanks for posting.
Have a nice day.
kilovolt
Wow, great coil and results, well done! I really love your projects in general, loneoceans. Thanks for posting.
Have a nice day.
kilovolt
Thanks

So while building the green coil, I thought, why not build another one to go along with it? Everything's better in red and black.


Re: Semikron DRSSTC Twin Coils!
loneoceans, Fri May 08 2015, 08:30PM
The coils are complete; here's me with the coils. They turned out to be bigger than I had imagined.
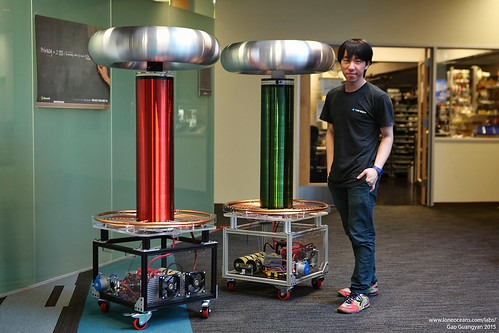
They're both running at about 60kHz and should run at 1.2kApk no problems. Right now I've got them set at 700-800A. More to come soon.
loneoceans, Fri May 08 2015, 08:30PM
The coils are complete; here's me with the coils. They turned out to be bigger than I had imagined.

They're both running at about 60kHz and should run at 1.2kApk no problems. Right now I've got them set at 700-800A. More to come soon.
Re: Semikron DRSSTC Twin Coils!
loneoceans, Thu May 14 2015, 03:29PM
The coils have both been run at a conservative setting with about 185-210VAC input from a generator. Sorry for the third post, thought it would be nice to share the results of the coil in action.
The generator was a 4kW Honda generator and was clearly struggling under the load during musical runs. I haven't managed to get the coils completely tuned yet but they are currently performing pretty ok with 7 feet of spark :) Unfortunately needed more power to turn both on at the same time.

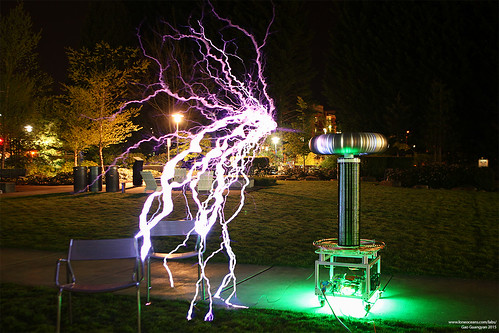
It's alive!
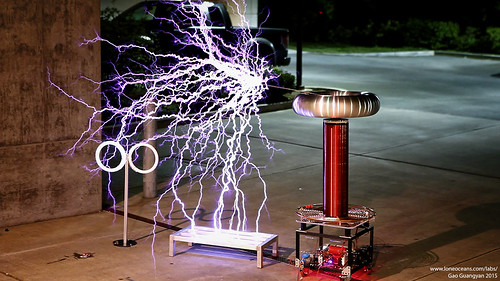
And the red coil in action.
After a minute or two runs, all parts of the coil are still quite cold, so I am quite confident the coil will be able to be run at much higher power with no problems, something like 1.2kA.
More photos can be found on my flickr:
And finally here's a video of the red coil in polyphonic mode. Looking forward to higher power runs soon and I think something like 10 feet spark should be no problem.
loneoceans, Thu May 14 2015, 03:29PM
The coils have both been run at a conservative setting with about 185-210VAC input from a generator. Sorry for the third post, thought it would be nice to share the results of the coil in action.
The generator was a 4kW Honda generator and was clearly struggling under the load during musical runs. I haven't managed to get the coils completely tuned yet but they are currently performing pretty ok with 7 feet of spark :) Unfortunately needed more power to turn both on at the same time.


It's alive!

And the red coil in action.
After a minute or two runs, all parts of the coil are still quite cold, so I am quite confident the coil will be able to be run at much higher power with no problems, something like 1.2kA.
More photos can be found on my flickr:

And finally here's a video of the red coil in polyphonic mode. Looking forward to higher power runs soon and I think something like 10 feet spark should be no problem.
Re: Semikron DRSSTC Twin Coils!
kilovolt, Thu May 21 2015, 09:53AM
Fantastic built! The coils look very nice. Do you let them arc in twincoil modus too? I mean arcing between both toploads with opposite phase?
And another question: Where did you get the spun toroids? Did you build them yourselve?
Best regards
kilovolt
kilovolt, Thu May 21 2015, 09:53AM
Fantastic built! The coils look very nice. Do you let them arc in twincoil modus too? I mean arcing between both toploads with opposite phase?
And another question: Where did you get the spun toroids? Did you build them yourselve?
Best regards
kilovolt
Re: Semikron DRSSTC Twin Coils!
Mads Barnkob, Fri May 22 2015, 11:33AM
Beautiful pictures and great results so far :)
Have you noticed any heating in the metal frame? You might not see it at sub 1kA, I think it was Dr. Spark that had a metal net heated up enough to burn the paint off, from just being near the primary pushing a few kA's.
Re: Semikron DRSSTC Twin Coils!
loneoceans, Tue Aug 11 2015, 05:56PM
Thanks for all the comments everyone. For the metal frame, I actually replaced some of the aluminum connectors with custom fiber composite connectors, to open as many conductive loops as possible. However I did not see any noticeable change in performance, nor did I witness any sort of heating prior to this. My guess is that the aluminium framing itself has a pretty thick layer of anodizing, and the loops may not actually be low-resistance loops in the first place. :)
As for the toroids, I had somewhat of a budget for this so they were purchased from Amazing1. They're pretty expensive and shipping is not cheap either, but they are really beautiful.
loneoceans, Tue Aug 11 2015, 05:56PM
Mads Barnkob wrote ...
Beautiful pictures and great results so far :)
Have you noticed any heating in the metal frame? You might not see it at sub 1kA, I think it was Dr. Spark that had a metal net heated up enough to burn the paint off, from just being near the primary pushing a few kA's.
Beautiful pictures and great results so far :)
Have you noticed any heating in the metal frame? You might not see it at sub 1kA, I think it was Dr. Spark that had a metal net heated up enough to burn the paint off, from just being near the primary pushing a few kA's.
Thanks for all the comments everyone. For the metal frame, I actually replaced some of the aluminum connectors with custom fiber composite connectors, to open as many conductive loops as possible. However I did not see any noticeable change in performance, nor did I witness any sort of heating prior to this. My guess is that the aluminium framing itself has a pretty thick layer of anodizing, and the loops may not actually be low-resistance loops in the first place. :)
As for the toroids, I had somewhat of a budget for this so they were purchased from Amazing1. They're pretty expensive and shipping is not cheap either, but they are really beautiful.
Re: Semikron DRSSTC Twin Coils!
Hazmatt_(The Underdog), Wed Aug 12 2015, 12:47AM
Awesome job man!
I was going to mention putting fiber washers under the screw heads to prevent them from making contact, but looks like that is not an issue.
Hazmatt_(The Underdog), Wed Aug 12 2015, 12:47AM
Awesome job man!
I was going to mention putting fiber washers under the screw heads to prevent them from making contact, but looks like that is not an issue.
Re: Semikron DRSSTC Twin Coils!
kilovolt, Fri Aug 14 2015, 07:55AM
Loneoceans, where do you get these nice toroids? Or do you build them yourselve?
Best regards
kilovolt
kilovolt, Fri Aug 14 2015, 07:55AM
Loneoceans, where do you get these nice toroids? Or do you build them yourselve?
Best regards
kilovolt
Re: Semikron DRSSTC Twin Coils!
loneoceans, Wed Dec 16 2015, 12:38AM
I took some photos recently of the coils in action and running off a proper power line instead of a small generator :)
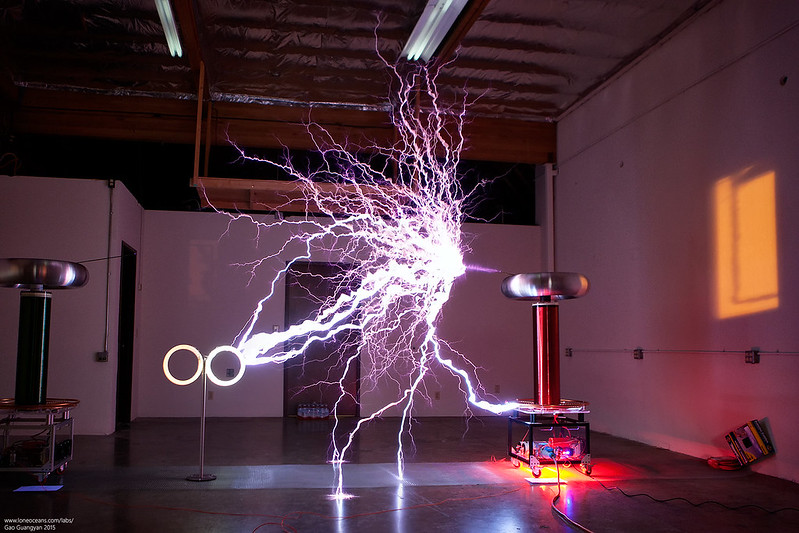
Here's the coil running at about 800Apk. I'm pretty sure I got that rare arc across from one coil to the other (about 2.8m point to point). Otherwise most of the time it's around 2.5m long sparks or less. About 3x plus secondary length, so it's running ok I think. So far extended runs (several minutes at a time) have been good, with the coil not really getting warm. However, this is likely due to the fact that it's quite cold these days (less than 10-5C).
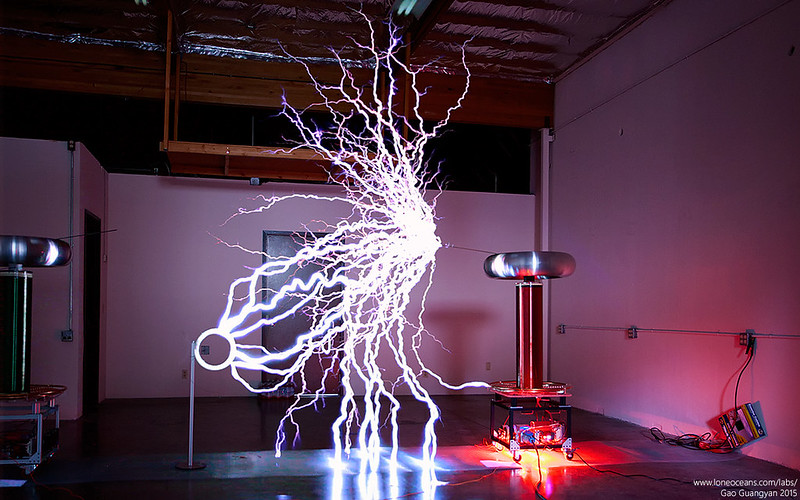
IGBTs should be good for even higher current. Time to turn it up sometime!

Here's a photo of both coils in action. Had to turn the power down because of lack of space.
loneoceans, Wed Dec 16 2015, 12:38AM
I took some photos recently of the coils in action and running off a proper power line instead of a small generator :)

Here's the coil running at about 800Apk. I'm pretty sure I got that rare arc across from one coil to the other (about 2.8m point to point). Otherwise most of the time it's around 2.5m long sparks or less. About 3x plus secondary length, so it's running ok I think. So far extended runs (several minutes at a time) have been good, with the coil not really getting warm. However, this is likely due to the fact that it's quite cold these days (less than 10-5C).

IGBTs should be good for even higher current. Time to turn it up sometime!

Here's a photo of both coils in action. Had to turn the power down because of lack of space.
Re: Semikron DRSSTC Twin Coils!
loneoceans, Fri Feb 12 2016, 05:44AM
That's right there are breaks in the frame so no worries about shorted turns. Here are some videos of the coils in action; enjoy!
Both coils playing a Christmas tune
Single coil in action
loneoceans, Fri Feb 12 2016, 05:44AM
Hazmatt_(The Underdog) wrote ...
Awesome job man!
I was going to mention putting fiber washers under the screw heads to prevent them from making contact, but looks like that is not an issue.
Awesome job man!
I was going to mention putting fiber washers under the screw heads to prevent them from making contact, but looks like that is not an issue.
That's right there are breaks in the frame so no worries about shorted turns. Here are some videos of the coils in action; enjoy!
Both coils playing a Christmas tune
Single coil in action
Print this page