
First Brick Coil - CM200 Half-bridge
loneoceans, Tue Apr 30 2013, 04:17AMGood evening everyone!

For the past few months, I've been trying to steal as much free time I can between school to work on my second DRSSTC. Yesterday I finally plugged in the power and got the sparks going, so I thought I'd like to share my progress with everyone. Over the next few weeks, I'll be tuning the coil more and optimizing it's output. :)
Update
Here's a video of it in action running 208VAC in :)
First Revision
The project began when I bought two Toshiba IGBT half-bridge modules on ebay, good for 150A 600V. The original plan was to build a compact and powerful DRSSTC running this full bridge, with about a foot long secondary. The coil also uses a revised version of Steve Ward's UD2 as the driver. After many months of work, I finally got everything put together. Unfortunately, initial tests were worrying, and I soon found out that one of my IGBTs was half-dead. With the lack of time and money, I wasn't able to continue with these bricks.
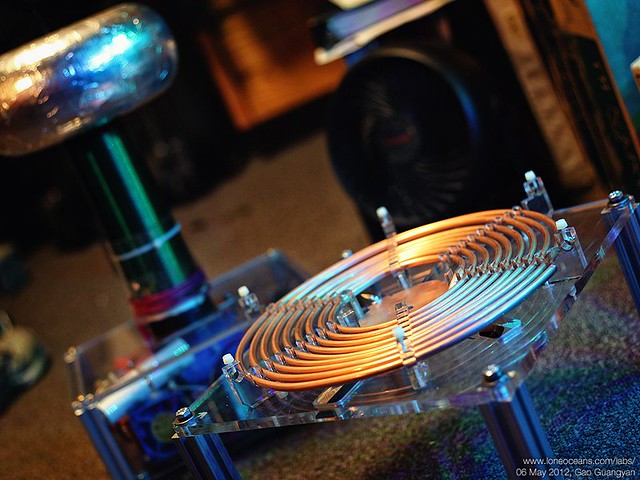
Above shows the primary during the construction phase. Note my SSTC1 in the background! The primary is press-fit so the copper tubing just pops into place.
Revision 2
I managed to get hold of a CM200DU-24F 200A 1200V IGBT and decided to make a half-bridge coil instead. The CM200 bricks are larger, so I wasn't able to fit a fullbridge inside the box I had already made. Finally, this worked perfectly and everything came together.
Preliminary Tests
Here's a photograph of the coil in action today. Initial tests were disappointing but it's surprising how much difference half a turn of the primary can make.
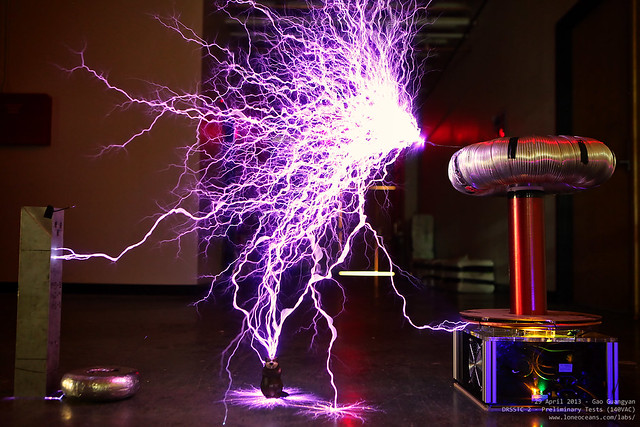
Specifications:
- CM200 Half Bridge
- 140VAC input
- 13" x 3.5"Secondary, ~2000 turns
- 16" x 4" Toroid (I want to get a spun one someday)
- 150nF MMC
So far I'm happy with the results, but because I'm using 1200V IGBTs, I should be able to push it with much higher voltage on the bridge. I have a 240V step-up variac on hand and will be using that to test shortly. I'd like to thank the people on this forum for the great information as well as Steve and Philip for their fantastic advice. :) I'll be updating the progress here.
Feel free to check out my flickr here

Or my website (page still being constructed)

Re: First Brick Coil - CM200 Half-bridge
Physics Junkie, Tue Apr 30 2013, 04:25AM
Looks awesome. I bet you could double that output with some fine tuning and that step up transformer like you said. You could also try a voltage doubler with the step up to easily get 600V. Anyways, good job and good luck
Physics Junkie, Tue Apr 30 2013, 04:25AM
Looks awesome. I bet you could double that output with some fine tuning and that step up transformer like you said. You could also try a voltage doubler with the step up to easily get 600V. Anyways, good job and good luck

Re: First Brick Coil - CM200 Half-bridge
Graham Armitage, Tue Apr 30 2013, 02:52PM
That's a classy looking coil - very nicely made. Will be interesting to see what it delivers when you push the limits a little
You take some awesome photos - they are fantastic. If the Tesla thing doesn't pay the bills you can always shift to photography !! What camera settings are you using (if you don't mind sharing)
Graham Armitage, Tue Apr 30 2013, 02:52PM
That's a classy looking coil - very nicely made. Will be interesting to see what it delivers when you push the limits a little

You take some awesome photos - they are fantastic. If the Tesla thing doesn't pay the bills you can always shift to photography !! What camera settings are you using (if you don't mind sharing)
Re: First Brick Coil - CM200 Half-bridge
loneoceans, Tue Apr 30 2013, 10:55PM
Yes I hope to power it with 240V sometime very soon, and we'll see how that goes. Also, I really hope to get a nicer toroid.
Thanks for the comments! Yes I also do photography as a hobby, and could write a whole long post about photographing these coils. It really depends on what aspect of the coil you want to show, as well as the lighting. So in one photograph, there's basically two things to take note of. 1, the background and overall illumination, and 2, the sparks.
Depending on how bright the sparks are and how bright the background is, I set the camera differently. All of them are of course taken it manual. I usually expose for the global illumination first, to ensure that I can see the coil and background without the sparks, then using the same settings, adjust the coil.
I have a push-button switch on my interrupter which only sends the signal when I push it down, so I can control how much sparks I want in the photos.
In this case, I wanted to capture the sparks as pretty bright sparks. To do this, I set the ISO fairly high and open up my aperture. Because the background is very dim, I have to expose the shot for a long time also, on the order of 4 seconds.
If I turn on the coil continuously for 4 seconds, all the sparks would be over exposed, so I only turn it on for about a second or so during the shot. That's basically how I do my photographs.
Example settings:
- Thick looking sparks - ISO 1600, F2.2, 1.6 seconds
- Normal looking sparks - ISO 1250, F3.5, 4 seconds
- More spark detail - ISO 400, F3.5, 10 seconds
Like it said, it really depends on the output of your coil and the brightness of the room. Does anyone want to know more? I could start a post on how I take my Tesla Photos.
loneoceans, Tue Apr 30 2013, 10:55PM
Bushman wrote ...
That's a classy looking coil - very nicely made. Will be interesting to see what it delivers when you push the limits a little
You take some awesome photos - they are fantastic. If the Tesla thing doesn't pay the bills you can always shift to photography !! What camera settings are you using (if you don't mind sharing)
That's a classy looking coil - very nicely made. Will be interesting to see what it delivers when you push the limits a little

You take some awesome photos - they are fantastic. If the Tesla thing doesn't pay the bills you can always shift to photography !! What camera settings are you using (if you don't mind sharing)
Yes I hope to power it with 240V sometime very soon, and we'll see how that goes. Also, I really hope to get a nicer toroid.
Thanks for the comments! Yes I also do photography as a hobby, and could write a whole long post about photographing these coils. It really depends on what aspect of the coil you want to show, as well as the lighting. So in one photograph, there's basically two things to take note of. 1, the background and overall illumination, and 2, the sparks.
Depending on how bright the sparks are and how bright the background is, I set the camera differently. All of them are of course taken it manual. I usually expose for the global illumination first, to ensure that I can see the coil and background without the sparks, then using the same settings, adjust the coil.
I have a push-button switch on my interrupter which only sends the signal when I push it down, so I can control how much sparks I want in the photos.
In this case, I wanted to capture the sparks as pretty bright sparks. To do this, I set the ISO fairly high and open up my aperture. Because the background is very dim, I have to expose the shot for a long time also, on the order of 4 seconds.
If I turn on the coil continuously for 4 seconds, all the sparks would be over exposed, so I only turn it on for about a second or so during the shot. That's basically how I do my photographs.
Example settings:
- Thick looking sparks - ISO 1600, F2.2, 1.6 seconds
- Normal looking sparks - ISO 1250, F3.5, 4 seconds
- More spark detail - ISO 400, F3.5, 10 seconds
Like it said, it really depends on the output of your coil and the brightness of the room. Does anyone want to know more? I could start a post on how I take my Tesla Photos.
Re: First Brick Coil - CM200 Half-bridge
loneoceans, Tue Apr 30 2013, 11:00PM
Here are some photos of the build you have an idea of what's inside:
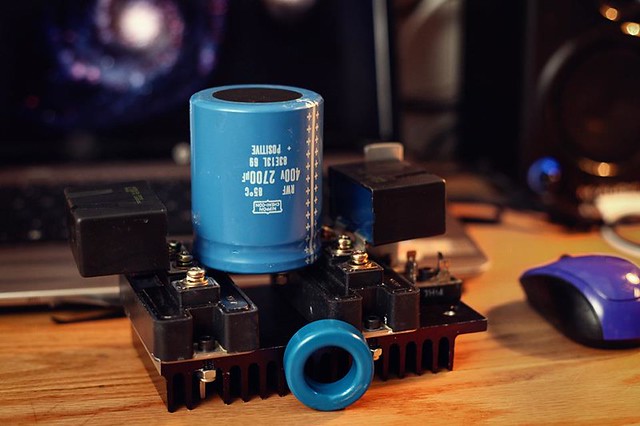
My original Toshiba 150A 600V IGBTs. Unfortunately these ebay modules were not good. :( I'm very pleased with how I had them laid out, but I can only use the half-sized bricks for this. Does anyone have CM300DU-12F or similar half-sized modules they are willing to sell to me?
Regardless, in order to fit everything in the same box, I made a new half bridge with CM200 and a voltage doubler.
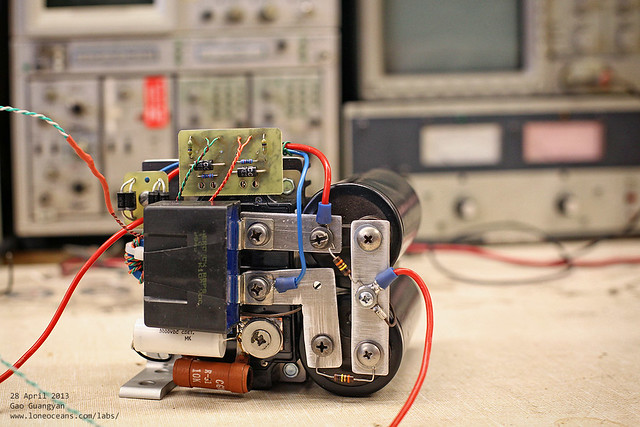
It's all integrated so all I need to do is plug in the GDT to the driver, the AC in and output the the primary.
loneoceans, Tue Apr 30 2013, 11:00PM
Here are some photos of the build you have an idea of what's inside:

My original Toshiba 150A 600V IGBTs. Unfortunately these ebay modules were not good. :( I'm very pleased with how I had them laid out, but I can only use the half-sized bricks for this. Does anyone have CM300DU-12F or similar half-sized modules they are willing to sell to me?
Regardless, in order to fit everything in the same box, I made a new half bridge with CM200 and a voltage doubler.

It's all integrated so all I need to do is plug in the GDT to the driver, the AC in and output the the primary.
Re: First Brick Coil - CM200 Half-bridge
HV Enthusiast, Wed May 01 2013, 12:08AM
Really nice work! Thanks for sharing. Great photography too! I really like how the arcs hit and spread out on the floor. Very cool!
HV Enthusiast, Wed May 01 2013, 12:08AM
Really nice work! Thanks for sharing. Great photography too! I really like how the arcs hit and spread out on the floor. Very cool!
Re: First Brick Coil - CM200 Half-bridge
Graham Armitage, Wed May 01 2013, 03:36PM
I would enjoy a quick photography thread - we all take pics of our work and knowing a bit more will be helpful. What you gave already is helpful. Thanks.
Graham Armitage, Wed May 01 2013, 03:36PM
I would enjoy a quick photography thread - we all take pics of our work and knowing a bit more will be helpful. What you gave already is helpful. Thanks.
Re: First Brick Coil - CM200 Half-bridge
Myke, Thu May 02 2013, 11:24AM
Looks great
There's this thread already for pictures:
Myke, Thu May 02 2013, 11:24AM
Looks great

There's this thread already for pictures:

Re: First Brick Coil - CM200 Half-bridge
loneoceans, Fri May 03 2013, 07:03AM
Some updates! Since I'm running 1200V IGBTs here, I could definitely do a lot better than the 120VAC I get from the mains. Unfortunately, the workshop I'm in seems to have their step-up variac missing, so I have no choice but to use a transformer. Unfortunately, the the step-up transformer I found is small (slightly smaller than a small MOT) and can't keep up with the current draw, limiting to only driving the bridge with the bus cap.
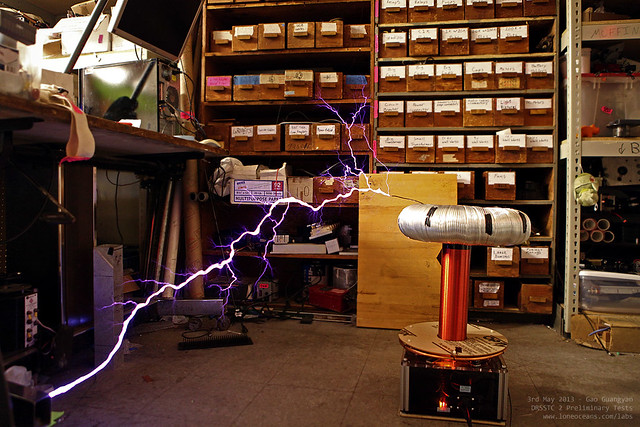
I went up to 200VAC in today as quick test but it was apparent that I was quickly running out of space! Strikes to the floor were very common, but when it didn't, it easily made 4 feet of spark, which is impressive considering that the secondary coil is just slightly longer than a foot. I also tried pointing the breakout point upwards, but it seems that my toroid is too rough (and dented) that it wants to break out and hit the floor instead. More to come! :)
loneoceans, Fri May 03 2013, 07:03AM
Some updates! Since I'm running 1200V IGBTs here, I could definitely do a lot better than the 120VAC I get from the mains. Unfortunately, the workshop I'm in seems to have their step-up variac missing, so I have no choice but to use a transformer. Unfortunately, the the step-up transformer I found is small (slightly smaller than a small MOT) and can't keep up with the current draw, limiting to only driving the bridge with the bus cap.

I went up to 200VAC in today as quick test but it was apparent that I was quickly running out of space! Strikes to the floor were very common, but when it didn't, it easily made 4 feet of spark, which is impressive considering that the secondary coil is just slightly longer than a foot. I also tried pointing the breakout point upwards, but it seems that my toroid is too rough (and dented) that it wants to break out and hit the floor instead. More to come! :)
Re: First Brick Coil - CM200 Half-bridge
Steve Conner, Fri May 03 2013, 10:43AM
Very nice do you know what the operating frequency is?
Steve Conner, Fri May 03 2013, 10:43AM
Very nice
 do you know what the operating frequency is?
Re: First Brick Coil - CM200 Half-bridge
HV Enthusiast, Fri May 03 2013, 12:04PM
Beautiful performance!!!
Have you had any primary strikes?
HV Enthusiast, Fri May 03 2013, 12:04PM
Beautiful performance!!!
Have you had any primary strikes?
Re: First Brick Coil - CM200 Half-bridge
loneoceans, Fri May 03 2013, 02:42PM
As measured with a signal generator and scope, I'm currently running the coil at just around 106kHz. :) The unloaded secondary Freq0 is about 122kHz, but streamer loading brings the freq0 down and it seems to do very well.
Thanks! No I haven't had a primary strike. As you can see, the last 'turn' around the primary is a ground strike ring, which it has hit. The brown circle on top of the primary is an acrylic primary cover (haven't taken off the protective paper yet) which should help reduce dust build up and provide a small amount of insulation.
loneoceans, Fri May 03 2013, 02:42PM
Steve Conner wrote ...
Very nice do you know what the operating frequency is?
Very nice
 do you know what the operating frequency is?
As measured with a signal generator and scope, I'm currently running the coil at just around 106kHz. :) The unloaded secondary Freq0 is about 122kHz, but streamer loading brings the freq0 down and it seems to do very well.
EasternVoltageResearch wrote ...
Beautiful performance!!!
Have you had any primary strikes?
Beautiful performance!!!
Have you had any primary strikes?
Thanks! No I haven't had a primary strike. As you can see, the last 'turn' around the primary is a ground strike ring, which it has hit. The brown circle on top of the primary is an acrylic primary cover (haven't taken off the protective paper yet) which should help reduce dust build up and provide a small amount of insulation.
Re: First Brick Coil - CM200 Half-bridge
loneoceans, Sun May 12 2013, 03:25PM
Hi everyone! Happy Mother's Day!
I finally wired up my coil and plugged it running 208VAC. Here's the results at 100us on-time, just barely turning open the taps and really running out of space to test it. It's hardly running anywhere near full power. Roughly 200bps, 500Apk.
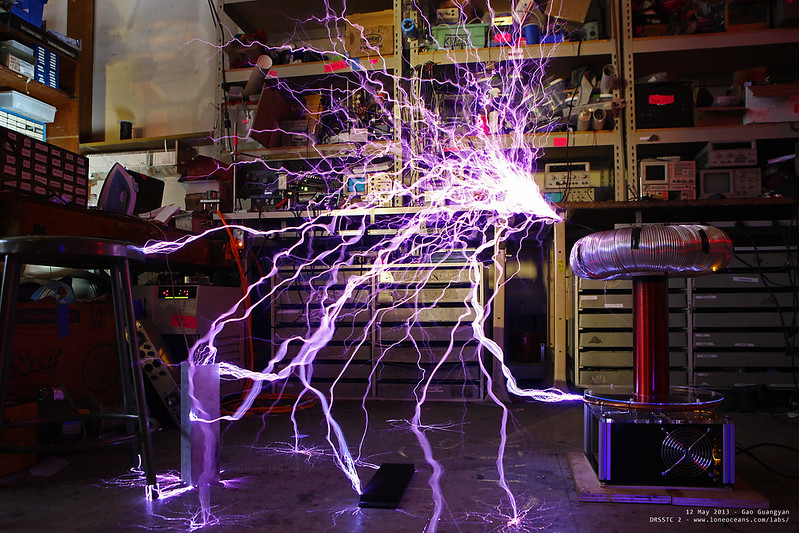
And another one:
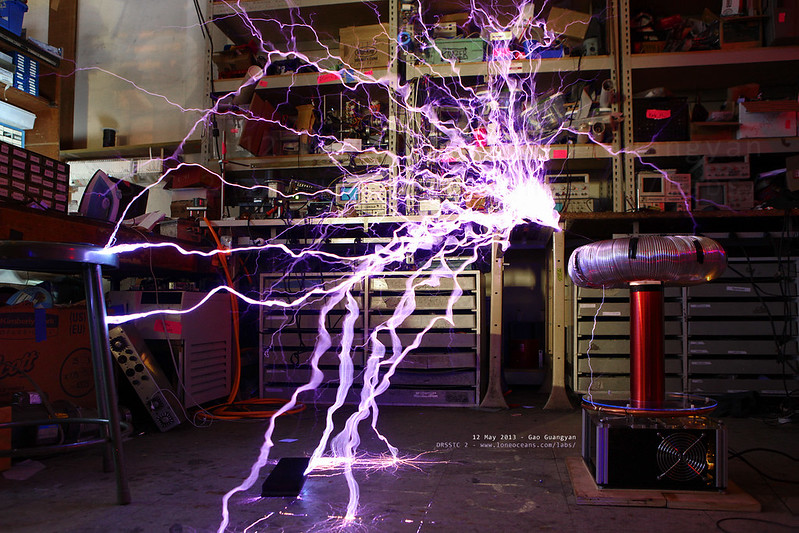
Enjoy
More to come soon!
loneoceans, Sun May 12 2013, 03:25PM
Hi everyone! Happy Mother's Day!
I finally wired up my coil and plugged it running 208VAC. Here's the results at 100us on-time, just barely turning open the taps and really running out of space to test it. It's hardly running anywhere near full power. Roughly 200bps, 500Apk.

And another one:

Enjoy

More to come soon!
Re: First Brick Coil - CM200 Half-bridge
Physics Junkie, Sun May 12 2013, 10:48PM
What a little beast that is... well done.
Are you doubling the 208v input?
Physics Junkie, Sun May 12 2013, 10:48PM
What a little beast that is... well done.
Are you doubling the 208v input?
Re: First Brick Coil - CM200 Half-bridge
loneoceans, Sun May 19 2013, 09:10PM
Yes I do have a voltage doubler since I'm using a half bridge, so it's running something like +-294V across the bridge :)
I also made a short video of it in action!
loneoceans, Sun May 19 2013, 09:10PM
Physics Junkie wrote ...
What a little beast that is... well done.
Are you doubling the 208v input?
What a little beast that is... well done.
Are you doubling the 208v input?
Yes I do have a voltage doubler since I'm using a half bridge, so it's running something like +-294V across the bridge :)
I also made a short video of it in action!
Re: First Brick Coil - CM200 Half-bridge
loneoceans, Thu Jan 22 2015, 07:01PM
Hi everyone,
In case you were following, I hought I would give a update on some tweaks I made just recently to my old DRSSTC 2 after it got moved over from one side of the US to the other side.
Surprisingly, it didn't fall apart in USPS mail!
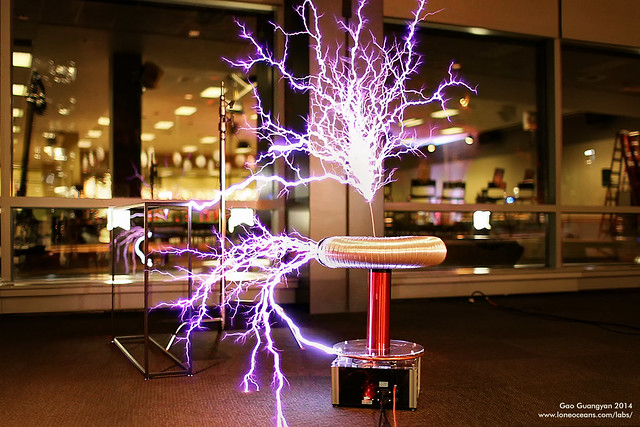
I re-did the wiring and upgraded the drive circuitry to my UD2.7 as well as made a new toroid for it.
Everything still fits in the 1' x 1' square box and I think I even managed to carve out some extra space! I was also invited for a demo at a nearby science fair just as a side show, and the coil worked very reliably over the course of an entire day, playing music and lighting up fluorotubes.
.. from the Nutcracker, just in time for the holiday season.
As always, lots more construction details and photographs on my updated project page here:
loneoceans, Thu Jan 22 2015, 07:01PM
Hi everyone,
In case you were following, I hought I would give a update on some tweaks I made just recently to my old DRSSTC 2 after it got moved over from one side of the US to the other side.
Surprisingly, it didn't fall apart in USPS mail!


I re-did the wiring and upgraded the drive circuitry to my UD2.7 as well as made a new toroid for it.
Everything still fits in the 1' x 1' square box and I think I even managed to carve out some extra space! I was also invited for a demo at a nearby science fair just as a side show, and the coil worked very reliably over the course of an entire day, playing music and lighting up fluorotubes.
.. from the Nutcracker, just in time for the holiday season.
As always, lots more construction details and photographs on my updated project page here:

Print this page