
Coil construction
Yandersen, Mon Mar 11 2013, 10:02PMJust want to share my technique of coil construction - maybe some of you would like to try it out:
Part 1, overview:
Part 2, practice:
Here are the results:
The technique is good for coils wound with <1mm wires as those are easily bend.
The major problem for me now is the long setting epoxy - it is required to fill the coil and is hard to find: epoxy commonly available now is 5min ones. Any ideas where to find an hour-hardening type of epoxy?
Re: Coil construction
Ash Small, Tue Mar 12 2013, 12:25AM
Your side of the pond I'd recommend West systems, here is a link to their website:
Maybe the 206 slow hardner would be ok, but I linked to the 209 extra slow hardner, because you wanted 'slow'.
Ash Small, Tue Mar 12 2013, 12:25AM
Your side of the pond I'd recommend West systems, here is a link to their website:

Maybe the 206 slow hardner would be ok, but I linked to the 209 extra slow hardner, because you wanted 'slow'.
Re: Coil construction
Yandersen, Tue Mar 12 2013, 12:55AM
Thanks a lot! Will go shopping tomorrow and try to find this one...
Yandersen, Tue Mar 12 2013, 12:55AM
Thanks a lot! Will go shopping tomorrow and try to find this one...
Re: Coil construction
Yandersen, Fri Mar 15 2013, 03:10PM
I got 105 epoxy and 209 extra slow hardener. It cost me ~$100 - bottles are so big... In 10hr mix turns from liquid into sticky gel and it takes 2 days for the mix to harden. Did not tried on coils yet.
This extremely slow curing and big bottles size dictate the new strategy: many coils in one day. Kinda have a few winding machines available, prepare the excessive amount of epoxy, and wind many coils one by one. In a next couple days you got all of them ready. Still, I would recommend 206 slow hardener instead of 209 - that one is just too slow, but I don't want to spend another $40.
BTW, maybe you have a question already arized "why not to wind coils directly on the barrel?". Because during the winding side pressure of the wire is big and not uniform: even if washers were aligned well, they may get repulsed causing barrel under the coil to bend into an arc. When I was practicing on-barrel winding in my early coilgun prototype, I stopped on 4th stage from 8 planned due to this issue causing barrel to get curvy. I still use homemade rolled paper-epoxy barrels which are not strong, but thin and non-conductive, and as far as they stay straight, they work perfect. Modular coils get into the barrel like beads.
Recently I found that steel washers I keep using at the ends of a coil support induction currents well enough to get repulsed from the coil. Even cut in a washer does not help a lot. So if you are using external iron make sure it is powdered iron or ferrite, otherwise some energy will be lost significantly reducing the benefit of using external iron.
Re: Coil construction
Ash Small, Fri Mar 15 2013, 03:42PM
Try heating it (putting the coils in a warm place) to cure it quicker. Around 80 degrees F should do it, read what it says in the instructions as far as temperature goes for further advice.
The beauty of this sytem is that you have plenty of time to work with it, at a cool temperature, then, when you are ready, you can increase temperature to cure it.
Maybe the 206 hardener would be better, but temperature is by far the biggest factor affecting curing times, especially with 'slow cure' hardeners.
EDIT: I looked at their website, it says 'cures in 6-8 hours @ 95F (35C)'.
"209 Extra Slow Hardenerâ„¢ is formulated for use with WEST SYSTEM Brand 105 Resin for general coating and bonding applications in extremely warm and/or humid conditions or when extended working time is desired at room temperature. Provides approximately twice the working time of 206 Slow Hardener. Forms a clear, amber-colored solid with good physical properties and moisture resistance for bonding and coating applications. Not intended for clear coating.
Pot life at 72°F (22°C): 40 to 50 minutes
Pot life at 95°F (35°C): 15 to 20 minutes
Cure to a solid state at 72°F (22°C): 20 to 24 hours
Cure to a solid state at 95°F (35°C): 6 to 8 hours
Cure to maximum strength at 72°F: 4 to 9 days
Minimum recommended temperature: 70°F (21°C)"
It says you have less than an hour pot life @72F.
Ash Small, Fri Mar 15 2013, 03:42PM
Yandersen wrote ...
I got 105 epoxy and 209 extra slow hardener. It cost me ~$100 - bottles are so big... In 10hr mix turns from liquid into sticky gel and it takes 2 days for the mix to harden. Did not tried on coils yet.
I got 105 epoxy and 209 extra slow hardener. It cost me ~$100 - bottles are so big... In 10hr mix turns from liquid into sticky gel and it takes 2 days for the mix to harden. Did not tried on coils yet.
Try heating it (putting the coils in a warm place) to cure it quicker. Around 80 degrees F should do it, read what it says in the instructions as far as temperature goes for further advice.
The beauty of this sytem is that you have plenty of time to work with it, at a cool temperature, then, when you are ready, you can increase temperature to cure it.
Maybe the 206 hardener would be better, but temperature is by far the biggest factor affecting curing times, especially with 'slow cure' hardeners.
EDIT: I looked at their website, it says 'cures in 6-8 hours @ 95F (35C)'.
"209 Extra Slow Hardenerâ„¢ is formulated for use with WEST SYSTEM Brand 105 Resin for general coating and bonding applications in extremely warm and/or humid conditions or when extended working time is desired at room temperature. Provides approximately twice the working time of 206 Slow Hardener. Forms a clear, amber-colored solid with good physical properties and moisture resistance for bonding and coating applications. Not intended for clear coating.
Pot life at 72°F (22°C): 40 to 50 minutes
Pot life at 95°F (35°C): 15 to 20 minutes
Cure to a solid state at 72°F (22°C): 20 to 24 hours
Cure to a solid state at 95°F (35°C): 6 to 8 hours
Cure to maximum strength at 72°F: 4 to 9 days
Minimum recommended temperature: 70°F (21°C)"
It says you have less than an hour pot life @72F.
Re: Coil construction
Yandersen, Sat Mar 16 2013, 12:46PM
Due to the plastic insulation around the coil I can't heat it up in the oven (common practice with 5min epoxies turning them into "glass" at 60C in 3min) - only when coil is taken out of the machine, but it can be done only when epoxy is hard. The mild temperatures are somewhat hard to keep for 8hr.
Hm, what temperatures plastic can sustain without softening? Scotch tape? I can try making side rings out of the plexiglass and axial cylinder out of the plastic pen - if this will allow heating.
Update: video of coil winding process is added to the first post.
Re: Coil construction
Ash Small, Sat Mar 16 2013, 04:00PM
You could possibly try highly polished metal surfaces, eg electro-polished stainless steel, or aluminium. , however I'm not sure how successful this will be.
I can see that most of the plastics I can think of that epoxy doesn't stick to will soften at these temperatures, and also, that wax wouldn't be much use at these temperatures.
Does epoxy stick to the 'shiny' side of kitchen foil?
What about CD's? (I'm not sure what they're made of)
Ash Small, Sat Mar 16 2013, 04:00PM
Yandersen wrote ...
Due to the plastic insulation around the coil I can't heat it up in the oven (common practice with 5min epoxies turning them into "glass" at 60C in 3min) - only when coil is taken out of the machine, but it can be done only when epoxy is hard. The mild temperatures are somewhat hard to keep for 8hr.
Hm, what temperatures plastic can sustain without softening? Scotch tape? I can try making side rings out of the plexiglass and axial cylinder out of the plastic pen - if this will allow heating.
Update: video of coil winding process is added to the first post.
You could possibly try highly polished metal surfaces, eg electro-polished stainless steel, or aluminium. , however I'm not sure how successful this will be.
I can see that most of the plastics I can think of that epoxy doesn't stick to will soften at these temperatures, and also, that wax wouldn't be much use at these temperatures.
Does epoxy stick to the 'shiny' side of kitchen foil?
What about CD's? (I'm not sure what they're made of)
Re: Coil construction
Yandersen, Sat Mar 16 2013, 09:00PM
Any smooth plastic would work. Any metal wouldn't (even if polished).
So for those who would like to try my way, I would recommend 206 hardener, not 209 I have.
Yandersen, Sat Mar 16 2013, 09:00PM
Any smooth plastic would work. Any metal wouldn't (even if polished).
So for those who would like to try my way, I would recommend 206 hardener, not 209 I have.
Re: Coil construction
Ash Small, Sun Mar 17 2013, 12:12AM
There are plenty of thermosetting plastics that epoxy will bond to. Metals need a rough surface to stick to epoxy, and they need to be clean. Any highly polished metal, especially if it is thin enough to be flexible, should be fairly easy to remove once it's cured. I used to own a business that specialized in producing stainless steel load bearing inserts for carbon fibre racing yachts. I'd need to etch the surface to get the epoxy to stick.
It generally helps to 'shock' it to get it off.
Ash Small, Sun Mar 17 2013, 12:12AM
Yandersen wrote ...
Any smooth plastic would work. Any metal wouldn't (even if polished).
Any smooth plastic would work. Any metal wouldn't (even if polished).
There are plenty of thermosetting plastics that epoxy will bond to. Metals need a rough surface to stick to epoxy, and they need to be clean. Any highly polished metal, especially if it is thin enough to be flexible, should be fairly easy to remove once it's cured. I used to own a business that specialized in producing stainless steel load bearing inserts for carbon fibre racing yachts. I'd need to etch the surface to get the epoxy to stick.
It generally helps to 'shock' it to get it off.
Re: Coil construction
Yandersen, Sun Mar 17 2013, 03:26PM
Ash, arguing like that we losing the point of discussion. Did you watched my second video? I couldn't get the nut off until I scraped epoxy out of the washer's edge. Metal was polished and it was easy to scrape epoxy from it, but still it was sticky enough to give me troubles. Scotch tape doesn't bond to epoxy at all. There is a set of materials which do bond to epoxy and some are don't. Just assuming your metal is nicely polished is not enough to be sure you will be able to get the coil out.
Re: Coil construction
Ash Small, Sun Mar 17 2013, 05:18PM
OK, point taken. I've watched the part of the video where you remove the coil from the jig now.
I appreciate you are developing a method that is easy for others to use, and that electro-polishing and 'shocking' aren't that straightforward without the correct equipment and experience. My point was that the bond between a highly polished metal surface and epoxy is muchweaker than the epoxy-epoxy bond, and will easily shear or pull apart with much less force than it takes for the epoxy to fail. (It was quite easy to scrape off using a knife)
One other point that came to mind is that if you are going to place washers at each side of the coil when it is installed in the CG (I understand this can increase efficiency), you could place the washers in the jig before winding, then it wouldn't matter if they get stuck, it will save adding them later.
I maybe should have watched your video first, but I pay for internet by the gigabyte, so don't generally watch lots of ~15 minute videos.
I'm sure that if you placed the jig in a vice (vise), and placed a wrench on the other 'nut', it would shear (the more highly polished the washer, the easier it would be to do), but I'm experiened at 'tricks' like that, which, I admit, aren't easy unless you know what you are doing.
While not that cheap, I think the high-temperature mold release wax here: should be ideal for your requirements.
There are some further suggestions here:
You'd still want as good a finish as possible on the parts of the jig that come into contact with the epoxy, though.
Ash Small, Sun Mar 17 2013, 05:18PM
OK, point taken. I've watched the part of the video where you remove the coil from the jig now.
I appreciate you are developing a method that is easy for others to use, and that electro-polishing and 'shocking' aren't that straightforward without the correct equipment and experience. My point was that the bond between a highly polished metal surface and epoxy is muchweaker than the epoxy-epoxy bond, and will easily shear or pull apart with much less force than it takes for the epoxy to fail. (It was quite easy to scrape off using a knife)
One other point that came to mind is that if you are going to place washers at each side of the coil when it is installed in the CG (I understand this can increase efficiency), you could place the washers in the jig before winding, then it wouldn't matter if they get stuck, it will save adding them later.
I maybe should have watched your video first, but I pay for internet by the gigabyte, so don't generally watch lots of ~15 minute videos.
I'm sure that if you placed the jig in a vice (vise), and placed a wrench on the other 'nut', it would shear (the more highly polished the washer, the easier it would be to do), but I'm experiened at 'tricks' like that, which, I admit, aren't easy unless you know what you are doing.
While not that cheap, I think the high-temperature mold release wax here:
 should be ideal for your requirements.
 There are some further suggestions here:

You'd still want as good a finish as possible on the parts of the jig that come into contact with the epoxy, though.
Re: Coil construction
Yandersen, Mon Mar 18 2013, 05:49AM
There are no metal parts come in contact with epoxy in the video - washers are covered with transparent scotch tape (it is not mentioned in second video - sorry - it is explained in first part only), while the central part has oiled paper ring over it rolled over with scotch tape, once again. So "jig" is completely insulated from epoxy by a scotch tape everywhere. Paper rings on sides are not epoxy-protection - those are just a physical barriers protecting the wire from hard surfaces coil will push during shots. Those are electrical insulators from steel washers I use to put on sides. You can include steel washers into the coil module (in fact my first recoup was done like that), but I found that for high stages induction currents are so big, that parasitics got higher then benefits. So I decided to not include washers into the coil. But if you do, cut washers first and epoxy-glue paper rings as insulators to them prior to work with wire. Here is some pictures for this approach:
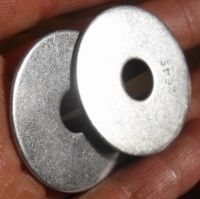
1) Get two washers:
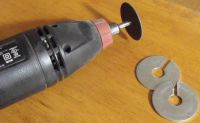
2) Cut them:
3) Sand the surface which will be covered with paper to ensure good epoxy bond:

4) Apply epoxy and glue washers to the paper (plastic underneath!):
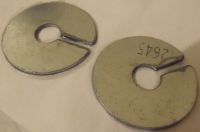
5) Insulate the gap too:
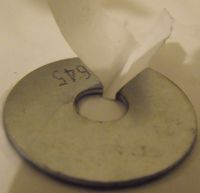
6) After epoxy hardened (5min epoxy is good enough), remove all excess paper:
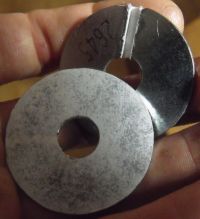
7) Here is an example of coil made with those washers:
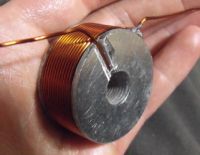
Yandersen, Mon Mar 18 2013, 05:49AM
There are no metal parts come in contact with epoxy in the video - washers are covered with transparent scotch tape (it is not mentioned in second video - sorry - it is explained in first part only), while the central part has oiled paper ring over it rolled over with scotch tape, once again. So "jig" is completely insulated from epoxy by a scotch tape everywhere. Paper rings on sides are not epoxy-protection - those are just a physical barriers protecting the wire from hard surfaces coil will push during shots. Those are electrical insulators from steel washers I use to put on sides. You can include steel washers into the coil module (in fact my first recoup was done like that), but I found that for high stages induction currents are so big, that parasitics got higher then benefits. So I decided to not include washers into the coil. But if you do, cut washers first and epoxy-glue paper rings as insulators to them prior to work with wire. Here is some pictures for this approach:
1) Get two washers:

2) Cut them:

3) Sand the surface which will be covered with paper to ensure good epoxy bond:

4) Apply epoxy and glue washers to the paper (plastic underneath!):

5) Insulate the gap too:

6) After epoxy hardened (5min epoxy is good enough), remove all excess paper:

7) Here is an example of coil made with those washers:

Re: Coil construction
BigBad, Mon Mar 18 2013, 06:18AM
Actually I just wound a coil a few weeks ago, before I read this, but it wasn't nearly as nice as yours. 250 turns of 0.3 odd mm magnet wire.
One thing, I potted it in polyester, it set off in just 20 minutes.
I didn't think it would, but it penetrated incredibly well in fact, the polyester I used was a car bodywork fiberglass plastic. Clearly it's intended to wet stuff out thoroughly anyway, as it turned out I didn't even get a single bubble, it sucked it all up.
The downside of polyester is that it contracts a good few percent, much more than epoxy but the copper seemed to stop it. I'll let you know if it shrinks later, it can take a few weeks. The copper wire will tend to stop it shrinking though, wires are pretty good fiber reinforcement.
Not saying I recommend it, but it was dirt cheap (about $10) and seemed to work, at least this once.
Re: Coil construction
Ash Small, Mon Mar 18 2013, 10:38AM
I did watch the first part, then skipped to the end.
Did you find the links in my previous post useful? If you keep the curing temp. to below 110F you can use car wax and hairspray as a release agent.
Ash Small, Mon Mar 18 2013, 10:38AM
Yandersen wrote ...
There are no metal parts come in contact with epoxy in the video - washers are covered with transparent scotch tape (it is not mentioned in second video - sorry - it is explained in first part only),
There are no metal parts come in contact with epoxy in the video - washers are covered with transparent scotch tape (it is not mentioned in second video - sorry - it is explained in first part only),
I did watch the first part, then skipped to the end.
Did you find the links in my previous post useful? If you keep the curing temp. to below 110F you can use car wax and hairspray as a release agent.
Re: Coil construction
Yandersen, Mon Mar 18 2013, 11:15PM
Would you like to try it and show the results? :)
Yandersen, Mon Mar 18 2013, 11:15PM
Would you like to try it and show the results? :)
Re: Coil construction
Sulaiman, Tue Mar 19 2013, 12:59PM
There is the option of self-bonding wire

You can also get 'square' cross-section copper wire for maximum current density.
Sulaiman, Tue Mar 19 2013, 12:59PM
There is the option of self-bonding wire


You can also get 'square' cross-section copper wire for maximum current density.
Re: Coil construction
Ash Small, Tue Mar 19 2013, 02:35PM
There are plenty of online resources that explain in detail how to apply a release agent to a mold, it's not difficult to do. ,or.r_qf.&bvm=bv.43828540,d.d2k&fp=4e753e884ed8bf3
6&biw=1366&bih=663
Ash Small, Tue Mar 19 2013, 02:35PM
Yandersen wrote ...
Would you like to try it and show the results? :)
Would you like to try it and show the results? :)
There are plenty of online resources that explain in detail how to apply a release agent to a mold, it's not difficult to do.
 ,or.r_qf.&bvm=bv.43828540,d.d2k&fp=4e753e884ed8bf3
6&biw=1366&bih=663
,or.r_qf.&bvm=bv.43828540,d.d2k&fp=4e753e884ed8bf3
6&biw=1366&bih=663Re: Coil construction
ElectronicBob, Tue Aug 13 2013, 09:40AM
Hey Yanderson
The coils you have produced are really impressive and you have given me some great ideas for my own coil winding process.
I am going to adopt the use of a "prodder" to get my windings nice and regular and ensure they bend in one place (like yours). Also I have done a test wind and used superglue to impregnate the coil. But your use of epoxy has got me thinking...which is best? I am thinking that epoxy might be better if the coil gets to higher temperatures. Does anyone have any thoughts?
Re: Coil construction
Ash Small, Thu Aug 15 2013, 12:32PM
Even so called 'high temperature' epoxies are only good for ~100 degrees C.
Ash Small, Thu Aug 15 2013, 12:32PM
ElectronicBob wrote ...
Also I have done a test wind and used superglue to impregnate the coil. But your use of epoxy has got me thinking...which is best? I am thinking that epoxy might be better if the coil gets to higher temperatures. Does anyone have any thoughts?
Also I have done a test wind and used superglue to impregnate the coil. But your use of epoxy has got me thinking...which is best? I am thinking that epoxy might be better if the coil gets to higher temperatures. Does anyone have any thoughts?
Even so called 'high temperature' epoxies are only good for ~100 degrees C.
Re: Coil construction
klugesmith, Thu Aug 15 2013, 05:36PM
1. I had not seen this thread before this week. Hats off to Yandersen for his outstanding coilcraft and teaching skills.
2. @EB: What temperature are you planning for? You can figure the temperature rise per shot from the electrical energy and mass of copper. There are many good epoxies.
3. @Ash: where did you get that 100 degree figure? That isn't very hot for most electronic materials and components. Glass-epoxy multilayer circuit boards are lead-free soldered at over 220 degrees C. What do you think IC packages are made of? A quick Internet search turns up this slow-curing potting compound rated for service at 275 degrees C.

Re: Coil construction
Yandersen, Fri Sept 20 2013, 06:16PM
Finally I gave a try to the West Systems 105-A epoxy and 209 extra slow hardener - superawesome chemicals! It gave me over an hour to wind the coil, unwind it and rewind it back until epoxy mix started to enter the jelly state. Then I put the coil into oven to cure at ~60C. The epoxy get hard after 2 hr (I checked periodically), but I took coil out after 3hr. Seems to be totally ready.
Now the bad news. Epoxy is so fucking good that it bonds even to the plastic. Those thick soft plastic rings on the sides I used to separate metal cage from epoxy had some scratches. They come out as chopped pieces. But scotch tape easily peels off. So the sides of the winding form must be covered with scotch. Better to have a separate thin scotch rings, as some minor sticking still occurs.
Re: Coil construction
Yandersen, Tue Sept 24 2013, 08:11PM
Some more info. I tried to unwind a layer from that coil - wire came out without insulation. So the West Systems epoxy, unlike the others, bonds to the wire' enamel harder, than the enamel to the wire!
Soaking coil in the epoxy is very important for coilgun coils, because the wire experiences a very hard pressures and pulse vibrations, which damages wire' insulation and tends to unwind the coil, changing it's shape. In addition, the common issue is a barrel squeezed by wire. Strong epoxy holds the coil in shape and prevents the inside turns from gripping the barrel.
So for coil winding, I would definitely recommend everyone the West System 105 epoxy and 209 extra slow hardener - it is better than any other epoxies I ever used. Thanks again to the Ash Small for aiming me at that product! :)
Re: Coil construction
Ash Small, Tue Oct 01 2013, 07:05PM
I was specifically referring to the 'general purpose', high-strength epoxies being discussed here. The West System datasheet for 105/209 epoxy/hardener combination here:
]tds_105_209.pdf[/file]
Gives a 'heat deflection temperature' (ASTM D-648) of 117 Farenheit (~47 Celcius).
Heat deflection temperature and ASTM D-648 are described here:
Some epoxies are claimed to withstand ~180 Celcius, or so, maybe even higher, but not a lot higher. I imagine physical strength isn't a major issue in the applications you describe, and some softening/weakening can be tolerated, but 'general purpose' epoxies will generally fail at not far above 100 Celcius, They will certainly be a lot weaker if they don't actually fail.
I was once told by an 'epoxy boffin' that 'different chemistry' is required at above 200 Celsius, or so.
@Yan,
EDIT: The specifications for the 'MG Chemicals 832HT High Temperature Epoxy Encapsulating and Potting Compound ' product linked to above makes no mention of strength, and is quite lacking in any technical specifications, but then, it's designed for potting, not for strengthening/re-inforcing a coil-gun coil.
Ash Small, Tue Oct 01 2013, 07:05PM
klugesmith wrote ...
3. @Ash: where did you get that 100 degree figure? That isn't very hot for most electronic materials and components. Glass-epoxy multilayer circuit boards are lead-free soldered at over 220 degrees C. What do you think IC packages are made of? A quick Internet search turns up this slow-curing potting compound rated for service at 275 degrees C.

3. @Ash: where did you get that 100 degree figure? That isn't very hot for most electronic materials and components. Glass-epoxy multilayer circuit boards are lead-free soldered at over 220 degrees C. What do you think IC packages are made of? A quick Internet search turns up this slow-curing potting compound rated for service at 275 degrees C.

I was specifically referring to the 'general purpose', high-strength epoxies being discussed here. The West System datasheet for 105/209 epoxy/hardener combination here:
]tds_105_209.pdf[/file]
Gives a 'heat deflection temperature' (ASTM D-648) of 117 Farenheit (~47 Celcius).
Heat deflection temperature and ASTM D-648 are described here:

Some epoxies are claimed to withstand ~180 Celcius, or so, maybe even higher, but not a lot higher. I imagine physical strength isn't a major issue in the applications you describe, and some softening/weakening can be tolerated, but 'general purpose' epoxies will generally fail at not far above 100 Celcius, They will certainly be a lot weaker if they don't actually fail.
I was once told by an 'epoxy boffin' that 'different chemistry' is required at above 200 Celsius, or so.
@Yan,

EDIT: The specifications for the 'MG Chemicals 832HT High Temperature Epoxy Encapsulating and Potting Compound ' product linked to above makes no mention of strength, and is quite lacking in any technical specifications, but then, it's designed for potting, not for strengthening/re-inforcing a coil-gun coil.
Print this page