If you need assistance, please send an email to forum at 4hv dot org. To ensure your email is not marked as spam, please include the phrase "4hv help" in the subject line. You can also find assistance via IRC, at irc.shadowworld.net, room #hvcomm.
Support 4hv.org!
Donate:
4hv.org is hosted on a dedicated server. Unfortunately, this server costs and we rely on the help of site members to keep 4hv.org running. Please consider donating. We will place your name on the thanks list and you'll be helping to keep 4hv.org alive and free for everyone. Members whose names appear in red bold have donated recently. Green bold denotes those who have recently donated to keep the server carbon neutral.
Special Thanks To:
Aaron Holmes
Aaron Wheeler
Adam Horden
Alan Scrimgeour
Andre
Andrew Haynes
Anonymous000
asabase
Austin Weil
barney
Barry
Bert Hickman
Bill Kukowski
Blitzorn
Brandon Paradelas
Bruce Bowling
BubeeMike
Byong Park
Cesiumsponge
Chris F.
Chris Hooper
Corey Worthington
Derek Woodroffe
Dalus
Dan Strother
Daniel Davis
Daniel Uhrenholt
datasheetarchive
Dave Billington
Dave Marshall
David F.
Dennis Rogers
drelectrix
Dr. John Gudenas
Dr. Spark
E.TexasTesla
eastvoltresearch
Eirik Taylor
Erik Dyakov
Erlend^SE
Finn Hammer
Firebug24k
GalliumMan
Gary Peterson
George Slade
GhostNull
Gordon Mcknight
Graham Armitage
Grant
GreySoul
Henry H
IamSmooth
In memory of Leo Powning
Jacob Cash
James Howells
James Pawson
Jeff Greenfield
Jeff Thomas
Jesse Frost
Jim Mitchell
jlr134
Joe Mastroianni
John Forcina
John Oberg
John Willcutt
Jon Newcomb
klugesmith
Leslie Wright
Lutz Hoffman
Mads Barnkob
Martin King
Mats Karlsson
Matt Gibson
Matthew Guidry
mbd
Michael D'Angelo
Mikkel
mileswaldron
mister_rf
Neil Foster
Nick de Smith
Nick Soroka
nicklenorp
Nik
Norman Stanley
Patrick Coleman
Paul Brodie
Paul Jordan
Paul Montgomery
Ped
Peter Krogen
Peter Terren
PhilGood
Richard Feldman
Robert Bush
Royce Bailey
Scott Fusare
Scott Newman
smiffy
Stella
Steven Busic
Steve Conner
Steve Jones
Steve Ward
Sulaiman
Thomas Coyle
Thomas A. Wallace
Thomas W
Timo
Torch
Ulf Jonsson
vasil
Vaxian
vladi mazzilli
wastehl
Weston
William Kim
William N.
William Stehl
Wesley Venis
The aforementioned have contributed financially to the continuing triumph of 4hv.org. They are deserving of my most heartfelt thanks.
Registered Member #1389
Joined: Thu Mar 13 2008, 12:50AM
Location: Pittsburgh, PA
Posts: 346
If you're having trouble with nasty looking ends, try using a rope whipping technique to tidy up the ends with some of your twine. Though you may have to undo some of your lacing to get at the affected wires, I imagine. I am enjoying looking at the pictures of the build (and thank you for not using imageshack).
Is that ball going to be sitting on top of your breakout point all the time, or are you going to take it off/put it on when you feel like it? Also, can the mechanical contacts hold up to the RF power passing thorough them, or might they get corona on those surfaces?
Registered Member #2028
Joined: Mon Mar 16 2009, 08:13PM
Location: Norway
Posts: 319
or simply paint it black, thats what I did with the mot/moc in my vttc, looks good.
I know this is going to make me look like an idiot, but how about electroplating the core with brass or copper? Would that affect the performance of the MOT? It sure would look great.
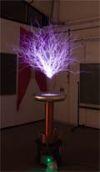
Cesiumsponge, i havent commented your project yet. What a stunning tesla coil! I love the old style cable lashing, and the choice of materials. I tend to prefer the more modern look, but this has definately caught my attention. Your attention to detail is beyond anything i have ever seen. I cant wait to see it finished.
Registered Member #135
Joined: Sat Feb 11 2006, 12:06AM
Location: Anywhere is fine
Posts: 1735
It's looking really good. I would have heatshrunk the crimp lugs to finish off the wire/lug connection with a clean look, but that's just me.
> you don't plate a transformer core. Laminations are electrically isolated with a layer of varnish and are carefully treated so as to reduce eddy currents. If the core were allowed to conduct to each adjoining lamination, enormous currents would build in the core and cause tremendous power loss and quite a bit of heating.
Registered Member #639
Joined: Wed Apr 11 2007, 09:09PM
Location: The Netherlands, Herkenbosch
Posts: 512
He could take the MOT completely apart. Clean the varnish of then electroplate it put new varnish on there and reassemble it. Though I have a feeling this would be to much work even for Cesiumsponge.
Registered Member #152
Joined: Sun Feb 12 2006, 03:36PM
Location: Czech Rep.
Posts: 3384
Dalus wrote ...
He could take the MOT completely apart. Clean the varnish of then electroplate it put new varnish on there and reassemble it. Though I have a feeling this would be to much work even for Cesiumsponge.
That would not work, clear the varnish and electroplate EVERY lamination? They are welded together. Or just the core? That would short it out anyways. And the magnetising current of a re-assembled MOT is always monstrous.
Registered Member #639
Joined: Wed Apr 11 2007, 09:09PM
Location: The Netherlands, Herkenbosch
Posts: 512
I've seen cores that aren't welded together. It will be a lot of work to strip the varnish of then plate every lamination and revarnish them. Don't know about how much the magnetizing currents would increase not a lot when the core gets put together nicely I guess.
From a practical standpoint it would be a lot simpler to make a housing from a few brass/copper plates.
Registered Member #397
Joined: Wed Apr 19 2006, 12:56AM
Location: Western Washington
Posts: 125
Firefox wrote ...
If you're having trouble with nasty looking ends, try using a rope whipping technique to tidy up the ends with some of your twine. Though you may have to undo some of your lacing to get at the affected wires, I imagine.
Is that ball going to be sitting on top of your breakout point all the time, or are you going to take it off/put it on when you feel like it? Also, can the mechanical contacts hold up to the RF power passing thorough them, or might they get corona on those surfaces?
I think it would look quite odd too for my tastes. I redid most of the offending terminals and redid the entire cable lacing job, this time switching to proper cable lacing material. What I used before was a waxed twine, which does work fine, but the proper cable lacing material almost like dental floss, but more waxy and no minty. It was good practice.
As far as the breakout point, I just put the ball on there because it was handy for the photo and I didn't want to jab myself with the sharp breakout point underneath. Which mechanical contacts are you referring to? If something is going to create an electric potential high enough to ionize air, the method of contact wouldn't change anything, unless it was such a poor mechanical contact that it established an arc.
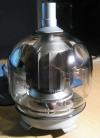
On the MOT: I once considered doing a brass casing or a gloss black sheet metal case to cover the transformer, much like a tube audio amplifier. However I thought twice and dropped the idea because the premise behind the steampunk aesthetic is to have the guts exposed, to show the mechanical goodness of what's underneath, all the wires, gears, and stuff you normally don't see. Keeping that in mind, I ended up lacquering the MOT a bit to protect it from corrosion. One of the filament transformers is a vintage Stancor so it already looked old with it's coat of shellac or lacquer. The other was a new Magnetek transformer. I actually lacquered it like crazy to give it an off-brown lacquered look as well. The transformers look like transformers as a result, and I just dolled them up a bit to make them look somewhat aged.
[quote] Outstanding work sir!
One little suggestion that may save a tear down the road is to ensure all connections to the tube are floating (Plate, grid and filaments) as once tube heats up things move and you do not want to hear a tink! This is good as plate cap can float on wire @
Spark On, Ch
The plate and grid connections actually look a -lot- more rigid than they really are. The bus wire I used has a fair amount of flex and the connections from the tank cap and plate cap are both bolted to the solder tabs on the resistor, which is pretty flimsy. I believe it should be fine with expansion of the glass envelope. I'm fairly certain moving the coil around for transport introduces much more twisting and flex than what the tube will see in stationary operation. I also have some split lock washers on the thumbnuts used on the choke so the connections at the resistor tabs can swivel a bit as I didn't torque the sucker so much that the split rings are completely flattened.
Ironically, on my original 810 VTTC, the plate cap wire actually nearly broke off at the tank cap terminal because the wire was so stiff that after repeated actions of taking off and popping on the plate cap, the wire strands finally broke one by one until it was just hanging there. It was some 20kv+ high voltage wire with hard insulation (not like that flexible silicone GTO wire).
I will keep this in mind though. I've had the filament warming for about an hour and I had no issues, but I do have a couple extra tubes. I am fairly confident on the toughness of these tubes.
The one currently being used is actually my beater tube. I had to use a torch to remove the silver solder on end of the grid cap once. The ceramic spacer piece had the ceramic-glass glue joint break loose, leaving the terminal jiggly since it was only attached to the invar feedthru, which could forseeably lead to the ceramic spacer scraping the glue clean off the glass, then eventually scoring the glass, causing it to fail down the road. I glued it back and re-silver brazed it back on. The cap was a dull cherry red from the heat and I had to use scotchbrite afterwards to clean up the oxidation. These things are pretty tough!
Dr. Kilovolt wrote ...
They are welded.
Yep, mine happens to be welded too. Not just a cheesy tack weld, but two parallel beads down the bottom and two more at the top perpendicular to the laminations. I couldn't seperate the laminations unless I took an end mill and machined a big groove to remove each weld.
Had stuff to do this weekend so I didn't touch the coil at all. I am also planning a dual 810 VTTC in a similar style and got a handful of canister-type mica transmitting caps in the mail, and waiting for my variable vacuum cap (didn't come yet D: ) so I have been sidetracked. I did manage to work on the ground connections today. Ran most of the wires and roughed in the bundles as I want them to break out nice and even to the ground block, as well as fabricated half of the grounding block and tapped the holes (copper is gummy!) This project is fairly simple as far as wiring goes too and its a burden to cleanly route stuff and lace it up. I think I might shoot myself in the face if I had to do cable lacing on something much more complex like Dr. Spark's Quadzilla with all his monitoring and control circuitry.
As long as I put in at least a couple hours a day, this thing should progress fairly quickly. Wiring and the primary are basically the only things left. Now that it's near completion, I've slowed down my pace a bit to smell the roses.
This site is powered by e107, which is released under the GNU GPL License. All work on this site, except where otherwise noted, is licensed under a Creative Commons Attribution-ShareAlike 2.5 License. By submitting any information to this site, you agree that anything submitted will be so licensed. Please read our Disclaimer and Policies page for information on your rights and responsibilities regarding this site.


 The Tesla Thermionic Valve Wireless Energy Transmitting Apparatus