If you need assistance, please send an email to forum at 4hv dot org. To ensure your email is not marked as spam, please include the phrase "4hv help" in the subject line. You can also find assistance via IRC, at irc.shadowworld.net, room #hvcomm.
Support 4hv.org!
Donate:
4hv.org is hosted on a dedicated server. Unfortunately, this server costs and we rely on the help of site members to keep 4hv.org running. Please consider donating. We will place your name on the thanks list and you'll be helping to keep 4hv.org alive and free for everyone. Members whose names appear in red bold have donated recently. Green bold denotes those who have recently donated to keep the server carbon neutral.
Special Thanks To:
Aaron Holmes
Aaron Wheeler
Adam Horden
Alan Scrimgeour
Andre
Andrew Haynes
Anonymous000
asabase
Austin Weil
barney
Barry
Bert Hickman
Bill Kukowski
Blitzorn
Brandon Paradelas
Bruce Bowling
BubeeMike
Byong Park
Cesiumsponge
Chris F.
Chris Hooper
Corey Worthington
Derek Woodroffe
Dalus
Dan Strother
Daniel Davis
Daniel Uhrenholt
datasheetarchive
Dave Billington
Dave Marshall
David F.
Dennis Rogers
drelectrix
Dr. John Gudenas
Dr. Spark
E.TexasTesla
eastvoltresearch
Eirik Taylor
Erik Dyakov
Erlend^SE
Finn Hammer
Firebug24k
GalliumMan
Gary Peterson
George Slade
GhostNull
Gordon Mcknight
Graham Armitage
Grant
GreySoul
Henry H
IamSmooth
In memory of Leo Powning
Jacob Cash
James Howells
James Pawson
Jeff Greenfield
Jeff Thomas
Jesse Frost
Jim Mitchell
jlr134
Joe Mastroianni
John Forcina
John Oberg
John Willcutt
Jon Newcomb
klugesmith
Leslie Wright
Lutz Hoffman
Mads Barnkob
Martin King
Mats Karlsson
Matt Gibson
Matthew Guidry
mbd
Michael D'Angelo
Mikkel
mileswaldron
mister_rf
Neil Foster
Nick de Smith
Nick Soroka
nicklenorp
Nik
Norman Stanley
Patrick Coleman
Paul Brodie
Paul Jordan
Paul Montgomery
Ped
Peter Krogen
Peter Terren
PhilGood
Richard Feldman
Robert Bush
Royce Bailey
Scott Fusare
Scott Newman
smiffy
Stella
Steven Busic
Steve Conner
Steve Jones
Steve Ward
Sulaiman
Thomas Coyle
Thomas A. Wallace
Thomas W
Timo
Torch
Ulf Jonsson
vasil
Vaxian
vladi mazzilli
wastehl
Weston
William Kim
William N.
William Stehl
Wesley Venis
The aforementioned have contributed financially to the continuing triumph of 4hv.org. They are deserving of my most heartfelt thanks.
Registered Member #543
Joined: Tue Feb 20 2007, 04:26PM
Location: UK
Posts: 4992
Eirik, I would expect some tens of uA at least of anode current by this stage - even if it is only cold cathode field emission - but think you must increase the heater voltage to 5V to be sure. Remember that in this tyoe of tube, X-ray intensity is usually controlled by varying the heater voltage/temperature, while the anode voltage (much harder to regulate) remains constant.
If that tube is dead, I will send you a PD500 shunt stabiliser triode which will most certainly produce a strong output at 50kV, though not as well focused as the Coolidge would have been.
So don't despair! If the Coolidge tube is kaputt, you'll soon have something else to make all your hard work worthwhile!
Registered Member #95
Joined: Thu Feb 09 2006, 04:57PM
Location: Norway
Posts: 1308
IT WORKS!
I had to increase the filament voltage to about 3V, (that regulator you gave me came in handy, Harry ) once in that range the tube rapidly starts conducting, and small changes in filament voltage cause large swings in anode current. Currently I've taken 4 x-rays. The anode current is about 3mA and the voltage a meager 40~45kV.
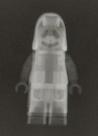
I was about to give up after the first x-ray, as nothing was showing up while the paper was under the developer. Little did I know it took much longer than when simply exposing the paper to bright light! Development times with rapid fixer are some 2 - 10 minutes, though the contrast is good after 5 min. I expose the cassette and objects at 15cm range, for 30 to 50 seconds. Greater distances would improve sharpness, but greatly increase exposure time. Here are the last two x-rays.
As evident in the ipod and cell phone exposure the anode voltage isn't high enough for penetrating radiation. Just look at the spikes on the Tesla-Lego figure's helmet, which consist of nothing but 1/2W resistor lead wire. I'm going to upgrade my CW tower now, and hope the voltage doesn't sag.
Registered Member #543
Joined: Tue Feb 20 2007, 04:26PM
Location: UK
Posts: 4992
That's marvellous, Eirik! Well done! I knew you could do it!
Increasing KVA will certainly increase sharpness, as the low energy X-rays always produce more "woolly" images. But as you say, the more Cockcroft stages the greater the 'sag', and you may start to lose current too. You'll just have to try it and see.
Perhaps now is the time to start thinking about a reliable ionization chamber, so you will have a better idea of what is going on with the rays as they travel in and around your room!
Now you have some data, you can enter it in RadPro and see how many Sv/hr you have. You may be surprised!
Registered Member #561
Joined: Sat Mar 03 2007, 02:46AM
Location: Adelaide Australia
Posts: 230
Uzzors wrote ...
IT WORKS!
I had to increase the filament voltage to about 3V, (that regulator you gave me came in handy, Harry ) once in that range the tube rapidly starts conducting, and small changes in filament voltage cause large swings in anode current. Currently I've taken 4 x-rays. The anode current is about 3mA and the voltage a meager 40~45kV.
I was about to give up after the first x-ray, as nothing was showing up while the paper was under the developer. Little did I know it took much longer than when simply exposing the paper to bright light! Development times with rapid fixer are some 2 - 10 minutes, though the contrast is good after 5 min. I expose the cassette and objects at 15cm range, for 30 to 50 seconds. Greater distances would improve sharpness, but greatly increase exposure time. Here are the last two x-rays.
As evident in the ipod and cell phone exposure the anode voltage isn't high enough for penetrating radiation. Just look at the spikes on the Tesla-Lego figure's helmet, which consist of nothing but 1/2W resistor lead wire. I'm going to upgrade my CW tower now, and hope the voltage doesn't sag.
Very nice!
I've just got to get my flyback driver working and I'll start making xray pics
Registered Member #95
Joined: Thu Feb 09 2006, 04:57PM
Location: Norway
Posts: 1308
Alrighty, my totem of manhood has been jacked up two notches. The output voltage is around 70kV no load, I haven't measured throughly nor under load yet. It should hold up enough to give much more penetrating x-rays this time. I expect to try it out this weekend.
Registered Member #543
Joined: Tue Feb 20 2007, 04:26PM
Location: UK
Posts: 4992
Great stuff, Eirik!
Remember that the 1G potential divider will draw off 70uA - 3.4W - at 70kV, so I would expect the tube voltage to jump up quite a bit when you disconnect the divider, unless you are sure you have power enough to spare to prevent 'sag'.
I've just remembered that I've got some Cold War era quartz fibre dosimeters in a box somewhere - you charge them to 300V, set the zero, and get a direct reading in mR when you look through it against the light like a little microscope. They're the size of a fat fountain pen with an aluminium body. I don't suppose they're wonderfully accurate, but located at centre beam at 5 - 10cm you will get a high enough reading to expect a fair degree of accuracy.
I'll put one in the post to you in the next few days, because it's really essential that you have some idea of what is coming out of your tube. It would be negligent not to know, lad.
It measures accumulated dose, so if you charge it and leave it on your workbench you can measure the dose received at that position up to a period of several days (before leakage means that the instrument has to be recharged)
I hope to unveil THOR, my single-shot solid-dielectric-gap pulse power flash machine in the projects section in the near future. I am having difficulty making a suitable cart for it, and am looking out for a discarded supermarket trolley (kart) to saw the wheel assemblies and weld them onto a new chassis. Trolleys pulled out of the river will do fine so long as they haven't been in the water for too long. (A terrible testament of our times! )
In the meantime, if there are any small bits and pieces you need to get on with your own machine don't be afraid to ask, as I may well have them knocking about somewhere.
Keep up the good work, Eirik!
Thor's Battle Against the Giants MÃ¥rten Eskil Winge, 1872
Registered Member #95
Joined: Thu Feb 09 2006, 04:57PM
Location: Norway
Posts: 1308
That sounds great, Harry. I'll wait until the dosimeter comes before testing again then. I used RadPro to find my current exposure. With the intensity I'm exposed to being only 6.663993E-013 µSv/hr, and my total exposure time 2,5 minutes, I consider it quite negligible. 2.8*10^-17 mSv. Increasing the tube voltage from 50 to 70kV greatly increases the exposure though! An order of 10^11!
Your project sounds intriguing, Harry. Single-shot x-ray exposure, yikes!
Registered Member #543
Joined: Tue Feb 20 2007, 04:26PM
Location: UK
Posts: 4992
Hei Eirik! I will do my best to post your dosimetry kit by the end of today, but if I can't find the time, it won't go off until Monday.
I am able to spare a 200cGy and a 500cgy quartz fibre dosimeter, a Stephen charger unit, and its instruction manual.
As RBE (Q) for electron and photon radiation is 1, the instruments can be directly read out as 0-2 Sv and 0-5 Sv respectively.
The 500cGy unit is a brand new Dosimeter Corporation Gamma & X-Ray Dosimeter Model 673 calibrated in 20cGy steps.
The 200cGy unit is in good used condition and is calibrated in 10cGy steps.
You will need a 1.5V alkaline D cell to power the charger unit, which weighs quite enough without the expense of sending a battery for it.
Both units will detect beta particles >1MeV.
Measurement compensation. I suggest you use the instruments together with an aluminium filter over the tube, since radiation below the aluminium K edge will not be able to penetrate the dosimeters.
If using the dosimeters close to the tube, I suggest you place them in a thin-walled aluminium tube such as cigar tube with a good low resistance earth connection to shield the instruments from strong local coulomb forces which could disturb the tiny charge on the quartz fibre.
I most strongly suggest that you investigate your calibration standads as follows. Taking take to set up true 90 deg rightangles (!) position the 200cGy instrument in its Faraday shield at a distance d from the anode at centre beam. I would suggest 150mm or 200mm for your first attempt. Making a few trials runs, (and recharging and resetting the dosimeter between each) determine very approximately the time t required to bring the dosimeter up to 66% of full scale - roughly around 130cGy - where a 200cGy instrument can be expected to be most accurate. Apply filament current and wait for five minutes to allow the filament to reach its stable working termperature and reach thermal equilibrium with the tube structure. Now start your stop watch, and apply anode voltage. After the time t previously estimated for a dose of 130cGy switch off your HT voltage, and stop your clock. Remove your dosimeter in its earthed Faraday tube to a good distance from the apparatus, and quickly bleed off any remaining HT in your C&W with the potential divider voltmeter. Use an Earth Probe to shunt off any remaining charges in and around the apparatus and any large local metal parts which might have accumulated charges on them.
Now open your dosimeter Faraday shield and take your reading.
You now have the parameters time, distance, dose, anode voltage, and aluminium filter thickness to enter into RadPro, and can directly compare the actual reading with the predictions of RadPro.
Repeat the exact procedure and conditions as many times as your interest in it can be made to last!
Now increase the distance in increments, repeating the same procedure for each, and comparing each empirical reading with the RadPro prediction.
When you can stand not one more minute of this dull routine, you must Remember at all costs that at this stage you are in maximum danger, and your personal survival may depend on a serious investment in Lyst Sterkøl to cope with repeating the entire set of procedures all over again with the 500cGy instrument the following day.
Work up your data forwards and backwards, draw your graphs, and you will have your first calibration curves, and confidence regions.
There is no need to do anything quite so boring for a very long time, or until you acquire a third instrument, which you can compare with the two first.
So you've got your dosimetry kit, a good brain, and the RadPro calculator, and rest is up to you... why not try some real experiments beyond the usual radiographs of mobile phones and sea shells?
One you may enjoy is the X-ray pin-hole camera, with which you will be able to image the anode, and thereby see the exact source of the radiation, a powerful experimental tool. Once you have imaged the anode, you might try bringing in a strong neodymium magnet to observe the active spot's deflection. You might also try to find out how the active spot may be altered by a strong alternating magnetic field.
You could attempt the early, simpler forms of X-ray crystallography....
But I've no business telling you how you should do your science!
My chief reward is knowing that you now have some basic safety equipment, but I would very much enjoy a piece of ordinary supermarket geitost if this is not too much to ask.
If there is space in the dosimeter parcel box, which I have not yet put together, I will include a few small EHT valves known to be good cold cathode X-ray emitters, as they weigh almost nothing compared with the Stephens charger unit. Run them under oil at 35 - 45kV or they will flash over, or fail due to glass dielectric puncture. But they will work for a few hours each, and cost only a few kronor, so it is no great loss when they fail. Don't heat the filament, so they are forced to conduct in cold cathode field emission mode. Don't let Ia exceed 40-50uA, or they will fail in minutes.
It would make a first class project to use the pin-hole camera to image the X-ray emission from a collection of old EHT diodes, since there will be no focal spot, as with your main dental tube, but numerous sources of emission of different intensities from different points within the valve structure.
I will write of THOR in a private message when I have the time. I must get on with my day now.
This site is powered by e107, which is released under the GNU GPL License. All work on this site, except where otherwise noted, is licensed under a Creative Commons Attribution-ShareAlike 2.5 License. By submitting any information to this site, you agree that anything submitted will be so licensed. Please read our Disclaimer and Policies page for information on your rights and responsibilities regarding this site.


 Uzzors' Coolidge X-ray Machine


 ) once in that range the tube rapidly starts conducting, and small changes in filament voltage cause large swings in anode current. Currently I've taken 4 x-rays. The anode current is about 3mA and the voltage a meager 40~45kV.


 )
)
 Are you going to put this on your website?