If you need assistance, please send an email to forum at 4hv dot org. To ensure your email is not marked as spam, please include the phrase "4hv help" in the subject line. You can also find assistance via IRC, at irc.shadowworld.net, room #hvcomm.
Support 4hv.org!
Donate:
4hv.org is hosted on a dedicated server. Unfortunately, this server costs and we rely on the help of site members to keep 4hv.org running. Please consider donating. We will place your name on the thanks list and you'll be helping to keep 4hv.org alive and free for everyone. Members whose names appear in red bold have donated recently. Green bold denotes those who have recently donated to keep the server carbon neutral.
Special Thanks To:
Aaron Holmes
Aaron Wheeler
Adam Horden
Alan Scrimgeour
Andre
Andrew Haynes
Anonymous000
asabase
Austin Weil
barney
Barry
Bert Hickman
Bill Kukowski
Blitzorn
Brandon Paradelas
Bruce Bowling
BubeeMike
Byong Park
Cesiumsponge
Chris F.
Chris Hooper
Corey Worthington
Derek Woodroffe
Dalus
Dan Strother
Daniel Davis
Daniel Uhrenholt
datasheetarchive
Dave Billington
Dave Marshall
David F.
Dennis Rogers
drelectrix
Dr. John Gudenas
Dr. Spark
E.TexasTesla
eastvoltresearch
Eirik Taylor
Erik Dyakov
Erlend^SE
Finn Hammer
Firebug24k
GalliumMan
Gary Peterson
George Slade
GhostNull
Gordon Mcknight
Graham Armitage
Grant
GreySoul
Henry H
IamSmooth
In memory of Leo Powning
Jacob Cash
James Howells
James Pawson
Jeff Greenfield
Jeff Thomas
Jesse Frost
Jim Mitchell
jlr134
Joe Mastroianni
John Forcina
John Oberg
John Willcutt
Jon Newcomb
klugesmith
Leslie Wright
Lutz Hoffman
Mads Barnkob
Martin King
Mats Karlsson
Matt Gibson
Matthew Guidry
mbd
Michael D'Angelo
Mikkel
mileswaldron
mister_rf
Neil Foster
Nick de Smith
Nick Soroka
nicklenorp
Nik
Norman Stanley
Patrick Coleman
Paul Brodie
Paul Jordan
Paul Montgomery
Ped
Peter Krogen
Peter Terren
PhilGood
Richard Feldman
Robert Bush
Royce Bailey
Scott Fusare
Scott Newman
smiffy
Stella
Steven Busic
Steve Conner
Steve Jones
Steve Ward
Sulaiman
Thomas Coyle
Thomas A. Wallace
Thomas W
Timo
Torch
Ulf Jonsson
vasil
Vaxian
vladi mazzilli
wastehl
Weston
William Kim
William N.
William Stehl
Wesley Venis
The aforementioned have contributed financially to the continuing triumph of 4hv.org. They are deserving of my most heartfelt thanks.
Registered Member #146
Joined: Sun Feb 12 2006, 04:21AM
Location: Austin Tx
Posts: 1055
Just as in a shorted strike-rail, I'd bet there will be significant current flowing in your aluminum frame unless you take care to put a break in each square loop formed by it (not just the top, but the sides too). If the frame's resistance is low, then the result is simply that it shorts out some inductance of the primary coil, which is not ideal because its increasing the resistance to achieve that inductance.
Registered Member #1403
Joined: Tue Mar 18 2008, 06:05PM
Location: Denmark, Odense C
Posts: 1968
Steve Ward wrote ...
Just as in a shorted strike-rail, I'd bet there will be significant current flowing in your aluminum frame unless you take care to put a break in each square loop formed by it (not just the top, but the sides too). If the frame's resistance is low, then the result is simply that it shorts out some inductance of the primary coil, which is not ideal because its increasing the resistance to achieve that inductance.
This was also my concern in a previous post, but now that I have given it some thought, I would like to see it run like it is and have him report back if there was any heat loss in the frame work.
Some years back when I worked with brewery automation, we had preform feeder consisting of two rolls that would sort them out before heating and blowing them up to bottles. We had great trouble with bus modules disconnecting from the network and after a reboot would seem fine again. Long story short, sorter part of the machine was done in similar aluminium profiles, all interconnected by 10mm^2 wire for grounding. The problem turned out to be static electricity buildup and the profiles was close to be isolating rather than acting as a good ground.
Wether this profile only acts with high resistance to static because of the surface treatment or it also has high resistance against induction, not so sure :)
But prepare your work for a "quick-fix" so you can cut out a piece and avoid the closed loops if it turns out to be a problem. A problem might also take a while to find, it could still eat power but also dissipate it quite good.
Thanks Steve and Mads for your comments :) I did some quick tests and I found that (as Mads mentioned) that the anodizing of the aluminium framing is actually pretty solid, which ended up being quite high resistance. This would as you can imagine, fluctuate greatly depending on how hard the connection screws 'bite' into the aluminium and break the anodizing. Since I have a setup going already though, I thought I might as well make this into an experiment to see how it works with or without a gap.
My backup plan is to simply replace the top connectors with fiberglass or similar flat plates instead of aluminium, with kapton tape between the member joints. Replacing just one of these opens the top square loop and two side loops, and replacing just two of them opens all 5 loops, so I'll see how it performs with and without.
Back to construction, more progress was made!
The driver will be powered by a 75W switching power supply, which will also run the fans and under-glow lights. I'm using my version of the UD2.7 here. I am planning to use the resistor for the lights because they seem a bit too bright. Appropriate holes were drilled into the grounded metal box which holds the driver.
I bought a spool of wire on ebay and made a little jig for it.
I got 8" PVC pipe and machined the end-caps for it out of polycarbonate, mounted it carefully on the lathe, and started winding it. I was also able to get the auto-feeder going, which was very cool to watch since the coil basically winds itself. I had to stop a few times to manually adjust the spacing since the wire thickness+insulation doesn't match the feed rate perfectly, but it worked out in the end. Also note that it basically takes up the entire lathe - couldn't have made a much bigger coil at all! Even with the lathe to help, this still took about an hour. Once done, I coated it with polyurethane varnish and left it on the lathe to dry. The coil will take several coats for durability.
Primary supports were laser cut using a 75W laser cutter. I also engraved numbers on them since they are all individually different, to account for the spiral.
The primary table was made using a large acrylic sheet and marked the old-fashioned way with a compass and straight edge.
Primary supports then drilled and tapped and screwed onto the primary table.
Finally, the primary goes together. This went quite easily with 3/8" copper tubing. I designed the primary supports to be a 'snap-in' fit, so they all fit together perfectly and in-place with no zip-ties required :)
Most of the components are done at this point, so the next time is to make all the small items like primary connectors and side panels, and the wiring which will definitely take more time than I think it will.
After a lot more work, I managed to put the coil together
The side panels were cut out on the laser cutter. This went pretty fast and it's great to have technology to help.
Here you can see the CT, GDT and gate drives all ready for assembly.
The wiring was a lot of work and still leaves a lot to be desired, but just wanted to get it together. Tested the wiring and started low-power testing without the secondary in place. Everything works great with perfect ZVS.
And the coil is completed, topped of with a spun toroid and green underglow. Time to plug it in!
Registered Member #1403
Joined: Tue Mar 18 2008, 06:05PM
Location: Denmark, Odense C
Posts: 1968
It looks real good, that laser cutter is really a improvement to good looking and fast made pieces :) I really like the idea of making the primary holder snap-in tight.
What kind of size / model / price is such a laser cutter machinery?
It looks real good, that laser cutter is really a improvement to good looking and fast made pieces :) I really like the idea of making the primary holder snap-in tight.
What kind of size / model / price is such a laser cutter machinery?
Where did you buy the toroid?
Thanks :) In fact I've been using all snap-in primary holders for almost all of my coils, usually setting the hole size to be the exact size of the primary conductor and the slot in to be a V-shape taper, just barely narrower than the diameter.
Usually I do one or two small test cuts to make sure the shape fits, and it helps with a bit of experience too since the laser cutter behaves differently depending on the thickness of the material. The laser cutter was available for use in the workshop I was building the coils in so I have no idea how much they cost, but this was a 75W Universal Laser, and they're pretty expensive, something like several 10,000s. There's also a 60W Epilog laser in the shop. I've seen people cut up to 2" thick acrylic with these guys with some tricks, so it's very impressive.
I got the toroid from Amazing1, of all places! They sell... somewhat sketchy tesla coils and other electronic things, but their toroids are very nice, and they even offer custom toroid spinning for any size you want.
Right now the safety folks are understandably a bit concerned with me running the coil from the shop's power, ...
The coils have both been run at a conservative setting with about 185-210VAC input from a generator. Sorry for the third post, thought it would be nice to share the results of the coil in action.
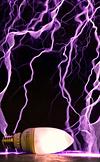
The generator was a 4kW Honda generator and was clearly struggling under the load during musical runs. I haven't managed to get the coils completely tuned yet but they are currently performing pretty ok with 7 feet of spark :) Unfortunately needed more power to turn both on at the same time.
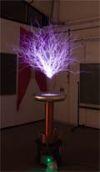
It's alive!
And the red coil in action.
After a minute or two runs, all parts of the coil are still quite cold, so I am quite confident the coil will be able to be run at much higher power with no problems, something like 1.2kA. More photos can be found on my flickr:
And finally here's a video of the red coil in polyphonic mode. Looking forward to higher power runs soon and I think something like 10 feet spark should be no problem.
This site is powered by e107, which is released under the GNU GPL License. All work on this site, except where otherwise noted, is licensed under a Creative Commons Attribution-ShareAlike 2.5 License. By submitting any information to this site, you agree that anything submitted will be so licensed. Please read our Disclaimer and Policies page for information on your rights and responsibilities regarding this site.


 Semikron DRSSTC Twin Coils!


 ...
...


