If you need assistance, please send an email to forum at 4hv dot org. To ensure your email is not marked as spam, please include the phrase "4hv help" in the subject line. You can also find assistance via IRC, at irc.shadowworld.net, room #hvcomm.
Support 4hv.org!
Donate:
4hv.org is hosted on a dedicated server. Unfortunately, this server costs and we rely on the help of site members to keep 4hv.org running. Please consider donating. We will place your name on the thanks list and you'll be helping to keep 4hv.org alive and free for everyone. Members whose names appear in red bold have donated recently. Green bold denotes those who have recently donated to keep the server carbon neutral.
Special Thanks To:
Aaron Holmes
Aaron Wheeler
Adam Horden
Alan Scrimgeour
Andre
Andrew Haynes
Anonymous000
asabase
Austin Weil
barney
Barry
Bert Hickman
Bill Kukowski
Blitzorn
Brandon Paradelas
Bruce Bowling
BubeeMike
Byong Park
Cesiumsponge
Chris F.
Chris Hooper
Corey Worthington
Derek Woodroffe
Dalus
Dan Strother
Daniel Davis
Daniel Uhrenholt
datasheetarchive
Dave Billington
Dave Marshall
David F.
Dennis Rogers
drelectrix
Dr. John Gudenas
Dr. Spark
E.TexasTesla
eastvoltresearch
Eirik Taylor
Erik Dyakov
Erlend^SE
Finn Hammer
Firebug24k
GalliumMan
Gary Peterson
George Slade
GhostNull
Gordon Mcknight
Graham Armitage
Grant
GreySoul
Henry H
IamSmooth
In memory of Leo Powning
Jacob Cash
James Howells
James Pawson
Jeff Greenfield
Jeff Thomas
Jesse Frost
Jim Mitchell
jlr134
Joe Mastroianni
John Forcina
John Oberg
John Willcutt
Jon Newcomb
klugesmith
Leslie Wright
Lutz Hoffman
Mads Barnkob
Martin King
Mats Karlsson
Matt Gibson
Matthew Guidry
mbd
Michael D'Angelo
Mikkel
mileswaldron
mister_rf
Neil Foster
Nick de Smith
Nick Soroka
nicklenorp
Nik
Norman Stanley
Patrick Coleman
Paul Brodie
Paul Jordan
Paul Montgomery
Ped
Peter Krogen
Peter Terren
PhilGood
Richard Feldman
Robert Bush
Royce Bailey
Scott Fusare
Scott Newman
smiffy
Stella
Steven Busic
Steve Conner
Steve Jones
Steve Ward
Sulaiman
Thomas Coyle
Thomas A. Wallace
Thomas W
Timo
Torch
Ulf Jonsson
vasil
Vaxian
vladi mazzilli
wastehl
Weston
William Kim
William N.
William Stehl
Wesley Venis
The aforementioned have contributed financially to the continuing triumph of 4hv.org. They are deserving of my most heartfelt thanks.
Registered Member #89
Joined: Thu Feb 09 2006, 02:40PM
Location: Zadar, Croatia
Posts: 3145
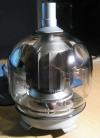
Seeing lot of people building their own HV transformers around old flyback cores, I decided to give it a try.
I decided to make it as simple as possible, without any potting and with ruggedly insulated PVC wire.
I used plexiglass for my former just because I had lot of waste pieces laying around. It's not much of a heat resistant material, but PVC isn't either! My next pick would be a block of teflon in a lathe.
I cut out some small rings and bigger plates, and just superglued them together, making a form in no time at all. It ended being pretty robust and tough, although it was pain to properly align (I couldn't use any kind of 'mould' as it would stick with glue).
I predicted to have 1-2mm free space for the core, but in construction plates started skewing and I ended in minus, being unable to fully close the ferrite core and with enormous 2mm airgap!
I could do little for it, so if I come in need to remove the airgap I'l have to remove one 'plate'.
Also, don't be afraid to post your own desings! I'm curious to see what shows up..
Registered Member #89
Joined: Thu Feb 09 2006, 02:40PM
Location: Zadar, Croatia
Posts: 3145
I already found this wire (pictured in corner) way too thick for this.. That is rugged telephone wire with about 0,5mm of insulation, it withstands 15kV at 50Hz almost indefinitely! Insulation also supresses corona very well. I may actually just want to save that wire for another, better transformer.
Biggest problem I can see is heating of insulation and former due to dielectric and copper losses, and their resistance to heat in overall... that is where enamelled wire trades off, it is stable on much higher temperatures.
Registered Member #152
Joined: Sun Feb 12 2006, 03:36PM
Location: Czech Rep.
Posts: 3384
Firkragg wrote ...
I already found this wire (pictured in corner) way too thick for this.. That is rugged telephone wire with about 0,5mm of insulation, it withstands 15kV at 50Hz almost indefinitely!
Here lies the problem. At 50hz maybe, but for sure not at 25khz! I can get heavy corona when I bring ground wire close to a 40kvdc insulated "flyback wire" energized with 15kv or less from ac flyback. The same ac flyback can penetrate insulation of a thickly (~1mm) insulated mains wire with remarkable bright flash
Registered Member #89
Joined: Thu Feb 09 2006, 02:40PM
Location: Zadar, Croatia
Posts: 3145
Corona is almost surely the smallest problem, considering I'l never have more than few tens of volts between windings that are actually close together. Surely, winding must not be that big so it starts seeping corona and arcing to core!
Registered Member #508
Joined: Sat Feb 10 2007, 01:57AM
Location: London, Ontario, Canada
Posts: 6
Beautiful work with the plexiglass! I have also made several secondaries for my flyback cores. What I do is machine a bobbin from some nonconductive hard plastic stock I have. Then, I wind on a layer of magnet wire, paint the layer with resin, and wrap the layer in resin-soaked white paper. The next layer is then wound and insulated the same way. Winding the successive layers squeezes air and extra resin out. Once all layers are wound, I then pot the secondary in a section of plastic pipe, providing screw terminals for the connections. The flyback below is based on a bobbin machined from Corian plastic, there are 20 layers each consisting of 80 turns of #28 magnet wire. Arcs will start at 3cm, and the #28 wire allows a lot of current draw without overheating when using the Mazzilli driver or an H-bridge. This secondary will heat 3/32" tungsten electrodes yellow-hot without overheating itself.
Registered Member #56
Joined: Thu Feb 09 2006, 05:02AM
Location: Southern Califorina, USA
Posts: 2445
I fail to see exactly the merit behind the stacked windings.
You still have 1/5 the output voltage between the tops of each coil (so you can't fill them all of the way if you are going for really high voltages) and the full output voltage is still available at the far end, so you need just as much insulation between the primary/secondary.
But, you also have 4/5 the output voltage right next to the core, so you need a thick bobbin (taking up valuable winding space) and the layer/layer insulation you are using is incredibly thick. Finally, you have to be careful when you wind the individual layers as there is nothing keeping the layers neat, so it would be very easy to pull the wire too tight and have it end up crossing the entire layer, greatly stressing its insulation.
I have great luck with 'normal' coils, using a few srips of overhead transparencies as layer/layer insulation, and using RTV to encapsulate each layer as I wind.
Registered Member #89
Joined: Thu Feb 09 2006, 02:40PM
Location: Zadar, Croatia
Posts: 3145
Thanks guys...
Well, in all cases, its just about conductor/insulation ratio that can fit trough the core in overall.
With layered windings I would then have all the output voltage between 'arms' of the core so it's mostly the same thing.
Biggest advantage is definitely ease of construction (winding of layered windings can be tedious and painful) and lack of need for vacuum potting. It can be also unwound and repaired if failure isn't really bad.
There is one, maybe less obivous problem: wire needs to be somehow passed to the center of the form in order to be wound, and then I will have 1/5 of output voltage (in my case) on that wire, wich may lead to stress and corona. Few kilovolts at most, but I still don't want it.
That wire also forces others outwards making the winding irregular in shape, but that isn't much of a problem with a thin wire.
I think I could have safely used as much as 8..10mm of wire space with 3mm insulating plates. It would allow more wire in horizontal length and insulation would actually be stressed less than now because of upper problem. That is I guess for my next transformer!
School is over in a week and I hope to have much more time for these things..
Registered Member #93
Joined: Thu Feb 09 2006, 04:11PM
Location: Houston, Texas
Posts: 64
For about the last 6 months I've been working off and on developing my own flyback transformers.
I'm really swamped at work, so I can't post a lot of text and pics at the moment, but will try to do so as time permits.
My coil forms are of the stacked variety, and I've found a few tips and tricks that might be of use to you. To fabricate the forms I use a table saw (along with its mitre and saw fence) and drill press instead of a lathe.
Fabricating the forms:
Sorry to sound like a safety Nazi, but for cripe's sake be careful! Use a sharp blade. Don't do anything that will put your hands in the vicinity of the blade! Don't do any of the cutting operations quickly! Use goggles. Get acquainted with your tools and technique before diving right in! I've never experienced any real problems with this technique, but you're using a table saw in a somewhat unconventional manner. You've been warned!
I can buy 10 feet of 2 inch diameter Ultra-High Molecular Weight (UHMW) solid rod for around US $45 (this makes a lot of coil forms).
I have the rod cut into 2 foot lengths so it's manageable on a table saw.
Taking into account the diameter of the ferrite core I'm going to use and the thickness of plastic I want to leave between the windings and the core, I calculate the depth of the grooves I want to cut in the rod.
Whatever depth I calculate, I set the table saw to this height. For example if I want grooves that are .75 inches deep on the form, I set the table saw blade so only .75 inches of the blade protrudes above the table.
I then use the saw fence to control the spacing between the grooves on the form. The width of the grooves depends on the kerf, or width of the cut the saw blade makes. I've found saw blades that have kerfs from 1/16 inch to nearly 1/4 inch. You'll need to experiment to find one that cuts grooves to your desired width.
Butt the end of the rod against the fence, and use your fingers to press the other end of the rod against the mitre.
Start the saw, and using the mitre, move the rod so that the saw is cutting into the rod as deeply as possible.
Keeping the end of the rod against the saw fence, slowly rotate the rod while keeping it pressed against the mitre until a complete groove is cut in the rod.
Remove the rod from the saw. Adjust the saw fence so that the next groove is cut some distance from the previous groove.
Continue cutting grooves in this fashion until you're done. I normally cut around 9 grooves in the space of about 2-1/4 inches.
Once you're done cutting the grooves, cut a notch through all the grooves. Without changing the height of the saw blade, set the rod and saw fence up so that the face of the rod that has the grooves cut in it is now perpendicular to the saw blade. Basically you want the notch in each groove to be the same depth as the groove.
Turn on the saw and push the rod into the saw to cut the notches.
Now you can cut off the grooved section of rod. I adjust the saw blade to slightly higher than the rod itself and use the mitre to guide the rod into the blade to cut off the grooved end. I normally don't use the saw fence here because I've sometimes had the grooved end get wedged between the saw blade and the fence, resulting in the cut piece being ejected forcefully from the saw.
Now take the grooved rod over to a drill press and use a Forstner bit to drill out a hole in the rod for the core to go through.
Winding the sections:
I used to wind the coils by hand, but that is an enormous PITA! I finally built myself a small winding machine and that's really been a big help.
I'm still in the process of experimenting with different wire gauges to do the winding with (ranging from #30 to #37), and getting between 2000 and 3500 turns on the form.
True, corona in general is a big consideration, but I found a specific instance that really affects coil construction - arcing between the top windings of a section and the wire that leads to the bottom of the section. For example, I only wind on 5 of the 9 grooves I cut in the form for this reason. Think about it. You wind a section by running your winding wire to the bottom of a section and then wind until you get just about to the outer lip of the groove. Well, you're already in trouble because wires in each winding layer of that section are in intimate contact with the wire that runs down the side of the section to the bottom of the winding. At high frequencies arcover is almost a certainty when the section contains 500-600 turns!
This is where the notch cut through each groove comes in. When I begin winding the first section, I start winding in the second groove. I bring the wire for the first section in through the notch between grooves 1 and 2. I keep the wire as close to the bottom of the winding by tying the wire entering the second groove down with a loop of fishing line.
When I complete winding the first section, I bring the wire over the top of the plastic lip and guide it into the next (third) groove over.
I don't wind in this groove. Rather, I use the fishing line to tie the wire down in this groove and run it through the notch to the bottom of the fourth groove and continue winding.
I wind my second section, bringing the wire over the top lip of the groove, but offset from where I brought the wire out for the first section (just to prevent flashover between sections)
I continue like this until my 5 sections are wound. I use hot glue liberally to help insulate the tops of windings and in the non-winding grooves where the wire is fed through a notch.
Using these techniques, I've developed flybacks that put out some pretty impressive arcs. I'm still doing research though.
It seems the winding section that is positioned over the air gap is more susceptible to arcover than the other sections, so I might try reducing the number of turns that I know will go directly over the air gap
I want to try to investigate ways of keeping corona down like encapsulating the coils in epoxy or acrylic. I'd like to do some experiments with vacuum impregnation too, but I don't have all the apparatus put together yet.
I'm also experimenting with coating the wire with polystyrene (Q-dope) as it gets wound. The only problem there is that the dope has to dry by evaporation and I don't have a feel for how long that takes (or if it ever completes). Maybe the answer is to wind about 1/3 of a section, apply a coat of epoxy, acrylic or Q-dope, wait for it to dry and then continue with winding. But based on the amount of time it takes to wind a single coil, I might not do too many experiments.
In any event, this kind of sums up what I've been working on lately. Hopefully it gives you some ideas that you can adopt or extend.
This site is powered by e107, which is released under the GNU GPL License. All work on this site, except where otherwise noted, is licensed under a Creative Commons Attribution-ShareAlike 2.5 License. By submitting any information to this site, you agree that anything submitted will be so licensed. Please read our Disclaimer and Policies page for information on your rights and responsibilities regarding this site.


 Homemade high-freq HV transformers